Fluid Flux is a comprehensive solution for simulating realistic water surfaces and fluid interactions within Unreal Engine. This documentation outlines its core features, tools, and best practices to help users achieve optimal results.
A foundational understanding of the Unreal Editor, Blueprint visual scripting, and content management is beneficial when working with the system. Following the outlined procedures will ensure a streamlined workflow and effective implementation across various project types.
Installation
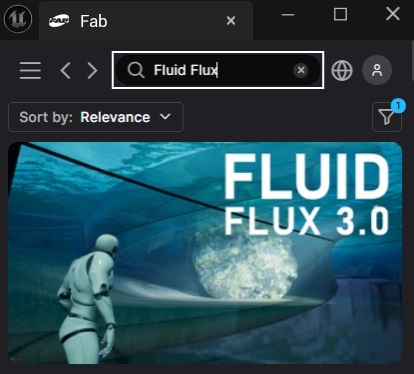
Fluid Flux can be purchased on the Fab marketplace and installed using the FAB plugin.
Frequent updates for Fluid Flux are planned, so always ensure you use the newest product version. The latest version of the product is outlined on the Unreal marketplace page and at the beginning of the documentation.
Following the installation/update procedure ensures a smooth transition and minimizes the risk of potential issues arising during the update process.
List of plugins required by Fluid Flux: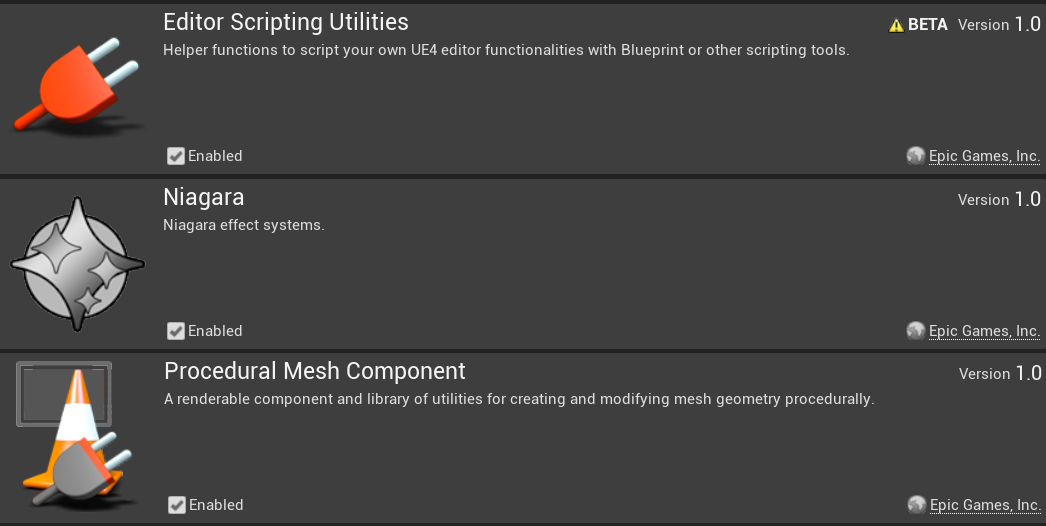
- UE Fab Plugin (installation)
- PythonScriptPlugin, (editor tools)
- EditorScriptingUtilities, (editor tools)
- GeometryScripting, (mesh generator)
- ProceduralMeshComponent,
- Niagara,
In the final stage of configuring the project, make sure that the project settings are properly configured:
|
DBuffer |
Enabled |
It’s required for proper decal rendering (wetness and caustics). If you don’t want to use those effects, you can disable the decal material in the surface actor. |
| CustomDepth-Stencil Pass | Enabled | This feature is required for the rendering of underwater depth maps. |
| Velocity Pass | Write During Base Pass | This feature improves the motion vector rendering. |
| Default Renderer Motion Vector | Precise | This feature improves the motion vector rendering. |
| Mask material only in early Z-pass | False | Required for proper tunnel capturing. |
| HighQualityTranslucencyReflections | Disabled | This option can cause a crash when used in conjunction with the substrate. |
| (config) r.OIT.SortedPixels | Disabled | This option may cause wrong translucent sorting in underwater materials. |
Additionally, if you plan to use a grooming system (such as hair) in your project, ensure that the post-process is completed after the grooming materials are finished. Use these console commands to force the order:
r.HairStrands.ComposeAfterTranslucency 0
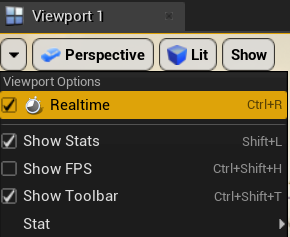
Ensure that Real-time rendering is active in your viewport, as it is required to simulate fluid motion in the editor.
Substrate compatibility
Since the release of Unreal Engine 5.7, the Substrate-related chapter is no longer relevant; Substrate is officially stable and compatible with Fluid Flux.
The Substrate is Unreal Engine 5’s advanced material authoring framework, replacing the fixed suite of shading models and blend modes, such as Default Lit and Clear Coat, with a more expressive and modular system. Substrate is still experimental (unstable), and many developers may not support it yet.
The Fluid Flux update 3.0.3 introduces Substrate support in UE5.4 and UE5.5. However, the pack is developed by default using the standard material system. Substrate translators do not fully convert Fluid Flux materials into the new system, requiring additional patched material files to ensure compatibility.
In the case of Fluid Flux, there are no noticeable visual improvements or benefits from switching to the Substrate system. As a result, the entire process aims to maintain compatibility across all projects.
- Enable substrate in your project.
- Download the patched materials pack.
- Unzip files and notice that the hierarchy of files fits the Fluid Flux structure.
- Copy the whole hierarchy of the FluidFlux folder to the Content folder in your project. Accept replacing files.
Project structure
The Fluid Flux project is structured in a specific manner. This brief description will help you understand the type of content available in each folder. Before starting work with the pack, it’s worth familiarizing yourself with its structure and the systems it provides.

- Demo – The Demo folder is the most important for new users. The demo examples present how to use this pack, achieve effects, and integrate systems with characters. Everything covered in this documentation will be demonstrated in the demo files. The product does not link files in the Demo folder and can be removed from the project at any time to optimize the build/project size.
- Editor – editor-related tools, icons, utilities, procedural mesh generator
- Simulation – Shallow water simulation actor and tools for controlling fluids and generating states.
- Coastline – Generating coastline data for oceans.
- Interaction – A simple system of interactions that adds detailed, lightweight ripple fluid simulations.
- Surface – Renders surface, underwater volume, post-process, caustics, and playing audio.
- Tools – Multiple tools that are shared between systems for generating heightmaps, SDF, and procedural meshes.
- Environment – Niagara particle systems that allow readback information from simulation, implementing swimming, buoyancy, and drive particles using the fluid state.
- Waves is a system designed to generate ocean waves that can be used in the background and mixed with fluid simulation.
Reporting Bugs
This Support and Reporting Bugs guide provides essential guidance on reporting system errors. Learn how to identify, report, and analyze bugs to ensure smooth support.
Player character
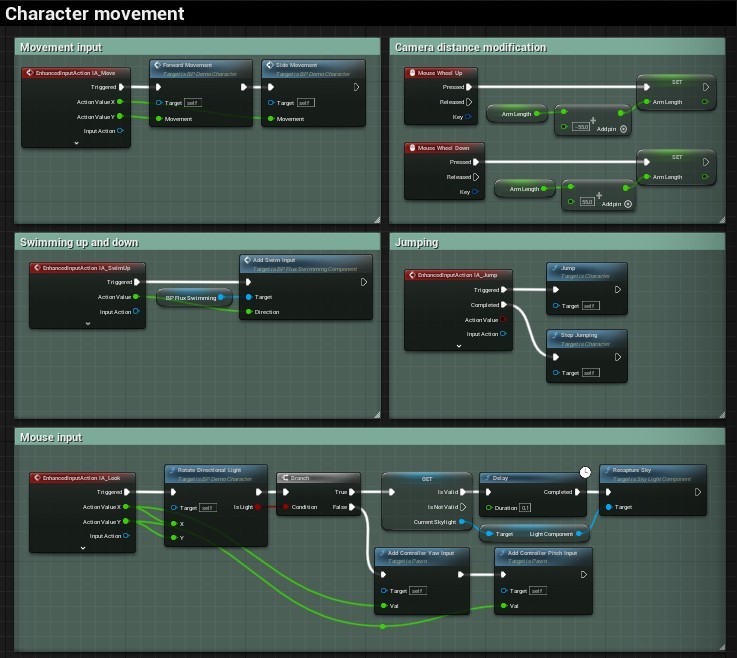
The demo maps showcase the features of Fluid Flux with the help of example classes like BP_DemoCharacter, which provide a fully functional implementation of the character interacting with water. The Fluid Flux build for UE 5.3+ uses Enhanced Input, which implements character input inside the project.
Character-related implementation is simplified to a minimum and encapsulated in separate classes, making the transfer of implementation even more straightforward. This document does not provide a detailed step-by-step description of implementing character, but highlights the components and features used. More detailed descriptions can be found in the sections dedicated to these tools:
| FluxDataComponent | Used for extracting surface information (velocity, height, and volume) from the water system. Provides that to other systems. |
| FluxInteractionComponent | It generates waves after interaction on the water surface. |
| FluxBuoyancyComponent | Character floating on water. Activates only when the character switches to a ragdoll state. |
| FluxSwimmingComponent | Implements swimming movement. It changes the character’s state when it’s in water and can swim (not ragdoll). |
| FluxDriverComponent | Implements communication between the vehicle and the character, which allows possession. |
| FluxModifierForceComponent | Simulation modifier that moves water around the character only inside the domain area. |
The easiest way to investigate how components are used in the character is to click the right mouse button on Component -> “find references,” the engine will show you all the places where it is implemented.
Disabling the help panel
After running the demo, you can notice the help panel located in the bottom right corner of the screen, which is helpful for testing features in the maps. The panel is added automatically. If you use an example character in your project and want to remove this HUD, there are many ways to choose:
- Add ToggleVisible in “begin play” FluidFluxPlayerController like this:
- Remove the “Create BP_HudWidged” node in the player controller
- Switch the game mode (controller) in your level from the demo to your game controller.
Swimming component
In general, swimming is not a prominent feature of this product; it is more of an additional example that presents one of many ways to do it. The swimming example is demonstrated in DemoCharacter and requires several components to function properly.
- Swimming requires PhysicsVolume on the map with PhysicsVolume.Water Volume=true is used to activate swimming when the character is inside.
- The swimming system requires Character.BP_FluxDataComponent that provides data from water.
- The BP_FluxSwimmingComponent implements movement for you and controls CharacterMovement, which is required.
- Open and click the right mouse button on BP_FluxSwimming -> “find references,” and you will see how it is controlled using input.
- The swimming animation depends on the character animation blueprint implementation and will vary in every project, so there are many ways to implement it. My simple example switches animation when SwimmingState is detected in SwimmingComponent.
Vehicle driver
The Fluid Flux has a unique vehicle pawn actor that can be possessed and controlled. The actor BP_FluxBuoyancyVehiclePawn is a template for the vehicle that can be inherited and implemented as needed.
The vehicle system supports many valuable features:
- Smooth physics replication with quantization
- Smooth camera movement with adjustment to direction
- Jump force action
- Enhanced input
- Customizable movement
- Interaction trails
- Possessed by the closest character (attaching player)
An example of the use of the vehicle class is implemented in the BP_FluxBoatPawn actor placed on demo maps.
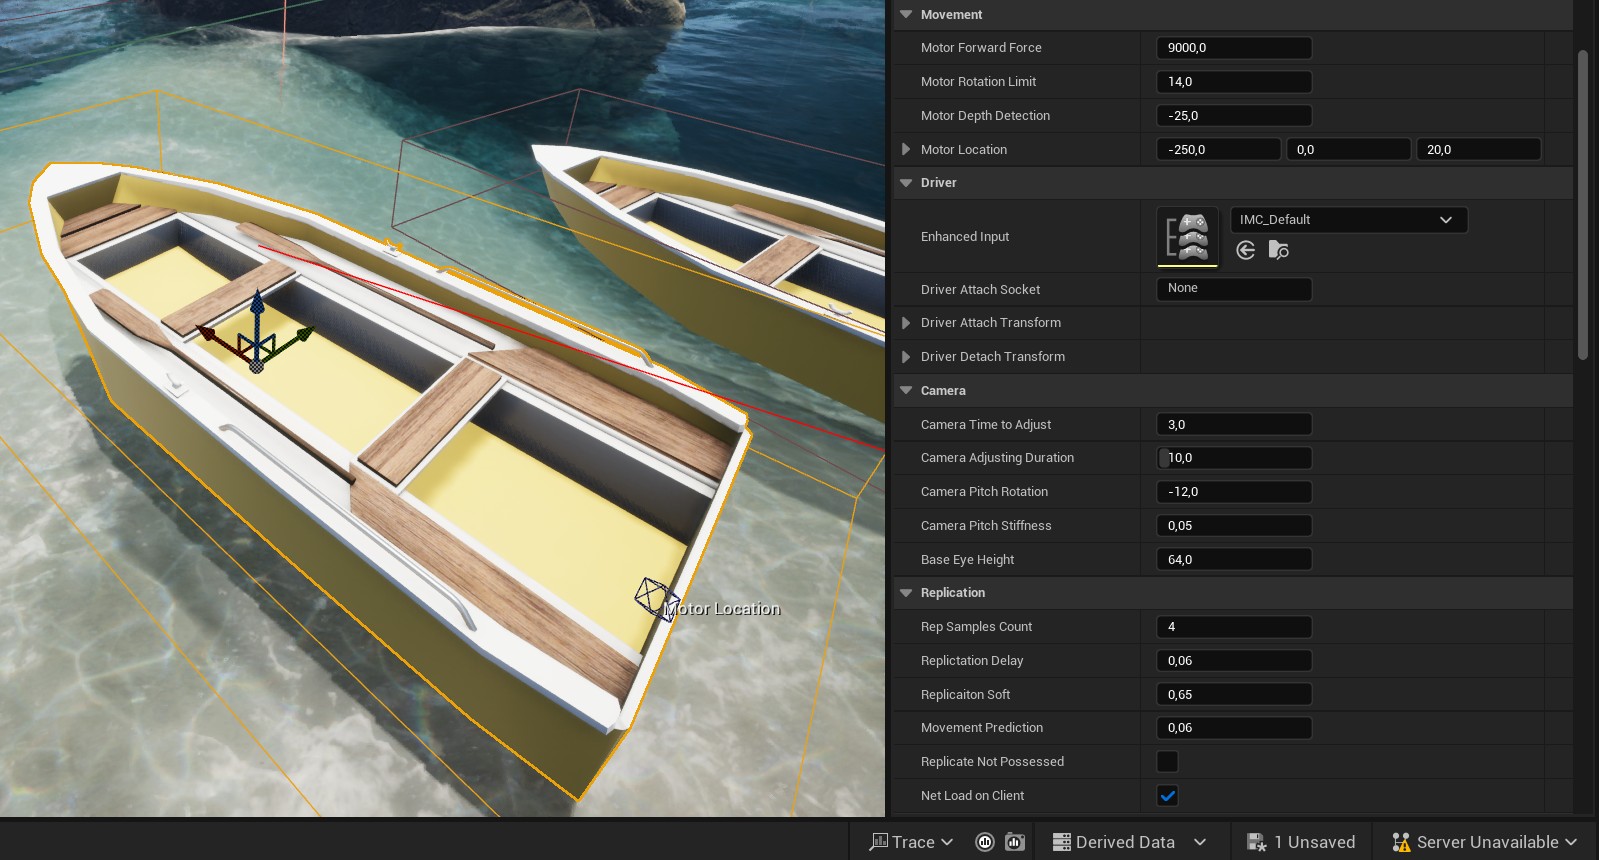
The movement of the motorboat vehicle is implemented in the function UpdateSteering, which converts the input to the motor force applied to the virtual location of a propeller in the water. All the input is replicated, and the system also implements a custom synchronization of the vehicle’s physical body.
The possessing system requires adding BP_FluxDriverComponent to the player pawn. This class is used for binding OnInteractionEvent, which is executed when the input is activated. This simple class acts as a bridge between the vehicle and the driver.
Buoyancy component
The buoyancy is an upward force exerted by a fluid that opposes the weight of a partially or wholly immersed object. The BP_FluxByouancyComponent calculates physical forces based on the configuration set using a PDA_FluxBuoyancyData data asset. Additionally, the system supports drag and current force that uses fluid velocity to determine movement.
Multiple byouancy copomonents can share the same Data Assets. The Data asset can be also switched dynamically based on requrements (for example destroyed ship that is drowning can use another data asset).
Example use cases of the buoyancy system can be found in the demo actors:
- BP_FluxCrate – a most straightforward actor with one pontoon.
- BP_FluxBoatPawn – a combination of multiple portions attached to the static mesh.
- BP_DemoCharacter – ragdoll is made of pontoons attached to skeletal mesh.
Limitations:
- The buoyancy forces require a physical body, which means it can’t be used in a sequencer that does not simulate rigid body physics in the editor.
- Only spherical pontoons are supported, and this approximation is not precise, especially for hard-edged meshes.
- The system requires FluxDataComponent to read the surface height and velocity weight.
Adding a buoyancy system to the actor:
- Add BP_FluxByouancyComponent to the actor.
- Add BP_FluxDataComponent to the actor – this will be responsible for reading water height.
- Create a new DataAsset that will store buoyancy settings. You can copy/use examples. DA_BuoyancyBoat, DA_BuoyancyCrate, DA_BuoyancyRagdoll, or create a new one. ContentBrowswer->Right button-> Miscellaneous ->DataAsset->PDA_FluxBuoyancyData.
- Set a newly created data asset for your actor component: BP_FluxBuoyancyComponent.DataAsset
- Set ComponentTag = “FluxBuoyancyOwner” in the actor component (mesh) that should be used as a parent of Buoyancy transformations.
The actor is already configured, but you must edit FluxBuoyancyData and adjust the parameters. You can do it with the help of the EUW_FluxBuoyancyEditor tool described below.
Using FluxBuoyancyEditor Editor
FluxBuoyancyEditor is an Editor Utility Tool created to preview and edit buoyancy settings in a 3d viewport.
- Open the folder /Game/FluidFlux/Editor/Widgets/ in the content browser
- Click the Right button on the editor utility EUW_FluxBuoyancyEditor and choose RunEditorUtilityWidged
- Select the actor class with a configured buoyancy system. Example boat.
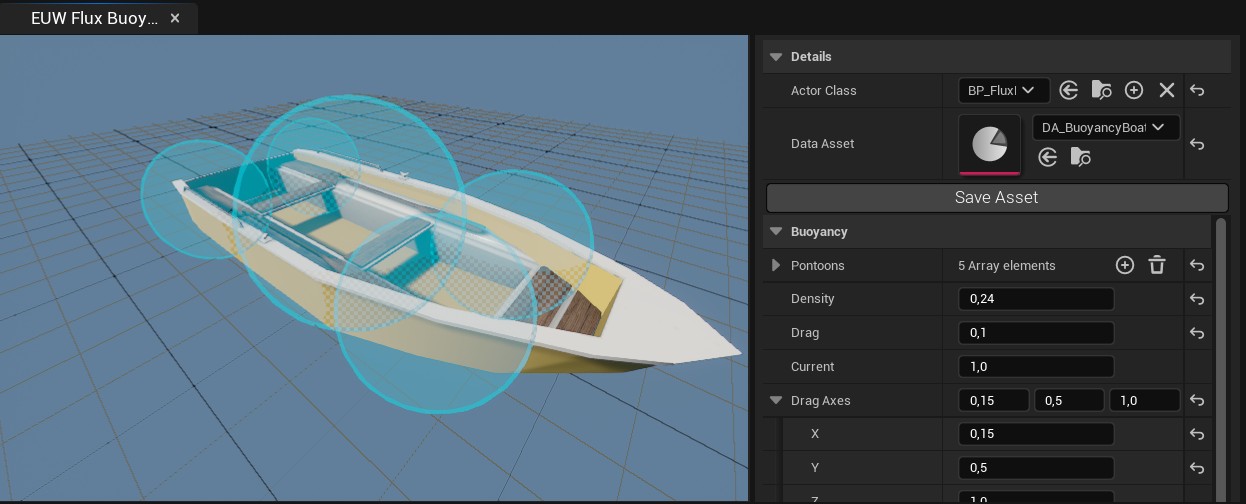
- Now, you can edit the settings of the data asset in the right panel. When work is done, click Save Asset.
Editor controls:
- Mouse Left button – selecting buoyancy pontoon (switching to pontoon settings)
- No selection – shows global parameters
- Mouse Right button drag – camera rotation
- Mouse scroll – camera distance change
The buoyancy geometry is represented as a list of spherical pontoons that approximate the body’s shape. Every pontoon has parameters that should be customized for specific use cases:
| Parameter | Description |
| Socket | Name of bone or socket used for attaching the pontoon. |
| Radius | The radius of the pontoon sphere. |
| Offset | Offset relative to the Socket or parent component. |
| DensityWeight | Scale of the density (larger density means a heavier object and less buoyant) |
| DragWeight | The scale of the drag effect (how fluid movement pushes the pontoon) |
You can run the game and edit buoyancy setting in runtime, everything will be update and you will see the changes in your game.
Good practices and solving problems:
- If the boat is flipping, then adjust the center of mass Z location (set it to a lower value so it will behave stably)
- Try to fit the pontoons to the geometry of the mesh. It is more precise when detecting water and behaves more predictably.
- Adjust the side drag to stop boats from sliding sideways.
- Edit FluxBuoyancyEditor and game in runtime mode.
- Make sure the physical body has Tag set to FluxBuoyancyOwner
- Use the DrawDebug option to visualize pontoons in runtime.
- Attribute BP_FluxByouancyComponent UsePontoonsInFluxData forces Flux data to generate custom readback points for every pontoon; it is precise but also may be slow in case of many pontoons.
Surface actor
The BP_FluxSurface actor is an abstract class generalizing an audiovisual representation of the simulation and coastline domain data. By default, this actor can’t be placed on the level as it is only an abstract class designed as a template that should be configured.
An abstract actor is like a guide for creating new actors. It defines some common features that all related classes should have, but it’s not complete on its own. Other classes need to finish the details. For example, an abstract class may not specify any ambient water audio, but a customized ocean template has sounds that match the type of water it represents.
The surface actor implements a list of advanced subsystems:
| Actor component | Features |
| DecalCausticsWet |
|
| SurfaceOverMesh |
|
| Post-Process |
|
| SurfaceUnderMesh |
|
| SurfaceProceduralMesh |
|
| FluxAudioComponent |
|
| Volume Absorption, Volume Scattering |
|
The BP_FluxSurface is an abstract base parent class, meaning it can’t be placed directly on a level. Configuring all these subsystems can be time-consuming, particularly for new users. This is why the package includes basic, configured surface child actor templates, which can be found in the FluidFlux/Surface/Templates folder.
| Template | Description |
|
BP_FluxSurface_Water |
The default water surface is spawned dynamically within the domain.SurfaceActorReference is not specified. |
|
BP_FluxSurface_River |
Simple river/waterfall material and basic underwater post-process, river audio |
|
BP_FluxSurface_Ocean |
Advanced ocean materials, ocean audio, materials blended with wave actor, underwater mesh, underwater scattering, and absorption volume. |
|
BP_FluxSurface_Coastline |
Rendering two domains, simulation, and coastline at the same time. |
Users can also implement their surface templates and extend the surface’s functionalities.
The surface actor does not have any data to render, meaning that simulation or coastline domains must send it to the actor by setting the SurfaceActorReference. The SurfaceActorReference attribute in the Domain actor you use (SimulationDomain or CoastlineDomain) should reference the surface actor that will render the data. Otherwise, the domain will spawn a temporary water surface that can’t be configured by hand.
Interaction system
The BP_FluxInteractionCapture is designed to add efficient, detailed interaction simulations in small areas around the camera (or specified object).
- It is a perfect addition that can improve the look of baked simulation almost for free.
- It currently supports the most straightforward fast ripple solver, but plans are in place to simulate a fluid pressure solver in the future.
The interaction system configuration is demonstrated in several example blueprints within the Fluid Flux demo, including BP_DemoCharacter, BP_FluxBoat, and BP_FluxCrate.
A detailed explanation of the implementation presented in BP_DemoCharacter can be found below:
- Component.BP_FluxDataComponent – This component reads the fluid data required for further interaction calculations, including height and velocity. You can find more information about this component and its configuration in the ‘Async Readback’ section.
- Component.BP_FluxInteractionComponent –This component stores a list of interaction sources. The interaction source is a sphere attached to the component (or skeletal mesh bone) that generates waves after interacting with fluid.
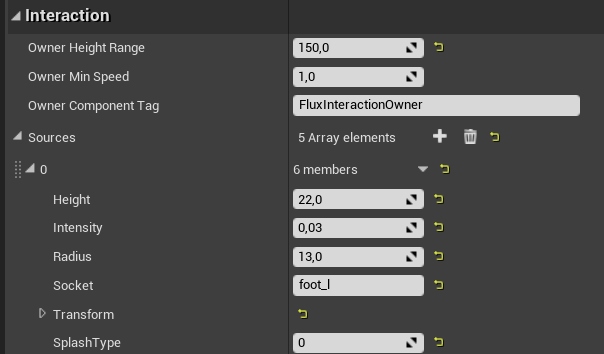
Configuration of interaction surface attached to l_foot bone. The system uses owner skeletal component with the tag “FluxInteractionOwner”. - Interaction sources will be attached to the mesh (skeletal or static) with the tag specified in the OwnerComponentTag attribute. Hence, adding this tag (FluxInteractionOwner) to the skeletal mesh that will move the interaction sources is essential.

- The BPI_FluxInteraction interface handles communication between the actor and the interaction capture system. It should be added to the Class Settings of the actor that will interact.
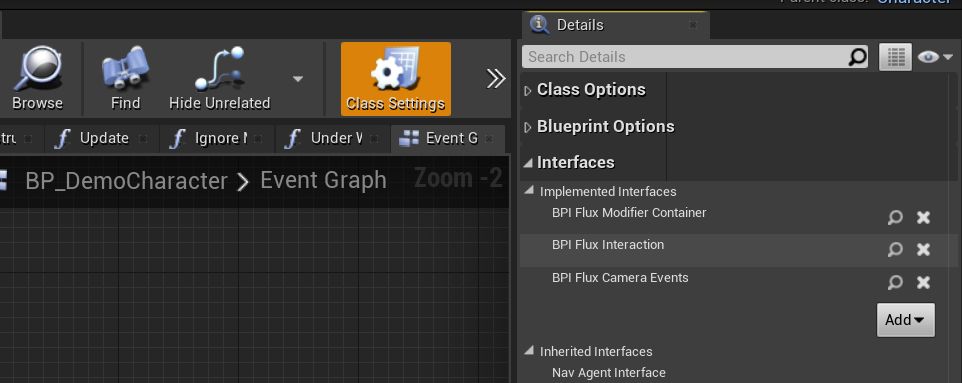
Player character interfaces - Implement the GetInteractions in BPI_FluxInteraction. When BP_FluxInteractionCapture is an overlapping interactive actor, it calls the GetInteractions function to retrieve information about the interactions that are occurring.
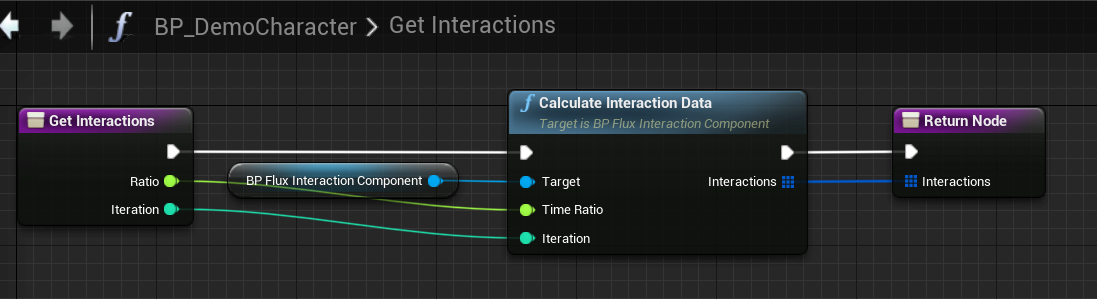
Simple implementation of the GetInteractions function from the BPI_FluxInteraction interface. - The BP_FluxInteractionCapture actor is placed on every map. The actor detects the interactable actors and manages the whole process of generating the interaction effect. The InteractionCapture actor uses the overlap to identify actors within the interaction actor’s area. This mechanism ensures that only the area’s actors are considered potential sources of interaction. For example, a character uses the Capsule component for overlap; custom actors require the addition of a collision component, such as SphereCollision.
There are many steps to do before interaction start working but no worries you can debug and make sure that every part of your implementation works correctly:
1. Test it on demo maps at first
2. Enable DrawDebug in BP_FluxInteractionCapture
3. Enable DebugDraw in BP_FluxDataComponent
4. Enable DebugDraw in BP_FluxInteractionComponent
5. Make sure that “GetInteractions” is evaluated. Put a breakpoint in this function to check. If its not then your actor is not detected by overlap with InteractionCapture and you may have to add collision volume to your actor.
Interactions with a fluid surface can generate splashes, adding realism and immersion to the simulation. This is achieved through a straightforward mechanism that detects when the interaction source intersects the fluid surface. If this condition is met, a splash effect is created to simulate the disturbance caused by the interaction.
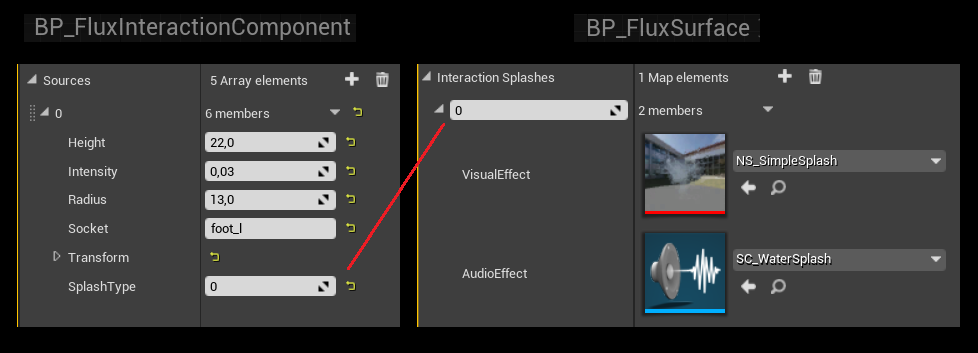
The InteractionComponent->Source->SplashType defines the splash index stored in the Surface->InteractionSplashes array.
Color presets
The color preset system is a powerful tool for effortlessly configuring the visual aspects of water. It offers a range of predefined presets, eliminating the need to create new material instances to modify scattering and absorption.
Before starting to change the color of the water, make sure the surface is configured correctly. The SurfaceActorReference attribute in the Domain actor you use (SimulationDomain or CoastlineDomain) should reference your surface actor. Otherwise, the domain will spawn a temporary water surface that can’t be configured by hand.
Changing surface color:
- Select the surface actor on your map.
- Find MeshRendering Tab and attributes: BaseColorPreset.
- You can use any preset from my list of predefined colors or create a duplicate and modify it.
Creating new custom color preset data asset:
Many pre-configured color presets are available for oceans, shallow water, and rivers. Additionally, users can create their water presets by duplicating existing examples and adjusting the parameters as desired, allowing for seamless customization and experimentation.
- In the content browser, open folder /FluidFlux/Content/FluidFlux/Surface/Templates/Color/
- Find a data asset preset closest to the effect you want to achieve.
- Duplicate chosen data asset
- Set the data asset to the surface rendered on your map (attribute BaseColorPreset)
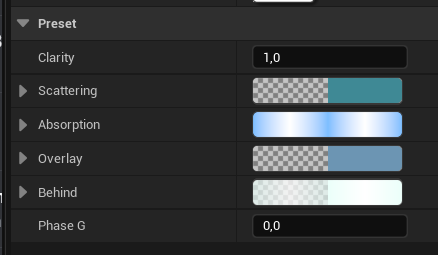
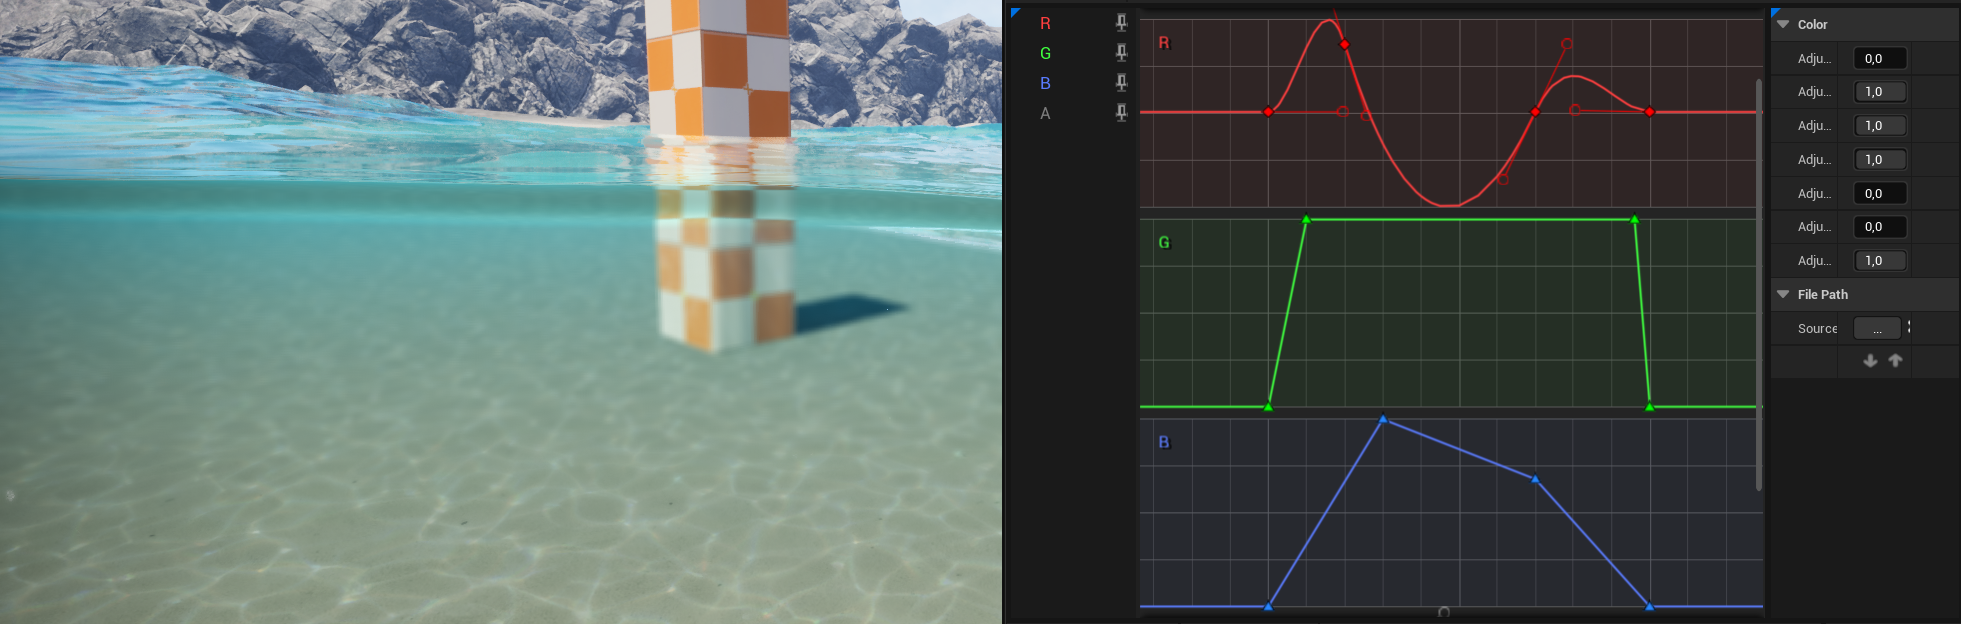
- Open data assets and edit parameters:
Modifying Color Presets with Editor Preview
As you may notice, editing the Color Preset through the Surface Actor does not automatically update the surface itself. This is because data assets cannot communicate with the surface actor in a way that allows them to broadcast changes directly.
To solve this, Fluid Flux provides a dedicated tool called OpenSurfaceEditorTab, designed specifically for editing Color Presets applied to the surface with live editor preview.
You can find and run this tool from the Details panel of the selected Surface Actor.
If OpenSurfaceEditorTab does not appear after clicking the button, make sure the Python plugin is enabled in your project settings under Edit > Plugins. It is required for opening editor tabs.

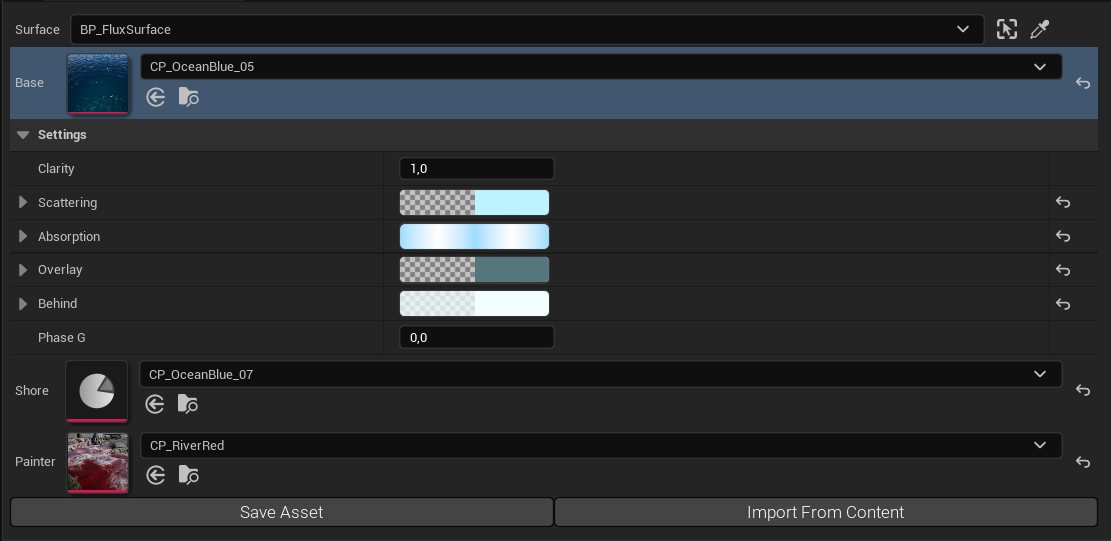
Using the new editor is straightforward:
- Select the Color Preset from the Surface that you want to edit.
- Expand the Settings parameter section and make your changes.
- When you are done, click Save Asset.
- If you want to import data from another data asset, use Import From Content.
World painter and brush
The FluxWorldBrush is a unique actor designed to manipulate data stored in the WorldPainterComponent canvas. The system offers three distinct types of canvas on which the FluxWorldBrush can perform painting operations:
- ColorPainter ( BP_FluxWorldPainter), interpolation between the base color and painter color.
- WaveSize (BP_FluxCoastlineDomain), interpolation between no wave and the highest wave.
- WaveType (BP_FluxWorldDomain), interpolation between Oceanic wave and coastline wave
This two-minute tutorial presents the workflow and possibilities of brushes:
Reading fluid data
The Fluid Flux utilizes Niagara asynchronous readback events to retrieve data from fluid render targets and pass it to blueprints. The Fluid Flux uses this feature in multiple situations:
- buoyancy and floating objects
- automatic dam breaking
- interaction detection
- swimming system
- fluid sound source analyzer
- underwater camera detection
- spawning splashes
There are examples of actors that are presenting the functionality of FluxDataComponent:
- Demo/Environment/BP_FluxDataReadbackExample – Basic data component test: reading water information and rendering an arrow of direction on the surface of water.
- Demo/Environment/BP_FluxRotatorActor – Rotating wheel reading the data from water under the mesh.
- Demo/Environment/BP_FluxBoatPawn – Advanced use case that reads multiple readback locations automatically sent by the buoyancy component. As a result, it generates samples of water in all the locations.
The current water state in the location of readback is read from the GPU and stored in component attributes:
- Flux Surface Location – The location on the water surface.
- Flux Fluid Velocity – Velocity of water on the surface.
- Flux Fluid Height – Height of the water (relative to ground) may be incorrect in the open ocean, where the ground height map does not exist in the system.
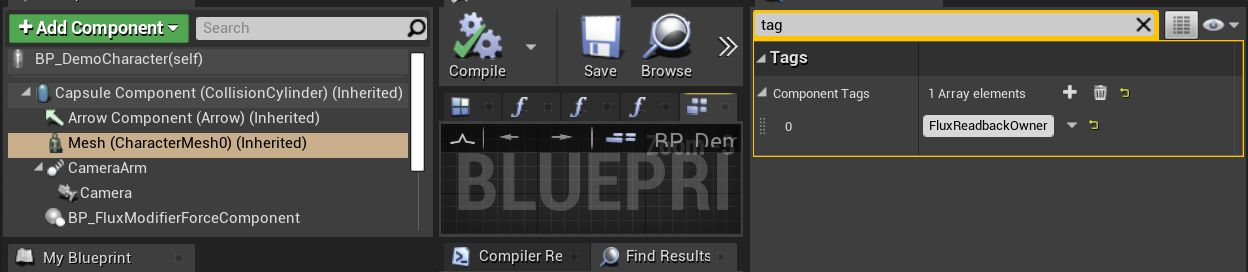
The BP_FluxDataComponent listener samples water at a specific location (Readback Locations) relative to the owner component specified by OwnerComponentTag and OwnerSocketName in the case of skeletal meshes.
By default, the component reads data from the fluid in every frame; however, for optimization, it can be configured to refresh with a lower frequency using the ReadbackEventInterval parameter.
Users can also bind to the event dispatcher OnReceiveParticleData to get the event every time the system receives data from Niagara.
Use Debug option in FluxDataComponent to make sure that component is following your actor and sampling proper values.
Niagara integration
The Niagara integration is based on three elements:
- BP_FluxNiagaraActor communicates with the simulation and data to the Niagara system.
- NE_FluxData emitter should be inherited by the Niagara system to read the data.
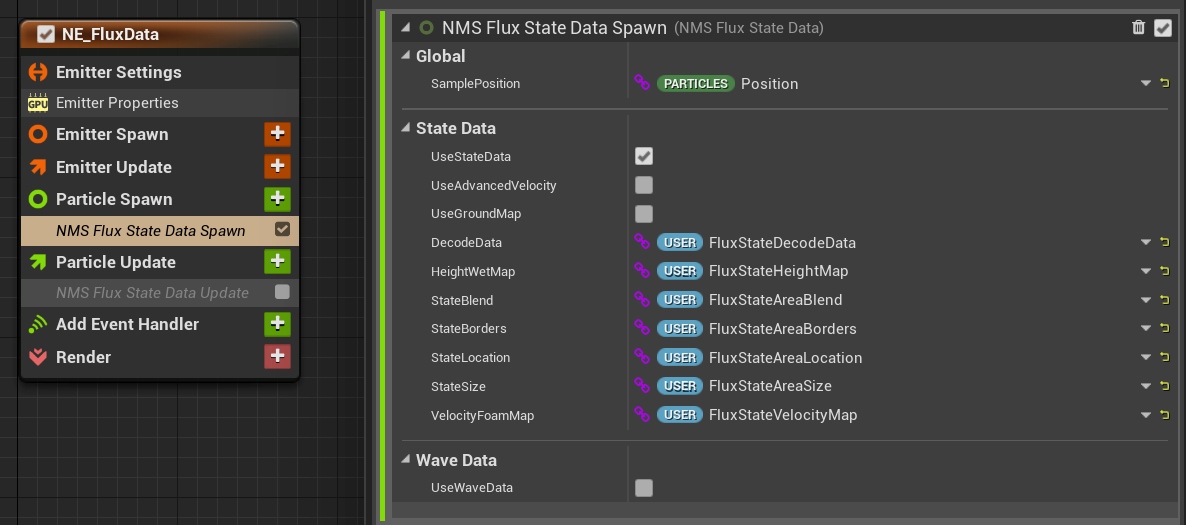
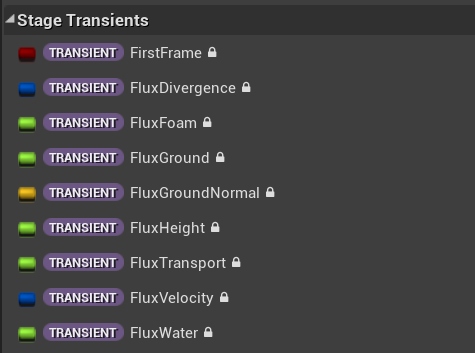
- NMS_FluxData is a specialized module that extracts simulation data from Stage Transients variables, which can be used to drive the particles.
All particle systems (trash, plants, splashes) in the pack are constructed similarly; feel free to check and modify the examples.
Translucency
Rendering underwater translucents is, in general, a challenging problem to solve. Single-layer water materials do not support translucency, so translucents are invisible when watching surfaces from above the water.
In general, I recommend using dithering instead of translucency.
The underwater volume post-process implementation is more functional because it can be overlaid with translucent meshes. It means that a translucent mesh is rendered on top of the post-process volume, but developers must handle the fading.
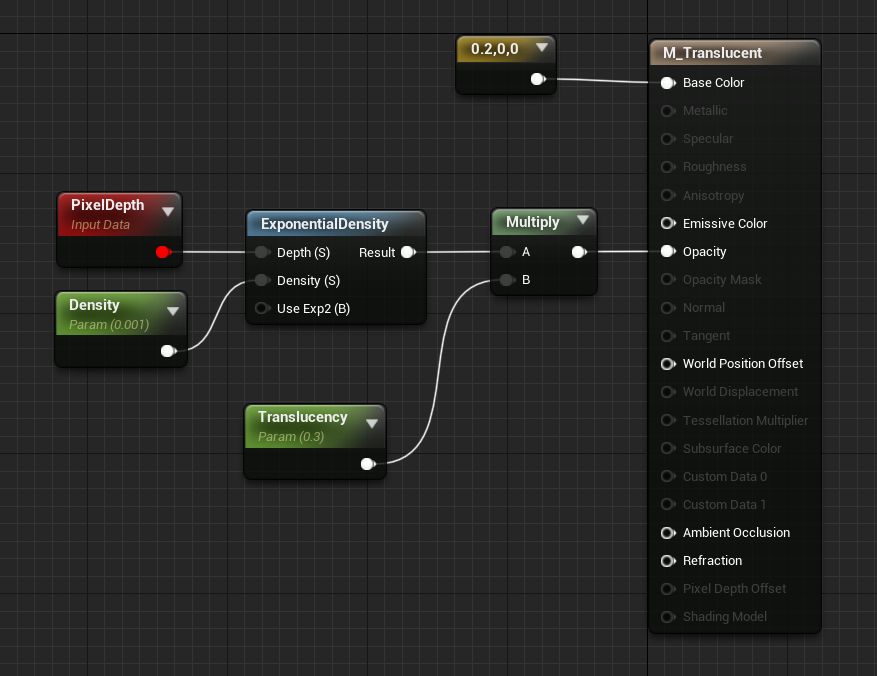
Final effect:
Cut the mask and holes
Generally, the system supports two methods for cutting holes in the water surface.
The first method is somewhat complex and is designed for small boats. Look at the example boat mesh (Demo/Environment/Boat/SM_Boat) that uses an additional cap mesh with M_FluxSurfaceInvisible material. The M_FluxSurfaceInvisible renders translucent materials using the Single Layer Water mode, which overrides the water surface and makes it invisible.

The second method for cutting holes requires the BP_SurfaceCutMask actor, which defines the rectangular area that will be removed. Unfortunately, only one cut mask per surface actor is currently supported.
- Drag and drop the BP_SurfaceCutMask actor into an area where you want to cut out the water.
- Select the BP_FluxSurface actor on your level and set the newly created actor to the CutMaskActor attribute.
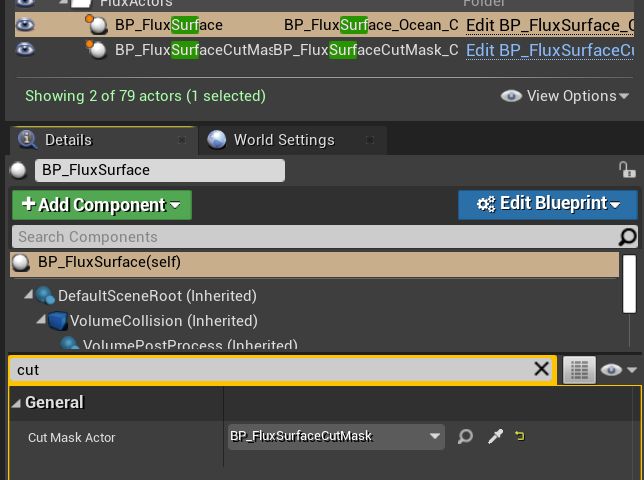
Example cut mask implementation presented on the FluxBeachMap.
Domain actors
Ground capture
Ground capture is a key component of Fluid Flux systems, ensuring that fluids interact correctly with the environment by requiring a defined container or boundary. This is achieved by detecting water blockers using a top-down projection of the scene, which generates a height map. The height map, also called a ground map, is a specialized texture where each pixel represents the height of the underlying geometry. This process enables precise identification of fluid boundaries and supports realistic interactions with complex terrain.
In the Fluid Flux pack, this task is handled by FluxHeightmapComponent, which is used in both the simulation and coastline domains. The generated height data play a pivotal role in determining the appearance and movement of water on slopes.
Visibility options
The ground scene capture component renders the current scene into a heightmap texture. Sometimes, we must exclude certain actors, such as bridges, that should not act as fluid blockers. In the ‘Domain:Heightmap: CaptureVisibility‘ tab, you can find options that may help determine which meshes should be visible in the heightmap:
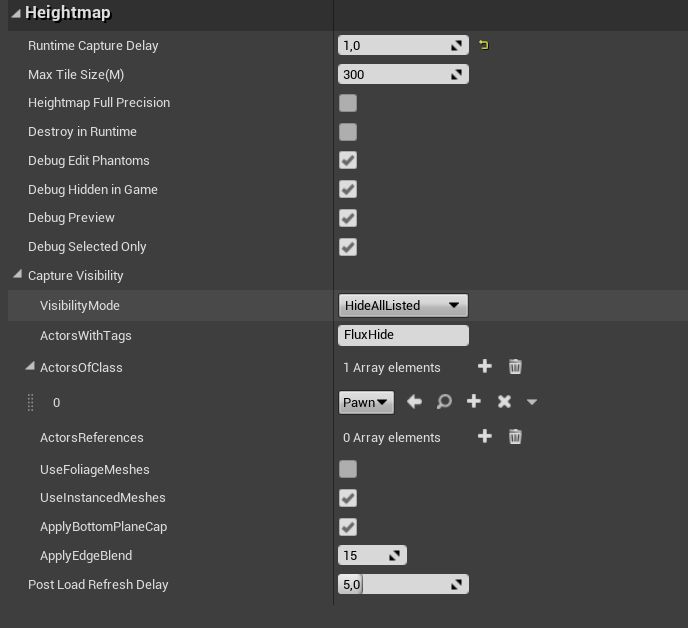
VisibilityMode can be used to determine whether the capture actor should render the entire scene and exclude specified actors (HideAllListed) or build a list of actors that should be used as blockers (ShowOnlyListed).”
- ActorsReferences – exclude chosen actor objects from your scene
- Actos of Class – can be used for excluding by type of actor class and its child classes
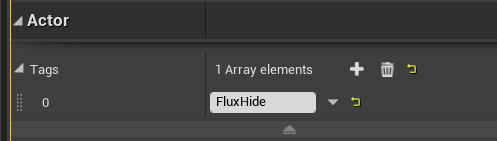
- ActorsWithTag = “FluxHide“: Every actor that uses this tag will be added to the list of excluded objects.
- Use the M_PhantomMesh material to render the mesh only during the processing of the ground capture (which is invisible to the world). This technique is suitable for imitating soft slopes of waterfalls or creating an alternative version of the ground when the environment is more complicated (like indoor meshes).
Solving issues
If something is not rendering properly in the height map, you can investigate the issue without simulating the fluid. The debug preview option is the most crucial feature for domain actors. It displays a height map that will block the water in the scene in the event of problems, bugs, or unexpected behavior.
There are many ways to configure the debug preview:
| Domain DebugAttribute | Description |
|
DebugHiddenInGame |
Debugging will only be visible in the editor. You can turn it off to see how the ground map is generated in runtime (sometimes, there may be a difference, for example, when the map is loading for a long time and the ground map captures the LOD details). |
|
DebugPreview |
Enable/Disable debug mesh. |
|
DebugSelectedOnly |
Allows for previewing the debug only when the domain is selected. |
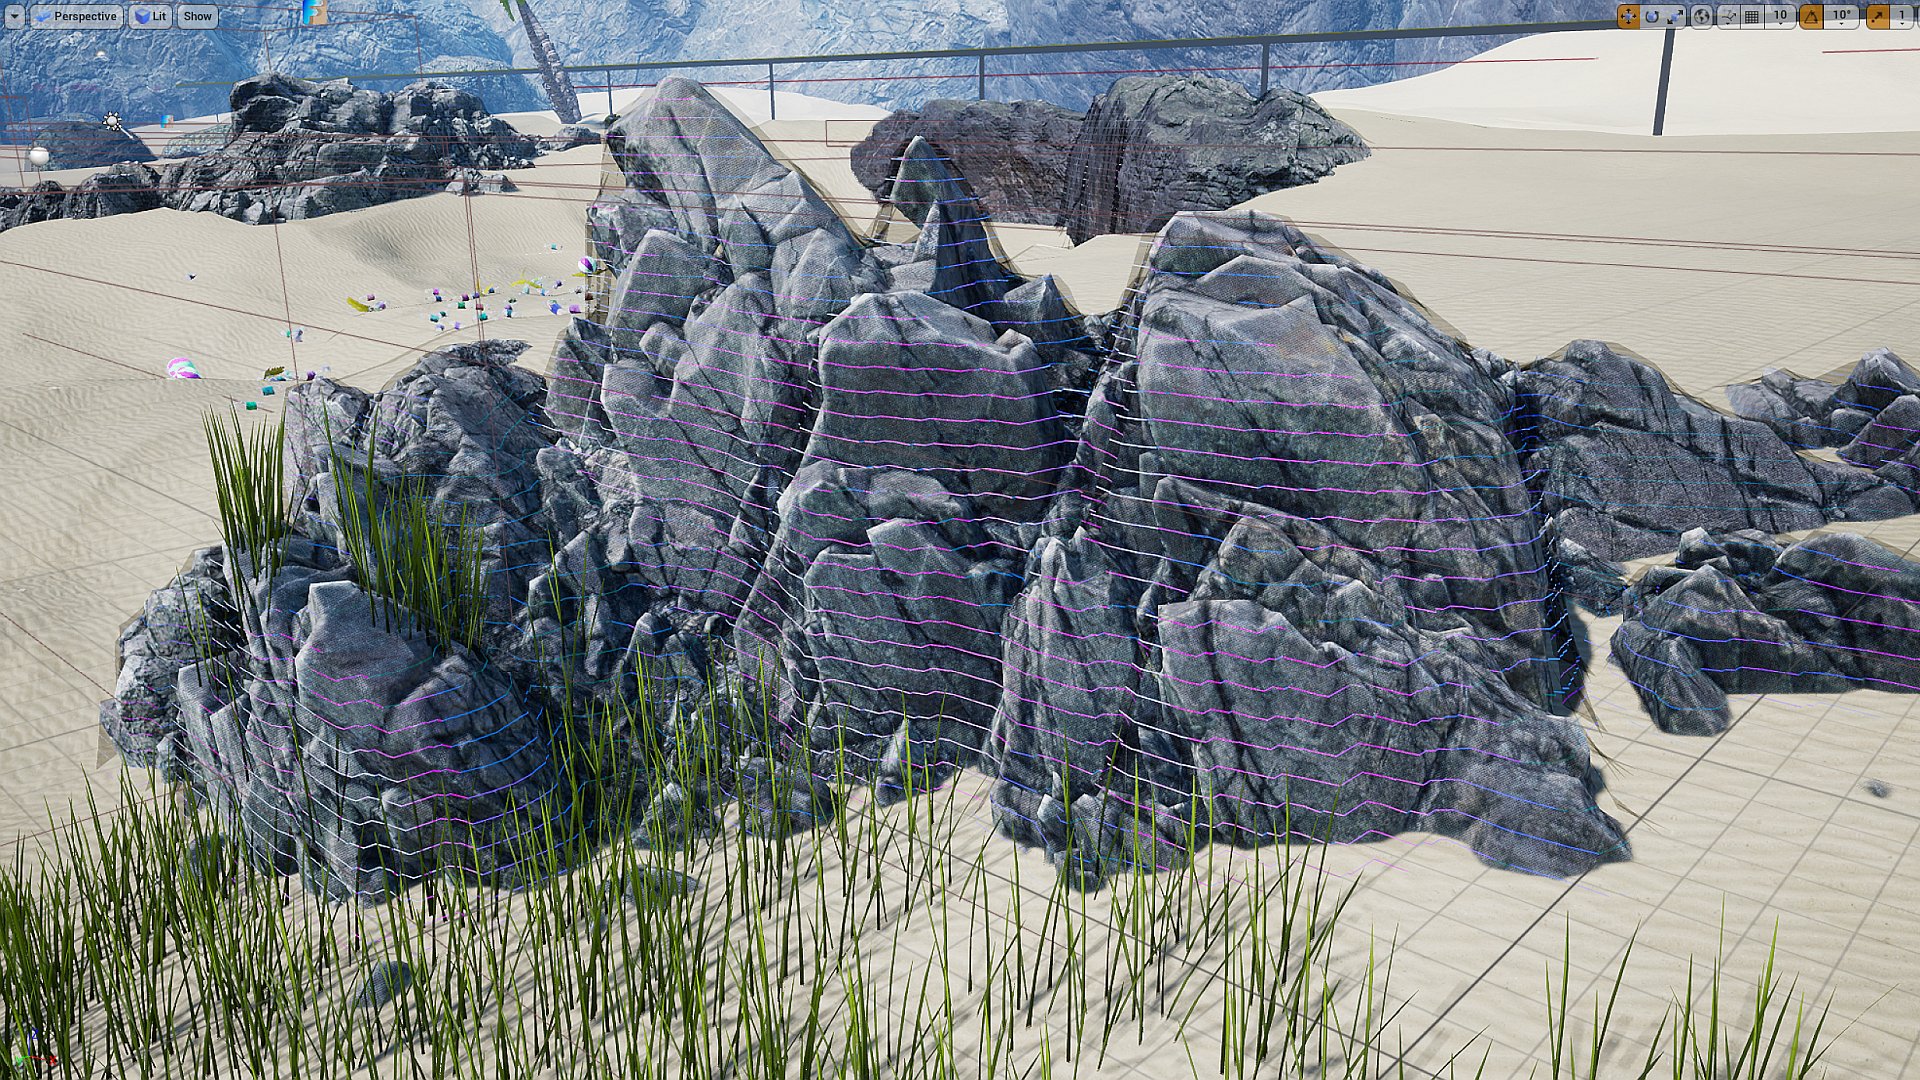
It’s noticeable that not every detail will be captured on the ground map, and the accuracy depends on the grid scale (attribute AreaWorldPixelSize). The shader for rendering this preview colors lines based on slope and exposes the ground’s discontinuity.
| Visualization | Description |
|
Green lines |
Easy to simulate, very stable fluid. |
|
Blue lines |
It has a good slope for moving fluid in some direction. |
|
Red lines |
The area may cause instability if fluid flows on it, but it is suitable for walls. |
|
White lines |
There may be some caves that can expose holes in the fluid mesh. |
|
Fully red polygons |
represent holes and discontinuities in the mesh. It should be eliminated if fluid can flow into this area. |
Landscape or mesh is not rendering to the ground map
If the “PixelDepthOffset” feature is used in the material, it may not be rendered to a ground map, which can cause issues with some simulations. This problem can be easily fixed in your material by a simple modification. Use the MF_FluxPixelDepthOffset material node to disable “PixelDepthOffset” while rendering the ground map.
The M_Photoscan_Master material is an example of a workaround for this problem using the MF_FluxPixelDepthOffset node.
![]()
Wrong Domain Z location:
Remember that after adding the Domain actor to your map, you must modify the domain actor’s height (Z position) depending on your landscape. The debug grid on top of the landscape geometry indicates everything works fine.
Groundmap works in the editor, but it is broken in the build or runtime.
There is a slight difference between testing in PIE and running the Shipping/Development build. Understanding this issue is crucial for finding a solution. The editor uses assets that are already loaded and can render them immediately. However, when you run the executable, the system has to stream landscapes and meshes. When the Fluid Flux system captures the ground map and the scene has not yet been streamed, it may result in inaccuracies, such as a flat ground map or the use of lower LOD levels. There are several potential solutions:
- Increasing the SimulationDomain.RuntimeCaptureDelay – delay is the simplest way to determine if this is the issue in your case. If, after increasing the value, the ground is captured correctly, it indicates that the ground was not ready when it was initially captured. However, this is not the optimal solution because you cannot predict how fast the game will load on various target devices. Low-end PCs and consoles may load more slowly, which can result in unpredictable behavior.
- OnLevelLoaded events – The most effective approach is to use SimulationDomain.RuntimeCaptureDelay = -1 and execute the function SimulationDomain.BeginPlaySimulation by hand from an event that notifies you when the level is loaded and ready for use. Unfortunately, there are no such events in the blueprint, so you will need to track this on your own in C++.”
- Setting SimulationDomain.UseInitialStateGround=true forces the system to utilize the ground map from the data stored in the exported SimulationDomain.InitialState
Simulation Domain
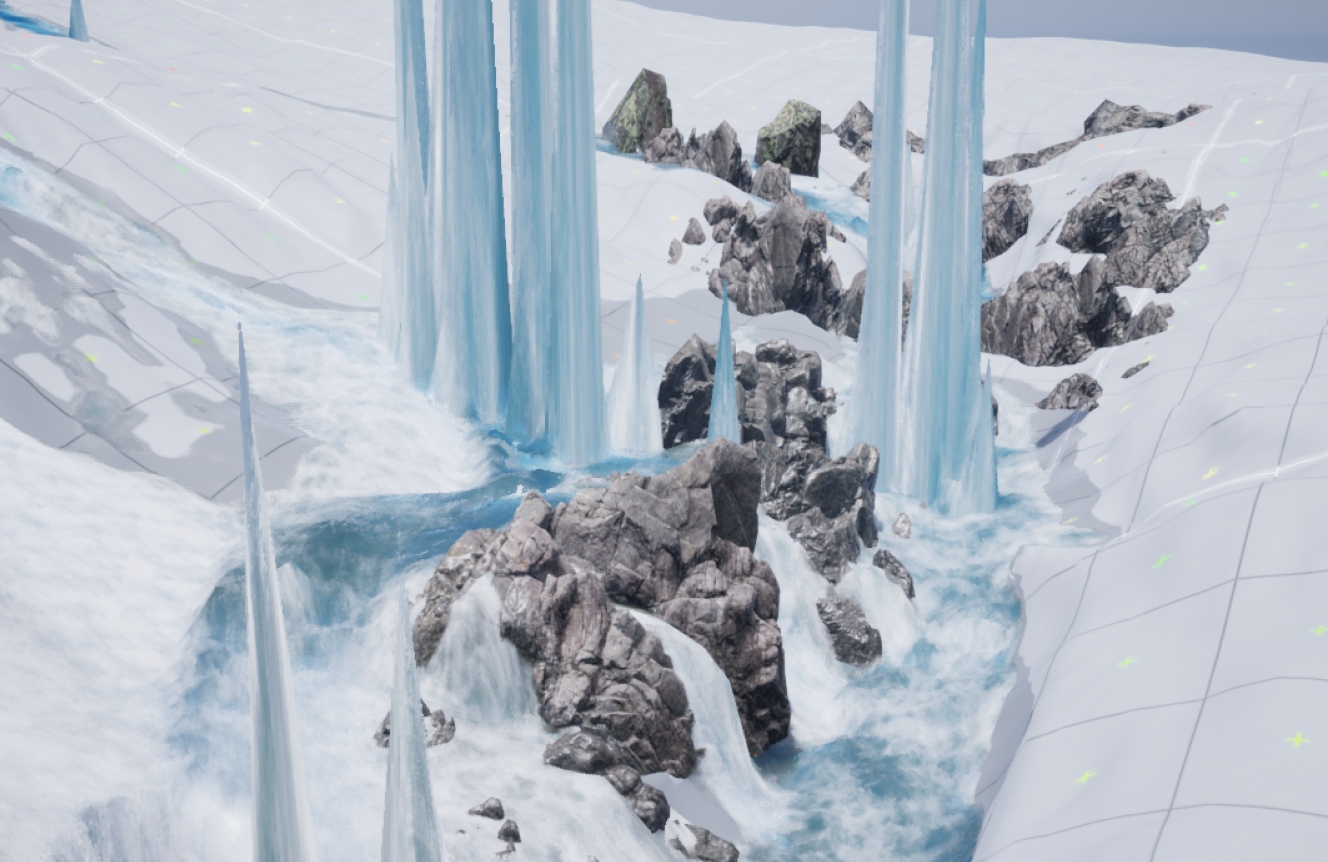
The Fluid Flux simulation implementation is based on shallow water equations. The shallow water equations are a set of mathematical equations that describe the flow of water in shallow areas, such as rivers and streams. They are commonly used in hydrodynamic modeling to simulate the movement of water and predict its behavior under various conditions. The resulting simulation will show the movement of the water and the formation of ripples and waves on the surface. You can adjust the initial conditions and parameters of the simulation to see how they affect the movement of the water and the formation of ripples. Remember that the shallow water equations are a simplified water flow model, and they may not always accurately reflect the behavior of actual water.
The BP_FluxSimulationDomain blueprint is the heart of the Fluid Flux system. This blueprint is responsible for handling important tasks like:
- Generating the ground height map for the texture (using FluxHeightmapComponent)
- Updating the simulation of shallow water fluid, foam, and wetness.
- Baking and exporting the simulation state.
- Sending data to the fluid surface renderer.
The Shallow Water simulation is based on the assumption of linear vertical pressure profiles, and therefore, it is simulated in two dimensions. In general, the algorithm can be described in a few steps:
- Simulation data is stored on 2D render targets.
Ground map – information about the landscape and obstacles
Velocity (RG) Depth(B) Foam(A) map – stores information about fluid
Height(R) Wetness(G) map – stores surface height and wetness of the surface - The slope of the ground height field and the slope of the fluid are combined and used to calculate the pressure and velocity.
- Simulation is an interactive process of updating fluid height and velocity.
- The result of integration is used for foam and velocity advection.
- Fluid modifiers are used as input for the simulation to change the current state.
- The simulation frame accumulates fluid wetness and generates the fluid surface mesh displacement.
The BP_FluxSimulationDomain actor placed on the map is doing nothing because it’s empty and needs to be filled with fluid. The simplest way to fill containers with fluid is by using a Modifier source actor.
The BP_FluxSimulationDomain blueprint has a straightforward editor that simulates the fluid’s state on the map in the editor mode. Simulation can be prepared in the editor, baked to a state, or dynamically updated by the simulation blueprint.
Modifier Component
A modifier component is a powerful tool that affects the simulation state and changes the current simulation state. It’s the simplest way to interact with the simulation. Modifiers can be used for:
- Adding/removing fluid in the simulation domain.
- Changing the velocity and flow direction of the fluid
- Simulating custom interaction with fluid
- Generating waves
The tutorial below presents how to add a source modifier to the scene and fill the simulation domain with fluid:
The Fluid Flux contains predefined modifiers:
- BP_FluxModifierComponent – Base parent class for all fluid modifiers. Every modifier component extends it and implements specific behavior. Users can create custom modifier classes and materials for specific use cases, such as whirlpools/waves. Describing the architecture is outside the scope of documentation. The BP_FluxModifierSourceComponent component is an excellent example of a modifier that can be used as a starting point for learning how the system is designed.
- BP_FluxModifierSourceComponent – Simple modifier that allows adding/removing fluid and changing velocity in a specific area.
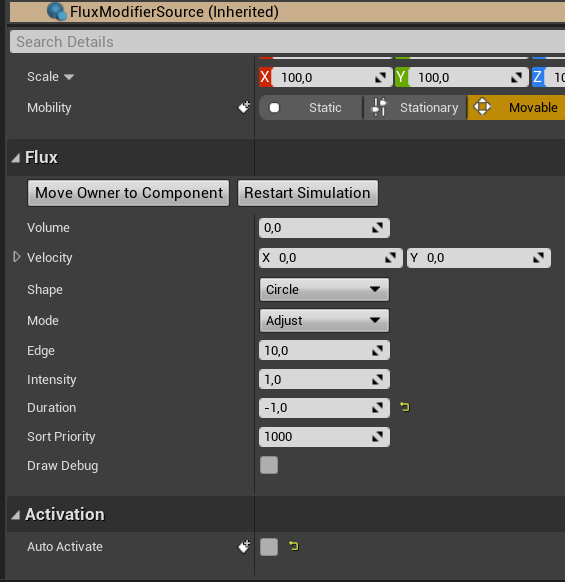
Parameters Volume The quantity of fluid applied by the modifier (depending on the Mode). Velocity The velocity of fluid applied by the modifier (depending on Mode). Shape The shape of the fluid modifier Mode Defines how the modifier is applied to the simulation. All modifiers are rendered to a simulation buffer. Mode is a method of blending used during this process.
Add – This mode will add the ‘volume’ of fluid and its velocity to the current fluid on the map.
Adjust – adjusting the current state of fluid to the height of the modifier.
Set – will set the constant height of fluid in the area.Edge The softness/hardness of the modifier edge. Useful for soft mixing with fluid or for uniform filling of the vessel. Intensity Scale the modifier’s effect on the domain (0.0, 1.0>. Duration Defines the duration for which the fluid source will remain active. (less than 0 means infinite), (0 Rendered in a single frame and then the modifier will be disabled), (more than 0 is the duration in seconds) SortPriority Affecting an order of modifiers in the queue. It may be helpful when the user needs to fill the domain and then remove some fluid. A value larger than 1000 forces the system to append without sorting. AutoActivate The modifier can be inactive initially and activated by an event from gameplay or a sequencer. There are many ways to remove fluid in the simulation domain. It depends on the mode you choose:
Mode= Set, Volume=0 – will set 0 water in the area of the modifier
Mode= Adjust, Actor.Z position – lock fluid at a specific height
Mode= Add, Volume negative – slowly removes fluid - BP_FluxModifierGerstnerComponent – Generates waves/fluid on the borders of the simulation domain. More info and use cases can be found in the chapters related to ocean configuration.
- BP_FluxModifierForceComponent – Generates forces when the actor moves (based on the velocity). It can be added to the character.
Modifier Container
The modifier container is a particular type of actor that can store multiple modifiers and send them to the simulation. If the actor implements the BPI_FluxModifierContainer interface, it’s considered a modifier container.
BPI_FluxModifierContainer interface can be implemented by any actor. A good example is BP_DemoCharacter that uses BP_FluxModifierForceComponent to interact with a fluid. AddModiffiers function only needs to be implemented to make it work.
BP_FluxModifierContainerActor is a primary container that combines multiple modifier components into a single actor, allowing them to work simultaneously.
BP_FluxModifierSourceActor is a specific type of container actor that simplifies the process of adding simple source modifiers to the scene.
Every modifier is rendered in an additional render target pass, so it’s not cheap. Minimizing the number of fluid modifiers within the simulation is a good practice for achieving the highest performance.
Solving issues
Unexpected spikes sometimes destroy the simulation. Shallow water simulation can exhibit unpredictable behavior due to the loss of stability when encountering steep slopes. This is a widely recognized problem that can be resolved by fine-tuning specific parameters and enhancing the reliability of the simulation.
- Slope Scale (Increase)
Increasing this parameter will scale the scene’s height on the Z-axis, making your fluid move slower on slopes. (This parameter will probably be redesigned in the future version for better consistency with the world scale measurements). - OvershootineBlend(increase), OvershootingEdge(Decrease) Fixes overshooting problem bysmootcheening
- Simulation Delta Time (Decrease)
Fluid flux is updating with a constant delay time. That means the time that elapsed between two game frames is divided by delta time, and the result is the number of iterations. Generally, more iterations result in lower performance. By default, the Simulation Delta Time attribute is set to 0.2. Although it is not entirely accurate, it can achieve the highest performance. - Debug Preview / Debug Hidden In-Game (Debug)
Pay attention to the ground debug preview. If you spot some red spikes where the simulation does not work correctly, your ground texture and geometry should probably be adjusted. - Tweaking other variables, such as slope clamp, velocity clamp, friction, damping, gravity, and even world pixel scale, can make a difference.
I am still experimenting with different solutions for this spike problem and trying to figure out some method to force stability even in bad conditions. You can expect multiple improvements in future updates.
Fluid state
The PDA_FluxSimulationState is a unique data asset specifically designed to store the current frame of the simulation. The simulation state is the most essential structure in the system.
The simulation actor dynamically updates simulation states. A dynamic simulation state is automatically created in the constructor script and stored in BP_FluxSimulationDomain.CurrentState actor. Data can be easily previewed and used for rendering and further fluid analysis.
The simulation state can be exported to the data asset and used later in many ways.
- It can be loaded at runtime
- It can be used as a starting point for the simulation
- It can send data to render by the surface actor
- It can be used in other gameplay tools, in Niagara emitters and materials
Exporting State
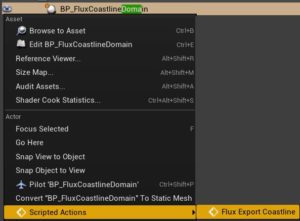
BP_FluxSimulationDomain.CurrentState can be baked to an asset by clicking the right button on BP_FluxSimulationDomain and choosing Scripted Actions -> Flux Export Simulation. The short tutorial below presents the process of generating and exporting the fluid state to a data asset:
- (0:07) Prepare data assets that will store the state
- (0:20) Start the simulation of fluid on your map and stop when it’s ready
- (0:50) Choose SimulationDomain->ContextMenu->ScriptedActions->FluxExportSimulation
- (0.54) Select the newly created state as a target and adjust settings.
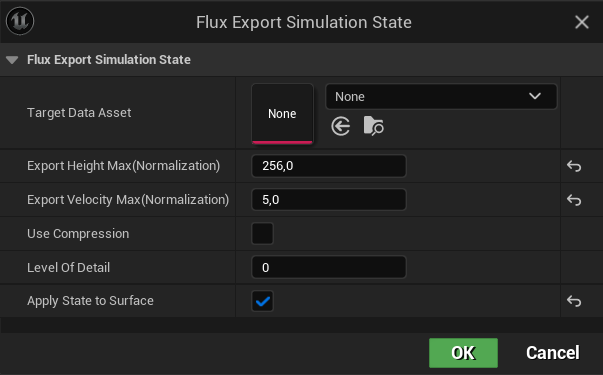
Parameter
Description
ExportHeightMax ExportVelocityMax ExportHeightMax and ExportVelocityMax can improve quality. When the velocity or height in the exported simulation is very small, it is worth scaling the precision to use the whole range of bytes when storing the data. The exporter should do this automatically when opening the script. However, analyzing the entire simulation may require many computations and additional implementation, so I decided to leave it for manual adjustments.
UseCompression Exporting compressed assets. It can save some memory, but also affects the quality of the surface. Level Of Detail Scales down the simulation resolution Apply State to Surface Applies exported data to the surface, which allows previewing the results.
After those actions, you should see the generated state and additional textures.
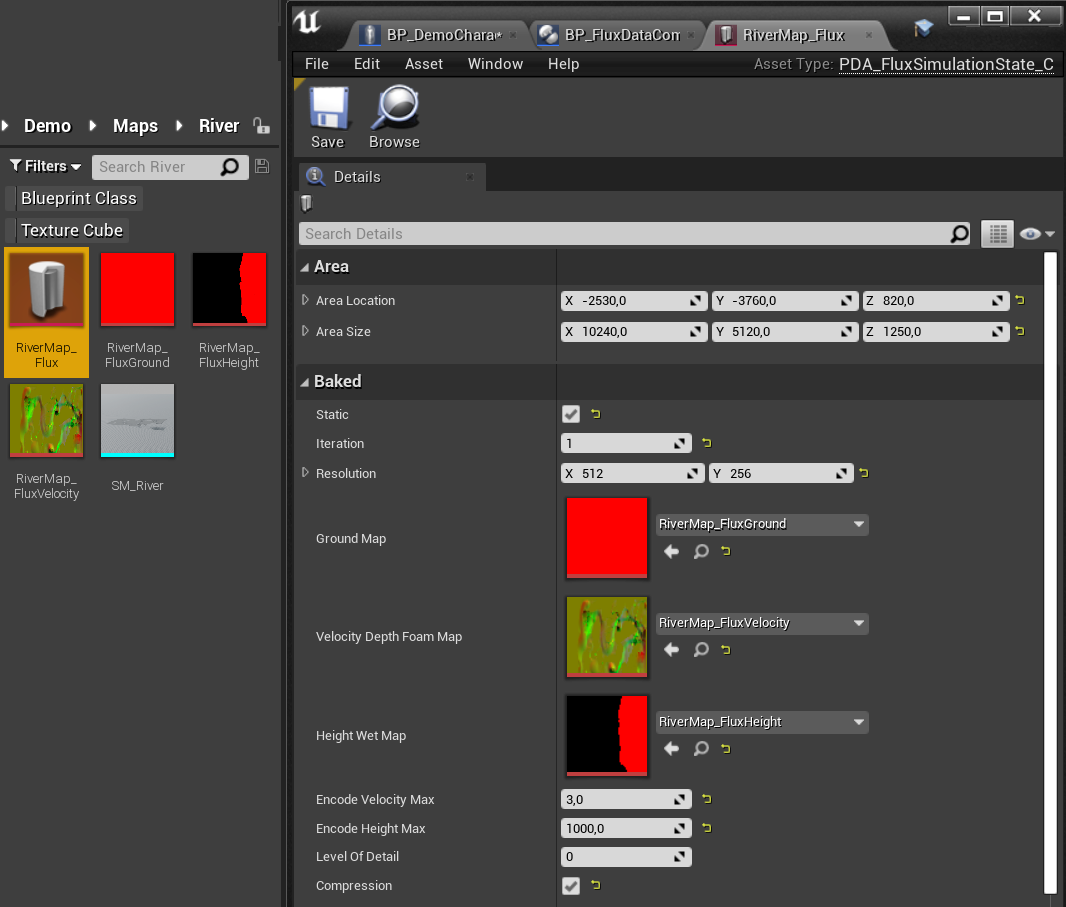
Pay attention to simulation resolution! The “Power of Two” rule is a fundamental necessity due to the way game engines work. You will not be able to export simulation state if it is size is not power of two (128/256/512/1024 etc.)
Use case 1: Initial state
Using the state as the initial state of simulation allows us to start the simulation from a specific frame. It means that a simulation of flowing water does not have to be generated every time the game starts it can start from the saved frame.
- Select SimulationDomain
- Find InitialState attribute
- Set the state exported before
Since now, the simulation has started by reading data from the state.
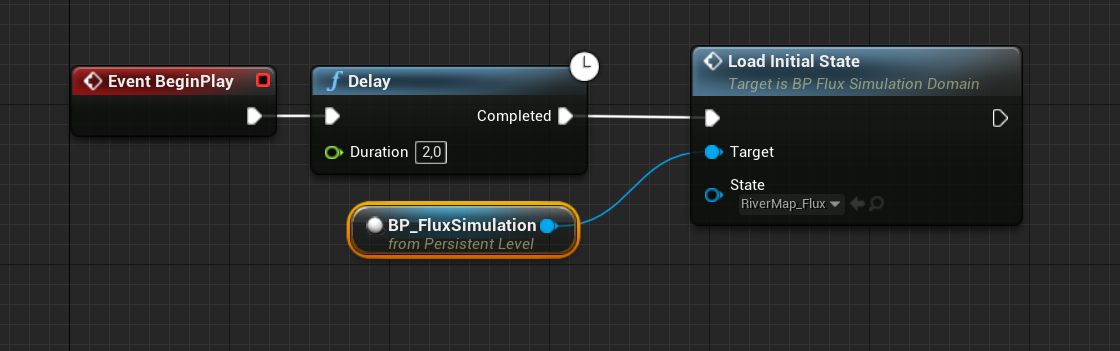
Use case 2: Loading state in gameplay
Sometimes, there is a need to load a state during gameplay in blueprints, like a checkpoint. Simulation->LoadInitialState function can be used to handle these tasks. Example use presented in the screenshot below:
Use case 3: Using state without simulation
If you are not planning to update the simulation dynamically, then a better option is to remove or disable the SimulationDomain actor and use SimulationState directly in the FluxSurface. This solution may be significantly faster and more reliable, and it can also save memory. Use this configuration:
- Configure SimulationDomain and run the simulation.
- Click the right mouse button on SimulationDomain and export it to the State Data Asset.
- Set SimulationDomain->AffectWorld = false
- Set Surface->SimulationState directly using the exported asset.
BP_FluxSimulationDomain.SurfaceActorReference is set, actors communicate with each other, and the state is automatically passed to BP_FluxSurface.SimulationState, but changing AffectWorld to false disables this connection.
SimulationDomain can be removed or set IsEditorOnlyActor to avoid spawning it in the final build and wasting memory.
Dynamic ground
The Fluid Flux uses a static ground map for simulating fluids, but updates are allowed occasionally. It is costly, so it is not recommended to use this operation in every frame:
The BP_BreakableDam presented in the video can be destroyed when the player triggers it. It is an excellent example of updating the ground after the dynamic object has moved. Look at the Break function, which is the heart of the dam system.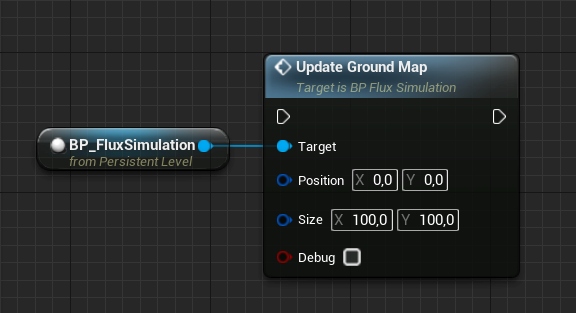
It evaluates UpdatGroundMap on a simulation actor, which takes the object’s position and size that will disappear to recreate the ground in this area. You can do the same operation when adding something on your level.
Mesh generator
The static mesh mode is the most efficient way to render fluid flux water surfaces. In Fluid Flux 3.0, the mesh generator was rewritten to a new, separate editor actor tool called BP_FluxSurfaceMeshGenerator.
The new tool uses the Geometry Scriprs Plugin introduced in Unreal Engine 5, so don’t forget to enable it in your projects!
Features of the mesh generator:
- This new tool is now separated from the BP_FluxSurface actor, making the interface cleaner and more encapsulated.
- The new wireframe preview option dramatically improves the visualization of exported meshes.
- Baker optimizes mesh density using fast, built-in engine geometry scripts, ensuring a more evenly distributed geometry density.
- Performance issues related to reading render targets have been addressed, and the entire generation process is now working over 50 times faster.
- The new static mesh generator provides more precise results and supports bigger meshes, thanks to shorter generation time.
- Exporting is simplified as the target mesh can be pinned to the blueprint and overridden every time it changes.
The video below presents the optimized output mesh generated in the editor with wireframe preview enabled which can be found in the Demo/FluxRiverStaticMap:
Unfortunately, there are still some limitations:
- Unfortunately, there are still some limitations:
- Geometry Scriprs works only in the editor, so generating static meshes at runtime is no longer supported.
- Generating huge meshes may take some time, as the system is partially implemented in blueprints.
- The generator works only for rivers and lakes. Building a static mesh for the ocean does make sense, as it should be dynamic.
- The output mesh can’t be blended with the ocean because it uses another surface rendering mode.
- If the mesh is too dense, generation may not execute as it may exceed the available iteration count in blueprints. It can be fixed by increasing the maximum loop iteration count parameter in project settings.
Generator tabs:
All generator attributes are organized in separate tabs designed for specific tasks:
- Exporter – saving data and configuration of the target mesh that will be exported, file name generation, etc.
- Source – Source of data for generation. The system can read data from the Simulation Domain, Surface Actor, or Simulation Data Asset.
- Generator – Parameters for processing mesh generation and mesh simplification.
- Preview – The way the mesh is displayed to the user. Preview mode is crucial:
PreviewEditor_GeneratedMesh – generated preview of mesh that can be adjusted.
PreviewActor_DataAsset – original data asset rendering.
PreviewActor_StaticMesh – final generated mesh on surface.
Generating mesh
In the tutorial below, we will walk through a workflow for generating static meshes based on the simulation’s baked state.
- Use a simulation domain to generate water. (previous chapters)
- Export simulated state to Simulation Data Asset (previous chapters)
- Switch surface to static mode (SimulationDomain.AfectWorld=false, SurfaceActor->SimulationState=Exported state.
- Add BP_FluxSurfaceMeshGenerator on the level.
- Set the SurfaceMeshGenerator.SourceActor = Level.Surface (it provides data for generation)
Alternatively, you can set the SourceDataAsset = exported data asset. - Set the SurfaceMeshGenerator.PreviewActor = Level.Surface (it will display the data)
- Set previewMode = PreviewEditor_GeneratorMesh. This option renders the mesh directly in the editor. It can’t be used at runtime.
- Use Exporter options to Target Static Mesh or generate a new one when it’s undefined.
- Click “Save to Mesh Asset” to export the mesh.
- When SurfaceMeshGenerator.TargetStaticMesh is set; you can switch the preview option to PreviewActor_StaticMesh to see the exported mesh in the game.
The BP_FluxSurface actor renders static meshes using the special mode SurfaceMeshMode=Domain_GeneratedMesh, which is automatically set by the generator.
The example preview material “MI_River_SurfaceOverStatic” is designed for static meshes and can handle fluid data such as foam and velocity encoded in vertex color. The material is set to the mode Material.UseSimulation = false, which means the system will read the data from the vertex information instead of sampling textures.
Surface PreviewActor_StaticMesh uses SurfaceOvewBakedMaterial for rendering geometry.
Recreating Ocean
Creating an ocean scene is a complex topic that involves coordinating multiple actors simultaneously. It is beneficial to review other tutorials before beginning to recreate the ocean scene. Examples of ocean setup are presented in the demo maps FluxIslandMap and FluxBeachMap. You can copy this setup (SurfaceActor, SimulationDomain, WaveTexture, WaveModifier) or create it from scratch on your map using the description from this chapter:
Configuration step by step:
- Start with an empty map with some island/landscape/ground meshed.
- Add actors:
- Add BP_FluxSimulationDomain actor. Responsible for simulating water.
- Add BP_FluxSurface_Ocean actor. Responsible for rendering.
- Add BP_FluxOceanWave actor. Responsible for ocean waves outside the simulation.
- Add BP_FluxModifierWaveActor actor. Responsible for generating waves in the simulation.
- Select BP_FluxSurface_Ocean actor
- Set Surface->SurfaceMeshMode = InfiniteGrid_128_Niagara. It will force rendering of an infinite mesh (a feature added in version 2.0).
- Set Surface->OceanWaveActor = FluxOceanWave. This action will facilitate the reading of data from the ocean wave actor.
- Select BP_FluxOceanWave – the dedicated actor that provides ocean waves. Implementation is much simpler than the classical analytical approaches, such as Gertner or FFT. The system uses an animated 3D texture (VT_OceanWave) generated in Blender.
- Adjust the Z position of the ocean wave actor.
- Adjust the wavelength and wave height to your needs.
- Select BP_FluxModifierWaveActor actor
- Adjust the transform of ModifierWave to cover the edges of the simulation that should generate waves. Change position and size if needed.
- Select BP_FluxSimulationDomain actor
- Switch the simulation domain surface to force rendering a new surface
Simulation->SuraceActorReference = BP_FluxSurface_Ocean - Change the blending of the simulation with the waves outside the simulation using the Simulation->Domain->AreaWorldBlend=(0.1, 0.1, 0.1, 0.1). You can adjust it to your needs. Custom blending between oceanic waves outside the simulation may be necessary in special cases, such as when dealing with a one-sided ocean. This can be achieved by configuring the AreaWorldBlend attribute within the SimulationDomain actor.
- Adjust the Z position of the simulation actor.
- Adjust the XY location, resolution, WorldPixelSize, and size to cover the area where the shallow water simulation should be generated.
- Ensure the ground map is captured correctly by checking if the debug grid represents your scene. (For more info, check the ground capture-related chapters)
- Switch the simulation domain surface to force rendering a new surface
- Test the simulation. Click SimulationDomain->StartSimulation or run the game.
Sequencer
Sequencer allows users to create in-game cinematics through its specialized multi-track editor. Unreal Engine has many options that can be used for previewing scenes, but Fluid Flux does not support some of them:
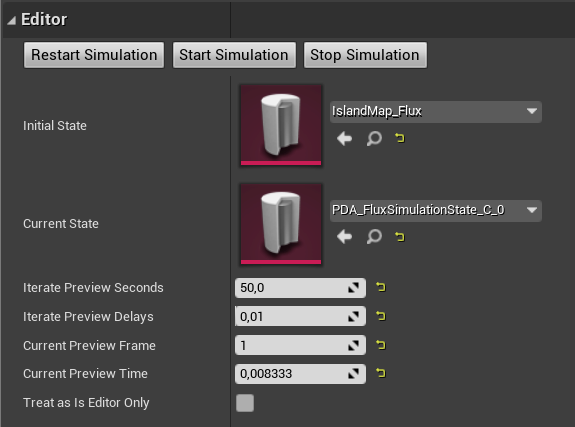
- Real-time – You can preview the simulation by hitting “play” (green button) in the editor. It will show you how it would behave in real-time.
- Editor – Clicking “Start Simulation” in BP_FluxSimulation actor on the scene (as presented in tutorials) allows you to generate a specific frame and save it to the state (an initial state that can be pinned to the simulation actor as the first frame).
- Sequencer editor – Simulation can’t be previewed in the sequencer because the Fluid Flux system does not allow rewinding simulation in the current version, and the sequencer affects actors – the topic is very complicated.
- Capture Movie – Sequencer Render Movie to Video. It works in real-time mode, and Fluid Flux water will render correctly in the final video.
- Capture 360 – This option was never tested.
If you want to preview the simulation with a sequencer, then this setup may be helpful for you:
- Drag and drop the sequencer on your map.
- Switch the AutoPlay option in LevelSequenceActor.
- Press “Play in selected viewport” or “Simulate.”
Fluid Flux provides an option to use modifier activation/deactivation functions from a sequencer. The process of using this functionality is simple:
- Add Sequencer on the level and set parameter: Autoplay=True
- Add Source modifier on the level and set parameters Duration=-1, AutoActivate=false
- Drag and drop the Source modifier to the sequencer.
- Add Track->FluxModifierSource
- Choose the moment of activation on the timeline and click “Add a new key,” then change the event’s properties as presented on the screen below. You can choose the Activate/Deactivate function.
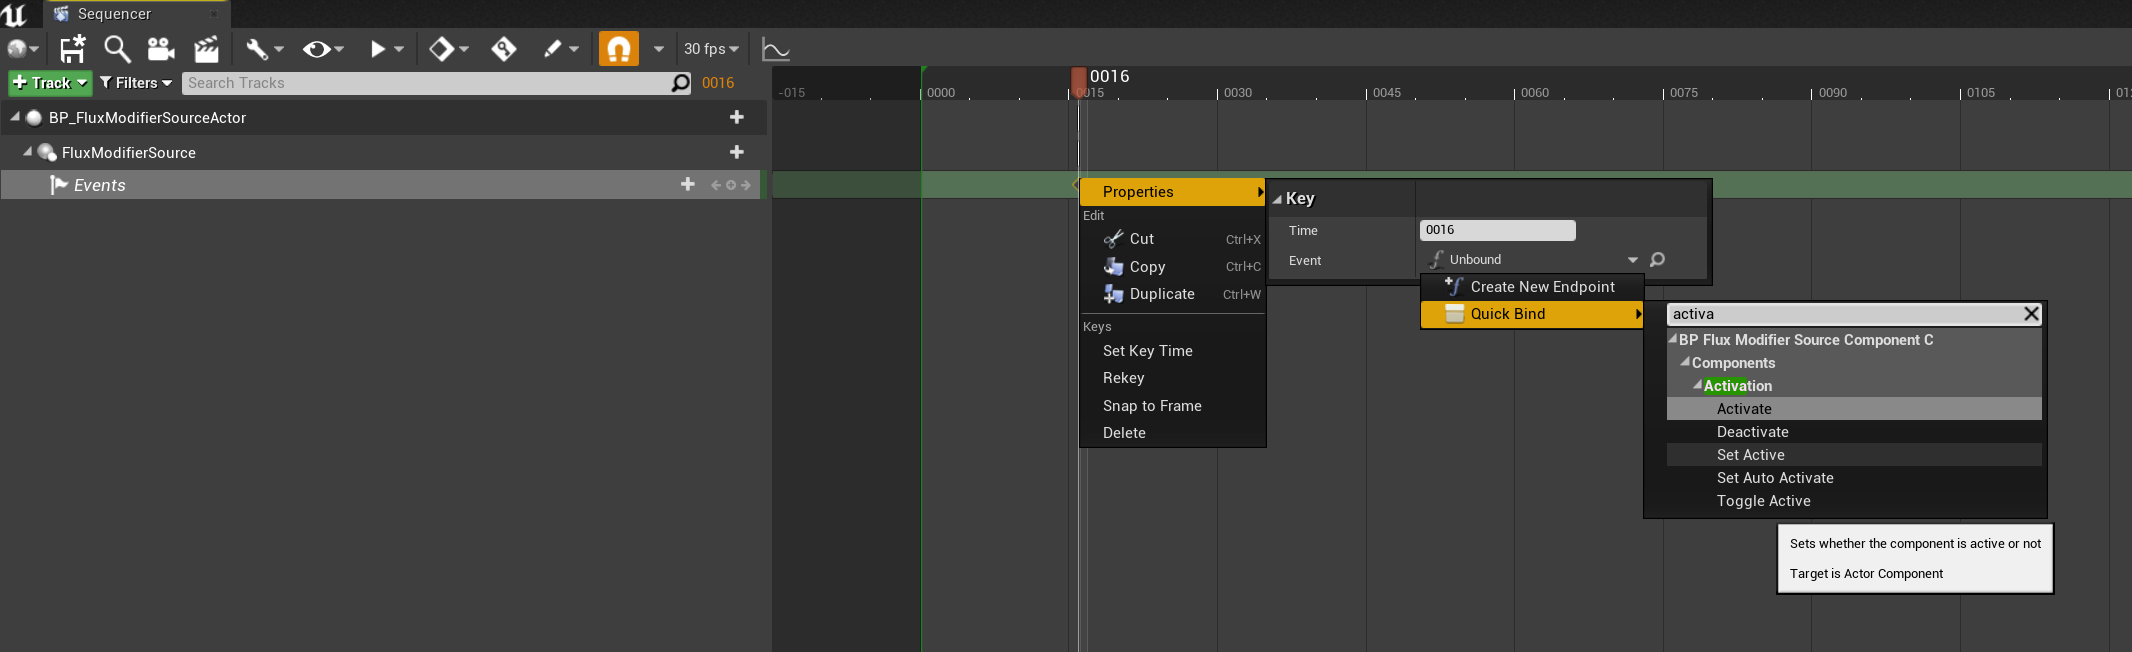
Now, you can test the scene by rendering a video or playing the game. The modifier should activate automatically by the sequencer event.
Coastline Domain
The BP_FluxCoastlineDomain is a dedicated system designed specifically for capturing and baking world data into CoastlineState. The architecture of the BP_FluxCoastlineDomain system is similar to the BP_FluxSimulationDomain, ensuring consistency and familiarity.
The coastline state serves as a fundamental data source during the rendering process for coastlines and oceans. The BP_FluxCoastlineDomain can communicate with the FluxSurface actor and feed it with data needed to render the water as presented in the short video tutorial below:
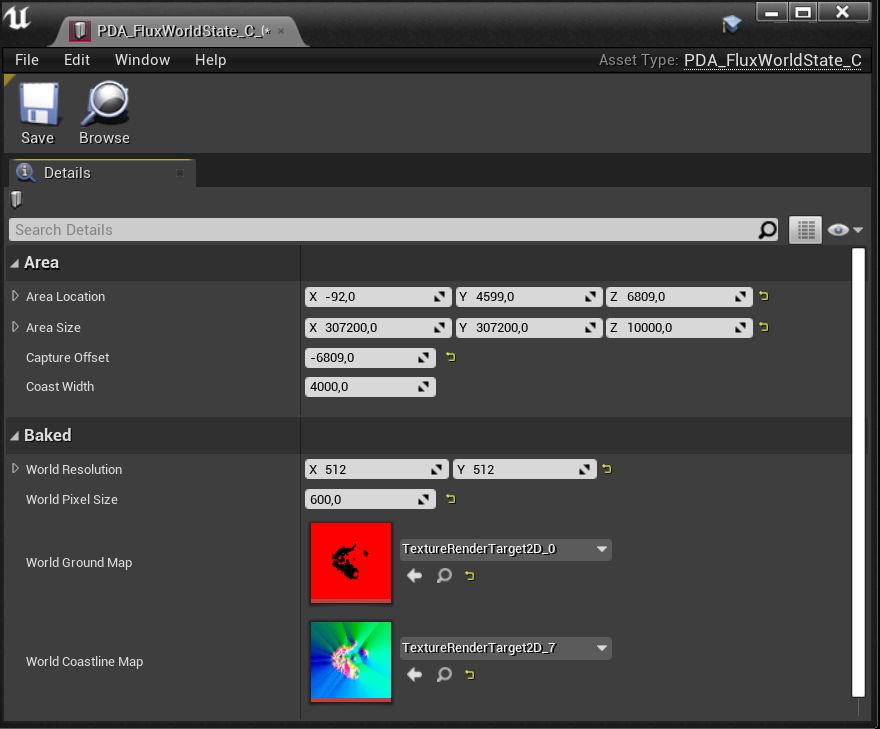
Coastline state
The BP_FluxCoastlineDomain actor generates a state that can be exported and saved as the data asset and stored in the project files. The CoastlineState data asset can be used as an initial state in the BP_FluxCoastlineDomain actor or loaded directly in the BP_FluxSurfaceActor, the same way as in the case of the SimulationState.
Exporting the current coastline state can be described in a few simple steps:
- Create an empty coastline data asset to store the data.
ContentBrowswer->RightMouseButton->Miscellaneus->DataAsset->PDA_FluxCoastlineState - Save to newly created data assets.
Select CoastlineDomain->RightMouseButton->ScriptedAction>FluxExportCoastline
Exported CoastlineState data asset stores two textures.
- WorldGroundMap stores the height map of the coastline area.
- WorldCoastlineMap stores the distance to the coastline, direction, wave height, and blending of the coastline.
If you are not planning to update the coastline dynamically, then a better option might be to remove (or disable) the CoastlineDomain actor and use CoastlineState directly in the Surface actor. It may be way faster, more reliable, and save some memory.
Try this configuration:
- Configure CoastlineDomain and export it to the state.
- Set CoastlineDomain->AffectWorld = false
- Set CoastlineDomain->IsEditorOnlyActor = true
- Set Surface->CoastlinerState directly using the exported asset.
You don’t have to remove the domain actor from the scene because IsEditorOnlyActor will remove it automatically for you in final build. Thanks to this solution you are able to use it later again in the editor for regenerating the state if the level geometry change.
Solving Issues
If, after following the tutorial steps, the coastline does not appear, you have likely encountered one of the scenarios listed below:
- Z location of the Coastline actor is wrong:
Remember that after adding the BP_FluxCoastlineDomain actor on your map, you need to modify the domain actor’s height (Z position) depending on your landscape. Otherwise, you may not be able to see coastline waves.
The debug grid on top of the landscape geometry indicates everything works fine.
- Landscape material uses Pixel Depth Offset:
If the “PixelDepthOffset” feature is used in the material, it may not be rendered to a ground map and cause some simulation problems. This problem can be easily fixed in your material by simple modification.
Use the MF_FluxPixelDepthOffset material node to disable “PixelDepthOffset” while caching the ground map.
The M_Photoscan_Master material is an example of a workaround for this problem using the MF_FluxPixelDepthOffset node.
- The coastline is incorrect in standalone/shipping or looks different after play
This issue is associated with the landscape not being ready during the map loading process, and the system utilizes a lower Level of Detail (LOD) for rendering the ground. Detailed explanations can be found in “Groundmap solving issues: Groundmap is broken in shipping/development build.” Two potential solutions are available:
– Use the RuntimeCaptureDelay attribute to postpone rendering the height map,
– Save the coastline to the state and directly load it from the data asset.
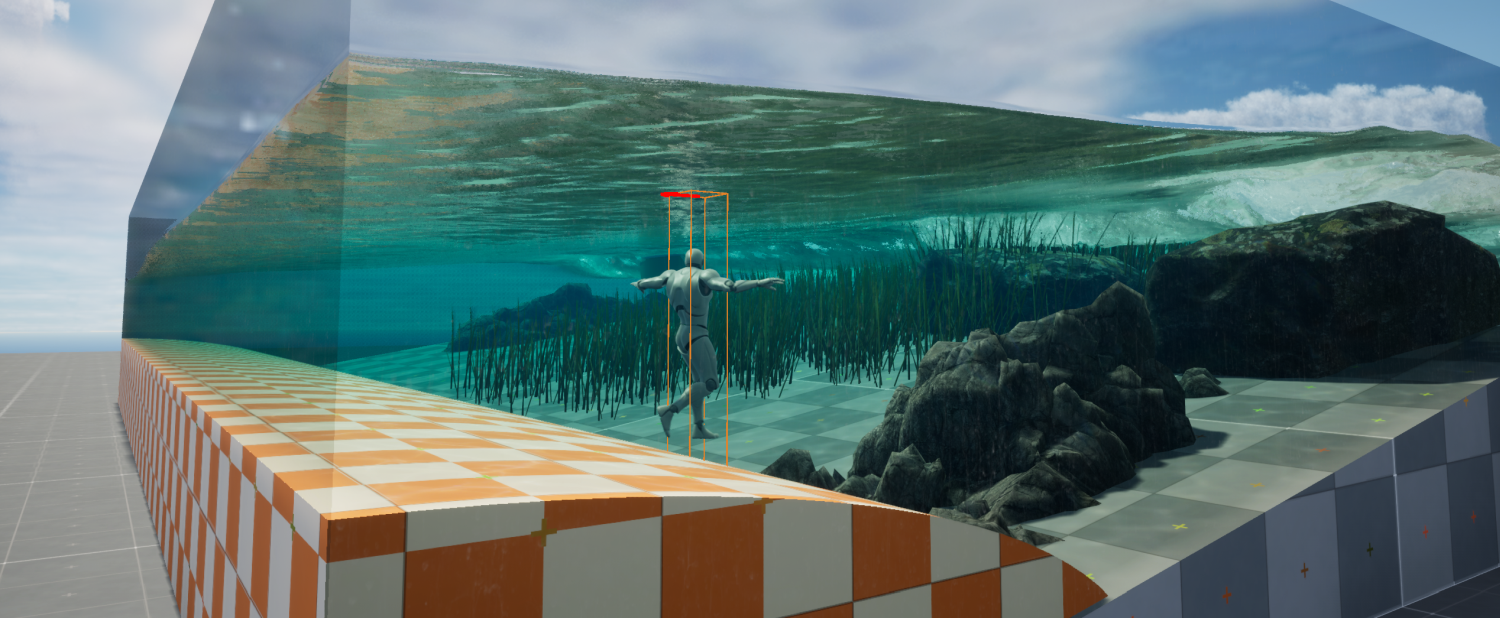
Glass system
The glass rendering system in Fluid Flux 3.0 is built upon three interdependent systems integrated with the BP_FluxSurface actor. Each of these systems will be described in detail later in this chapter:
-
Masking
The geometry of the glass volume is captured in an SDF (Signed Distance Field), which is then used to cut holes in the surface mesh. -
Glass
TheBP_FluxGlassActorcan render any mesh as glass while sampling water height to apply advanced post-process effects like waterline refraction and absorption.- You can use multiple glass actors simultaneously.
- Note: Calculating water-related data is computationally intensive and processed per vertex. To ensure optimal results, glass meshes must have a high vertex density and use multiple layers of transparency.
-
Absorption
The volume mesh absorbs light within the underwater distance field, creating realistic underwater scenes enhanced by watercolor-inspired lighting effects. The effect is implemented in Surface.VolumeAbsorptionMaterial automatically applies the colors of the water based on the geometry inside the SDF attached to the surface. Clearing out this material disables the effect.
Example use cases of glass systems are presented on demonstration maps and can be found in the Demo/Maps folder:
FluxGlassSectionMap– Only the glass system is used to render the borders of the simulation. The old fluid cross-section system was removed from the surface actor. This map uses a custom glass actorBP_FluxGlassSection(example on FluxSectionMap) to achieve the effect of the water volume cut.FluxOceanMap– The simplest example of an SDF domain and a sphere of glass cutting a hole in the ocean.FluxCoastlineMap– Single SDF domain capturing the spline mesh tunnel and rendering glass combined with the coastline.FluxIslandMap– Advanced example presenting a mix of multiple types of SDF bodies and glass meshes (spline, Box, Sphere) and a simulation reacting on the glass mesh.UseCase_02_InverseTube– Inversed spline mesh glass and inversed sdf cut. Additionally, the configuration presents the top cap of the ground map used as a blocker for fluid inside the tube (see the ground map after selecting Simulation Domain)
Example A – Basic configuration:
- Prepare a map with water, and configure a surface actor (as in previous chapters). It’s important to make a complete configuration with a separate surface actor placed on the map.
- Drag and drop BP_SDFVolumeDomain on the level and select the newly created BP_SDFVolumeDomain on the map.
- Adjust attributes of selected BP_SDFVolumeDomain: location, resolution, and texel size to cover the area where the glass mesh should cut the hole. Make sure the water surface and glass effects are generated within the domain.
- Find BP_SDFVolumeDomain.Target Actors and add an item that points to the water surface actor on your map (BP_FluxSurface). This step is important because from now on, the domain will send the generated SDF to this actor. This step forces the SDF system to send data to the Surface Actor and cut holes in it.
Example B – Adding a box/sphere-shaped glass container
- Drag and drop the Glass Actor BP_FluxGlassBox onto the level.
- Select BP_SDFVolumeDomain, find the SourceActors list. Add a new item to the list and set its reference to the BP_FluxGlassBox you just created on the map. The domain will read the shape data from this actor; you can add as many actors as you want.
- Select BP_SDFVolumeDomain and click CaptureDistanceFields. The button forces the signed distance field to be refreshed based on the current geometry.
Example C – Adding a glass tube (advanced)
- Add BP_SDFOutline on the map. This actor represents a canvas for ActuPrint spline actors.
- Select BP_SDFVolumeDomain, find the SourceActors list. Add a new item to the list and set its reference to the BP_SDFOutline you just created on the map.
- Add BP_FluxGlassSplineActor and set the MeshCrossectionSDF in it. It’s basically the description of the tube shape.
- Select the BP_SDFOutline
- Adjust the BP_SDFOutline location, resolution, and world pixel size to overlap the spline actor area with the required precision. It’s good practice to start with the parameters to BP_SDFVolumeDomain, and you can later adjust the precision or size to get better/optimal results.
- Select BP_SDFOutline and sdd spline actors to the CapturedActors list. This step is required to indicate to the system which spline actors should be used as data sources.
- Select BP_SDFVolumeDomain and click CaptureDistanceFields. The button forces the signed distance field to be refreshed based on the current geometry.
From now on, you should see holes in the surface of water. I’m aware that the current setup isn’t as straightforward as it should be, and I’m working on a much simpler solution that will bake SDFs directly from static meshes, eliminating the need for additional complex actors.
Masking surface
A Signed Distance Field (SDF) volume is a 3D representation where each point in space stores the shortest distance to the surface of a shape. The “signed” aspect means the distance is positive outside the shape and negative inside, allowing precise surface representation. Fluid Flux uses a signed distance field volume (BP_SDFVolumeDomain) to represent shapes that can cut holes in the water mesh surface. Sampling data from the SDF volume can determine if a point on the surface is inside or outside the shape.
Capturing shapes:
Building an SDF volume requires capturing the distance to the surface of the scene geometry. This process requires a specified list of actors that will be captured by adding them to the array BP_SDFVolumeDomain.SourceActors is an array. Those sources of data can be generated differently depending on the type of geometry, and Fluid Flux supports a few basing types of SDF sources (implementing the BPI_SDFSource):
- BP_SDFShape – The most straightforward mesh shape represents a box with round corners.
- BP_SDFOutline – Intermediate actor capturing data from Spline actor meshes that can capture many spline meshes simultaneously.
- BP_SDFProjection – capture scene geometry to heightmap and then convert to SDF (Experimental)
- BP_FluxGlassBox/BP_FluxGlassSphere – custom implementations of glass actors integrated with BP_SDFShape.
Sending data to actors:
The BP_SDFVolumeDomain is the only container that generates and stores information about the signed distance field. That data needs to be sent to other actors for further use. The list of actors that should receive data from Domain is defined in BP_SDFVolumeDomain->TargetActors.
Example systems that use the SDF data,
- BP_SDFPreview (implements BPI_SDFRenderer) is a simple actor that can be used to debug the SDF on the plane mesh.
- BP_FluxSurface(attribute SignedDistanceFieldMask), the surface actor, uses that data to cut holes and volumes.
Exporting SDF to data asset:
Overall, the system is designed to generate SDFs in real-time. However, an additional feature is the ability to save a baked SDF volume as a data asset (PDA_FluxSignedDistanceField). This enables the SDF to be stored statically on disk, bypassing the resource-intensive runtime generation process. The export method is similar to that used for other data assets in Fluid Flux.
- Crate PDA_FluxSignedDistanceField data asset.
- Select BP_SDFVolumeDomain
- Click the right button on it and choose Script at Actor Actions -> SignedDistanceField->Export.
The exported PDA_FluxSignedDistanceField asset can be used directly in the Surface actor as BP_FluxSurface->SignedDistanceFieldMask. Remember to disable generation of the BP_SDFVolumeDomain by using the attribute AffectWorld=false or removing the Domain.
Limitations:
- SDF Domain Coverage – The SDF (Signed Distance Field) domain must cover the entire tunnel area, represented as a 3D texture. Stretching the SDF across a large scale can significantly increase memory usage. I intend to address this limitation by implementing virtual texturing in a future update.
- Spline Mesh to SDF Workflow – Baking spline meshes into the SDF is slow and involves multiple steps, which can be confusing for new users. I aim to streamline this process by transitioning the implementation to Niagara, making it more efficient and user-friendly.
- Surface Hole Cutting: Precision Cutting Holes in the Surface Using the SDF can occasionally appear imprecise. While increasing the SDF resolution can address these issues, it may also lead to excessive memory consumption that exceeds practical budgets.
Glass rendering
A glass rendering system is an advanced combination of materials that uses advanced translucency rendering in Unreal Engine.
The system is based on BP_FluxGlassActor, which implements a few functionalities and attributes shared between numerous predefined types of glass actors that can be placed on a map:
- BP_FluxGlassBox
- BP_FluxGlassSphere
- BP_FluxGlassSection
- BP_FluxGlassSphere
The glass is rendered as multiple instances of the same mesh, interpreted differently depending on the material used. Those material layers can be adjusted in glass actors:
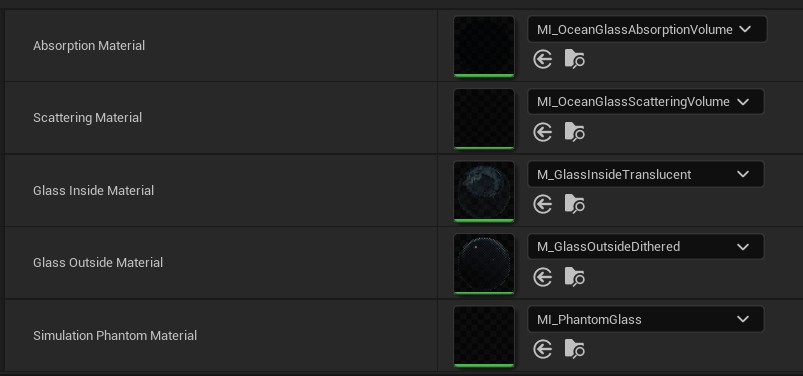
- Absorption/Scattering – is responsible for rendering the volume of water behind glass. The mesh utilizes data from the Fluid Flux surface to calculate depth and truncates the mesh in areas where water volume should not be displayed. It is rendered as two independent translucent passes, multiplicative absorption, and additive scattering. The scattering layer also supports the refraction effect of the waterline and water drops.
- Glass Inside – material used for rendering dirty glass and prebaked cube map refraction.
- Glass outside – this layer renders the dithered glass material visible outside the tunnel. It utilizes dithered transparency, which causes some smearing but improves performance, fixes bugs related to invisible glass under single-layer water surfaces, and enhances translucency sorting. This mesh is also used to render soft shadows.
- Simulation Phantom – This mesh is used to exclude the area from the simulation ground map.


 r
r