
Glitchphobia was my first game created for Epc MegaJam it was really fun experience and great opportunity to check skills and speed programing.
Author: Krystian
I'm a game developer.
Update 1.2 is ready now. One of the biggest change is new blueprint BP_AquaticSimulation that implements the simulated interactions between the water surface and environment objects.
Weapon FOV is an advanced and very useful material node that solves many issues related to the first-person character. This package will take your FPP game to industry standards like Shadow Warrior, HL2, Battlefield, Dying Light, and much more without any noticeable additional cost.
It is just one node in material calculated per vertex, so implementation is very fast. You don’t need to use an additional render target or separate pass to fix problems with a weapon.
Unreal Marketplace :
https://www.unrealengine.com/marketplace/weapon-fov
Features:
- Separate weapon FOV – You can set a custom field of view per weapon. This fixes the weapon stretching when changing the game FOV and is helpful for calibrating weapon size on the screen independently of the camera.
- Weapon depth priority – Weapon scale in camera Z-axis (depth). This feature fixes the intersection of weapons with walls. The player capsule radius can be smaller, and the weapons can be rendered over the environment.
- Near-plane clipping – Modify the near-clip plane to see more/less mesh in the camera.
- Weapon transform – Applies a custom position of the weapon in camera space.
- Effect blending – Implements the transition between FOV space and world space. It is useful for projectiles and the character’s body that is standing on the ground.
- Material node – Can be customized per weapon or controlled in global material parameter collection.
- Clean implementation – Calculated per-vertex, very fast no need to use the separate pass to fix problems with a weapon.
- Zooming effect – Change the camera FOV when the weapon stays the same. That makes scope zoom effect really easy to implement.
- NEW! Realistic sniper scope – Multiple parameters: lens refraction, aberration, overlays, etc.
Get Started
- Open material that should be rendered in special weapon FOV mode.
- Go to detail panel on the left-hand side ( Default Viewport on 4.23 )
Check ” Materials > Use Material attributes [ Bool Value ] “ to true. - Create a new node ” MakeMaterialAttributes “ and plug everything the same as how your materials work.
- Create a new materials function node ” ML_WeaponFOV “ plug into ” Material Attributes “.
- Or in case you have “ Use Material attributes = False ”in the material then put” MF_WeaponFOV “ material node before the final node in the chain.
- Here is an example of materials.

Parameters
All global parameters can be edited by ( MP_WeaponFOV [ Material Parameter Collection ] ) inside of the Weapon FOV folder.
|
MP_WeaponFOV |
|
| Weapon FOV | Custom field of view per weapon. This fixes the weapon stretching when changing the game FOV. It helps implement the zoom effect and calibrate weapon size on the screen independently of the camera. |
| Depth Scale | Weapon scale in camera Z-axis (depth). This feature fixes the intersection of weapons with walls. The player capsule radius can be smaller, and the weapons can be rendered over the environment. |
| ClipDistance | Modify near clip plane to see more/less mesh in the camera. |
| Blend Effect | Bending between enabled(1.0) and disabled(0.0) effect. |
| Weapon Offset | Transformation of the weapon into the camera space. |
Weapon FOV
A custom field of view for the mesh applied with materials fixes the weapon stretching when the field of view of the game camera has been changed to other values. This is useful for implementing the zoom effect and calibrating weapon size on the screen independently of the camera.

Clip Distance
Modify near clip plane to see more/less of mesh in the camera, This function is working same as (Near clip plane) features in Unreal Engine 4.

Depth Scale
Weapon scale in camera Z-axis (depth). This feature prevents weapons from intersecting with walls. The Player capsule radius can be small, and the weapons will still be rendered over the scene’s geometry.
Blend Effect
It implements a transition between FOV space and world space based on the distance from the camera. This is useful for projectiles and character bodies standing on the ground.
Wide Screen
By default, the engine uses Horizontal FOV ( adjusting FOV when the screen stretches on the X-axis). To enable widescreen support, you need to change how FOV is calculated in the player camera:
Camera.AspectRatioAxisContraint = Maintain-XAxisFOV
The WeaponFOV System needs to know how to interpret the constant FOV in the project.
MP_WeaponFOV.ConstantRatio = 0 This option forces the system to keep the mesh size the same when the screen is wide.
Scope Material
The WeaponFOV package in version 1.2 introduces a new feature that helps to implement sniper scope in your games.
Basically the scope implementation is base on rendering the scene to texture form second zoom camera installed inside the scope so it can be little heavy and should be used wisely
New advanced material M_ScopeLens can be found in the Utils folder.
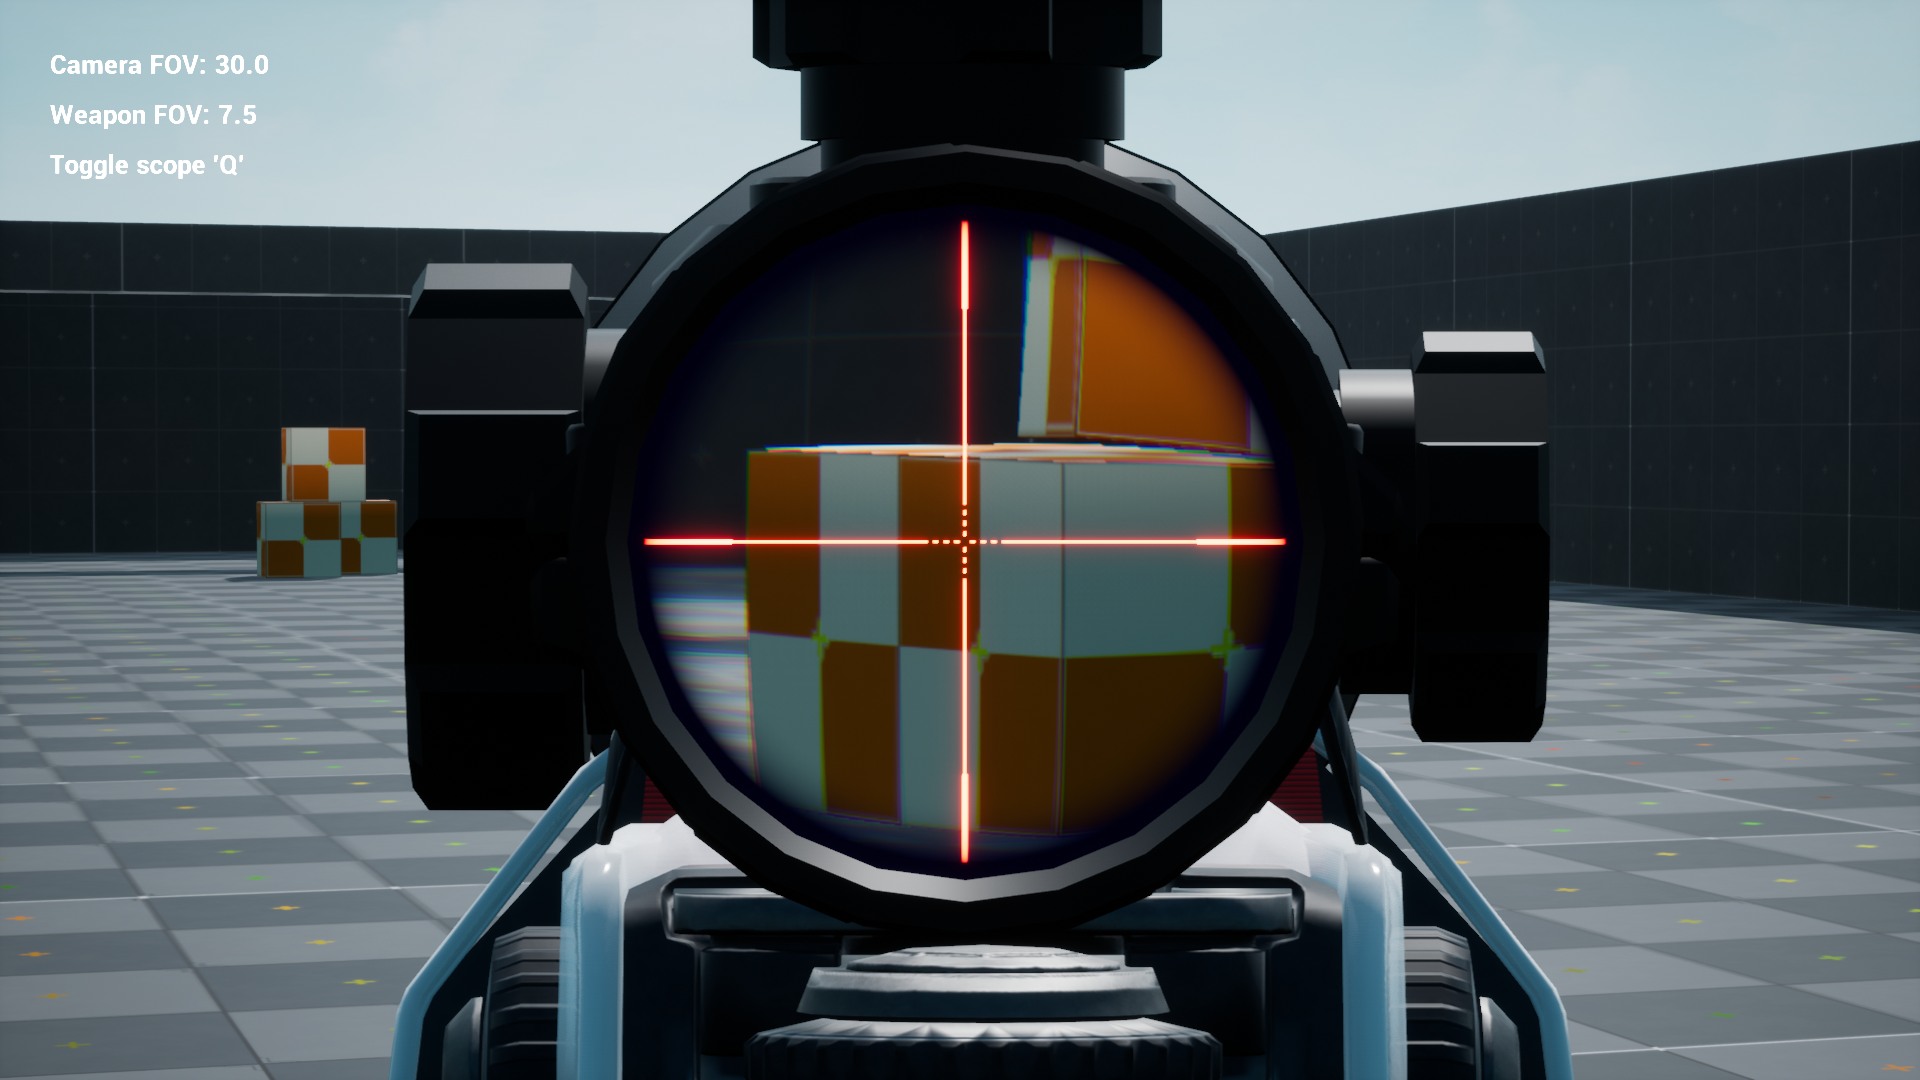
For example, the material of M_ScopeLens can be found in the Demo folder WeaponFov/Demo/Weapon/MI_ScopeLens. Multiple parterres can be modified to achieve a very realistic effect of scope all visual effects are divided into three categories Lens Layer, Overlay Layer, Circle Mask:
Circle Layer
The black circle represents the mask of effect.
|
Circle |
|
| Circle Radius | The radios of the circle mask. |
| Circle Width | Width of circle mask edge. |
| Circle Color | Color outside of the circle mask. |
| Use Circle Mask | Whether the circle mask should be used. |
Lens Layer
Distortion is used on texture rendered from the additional camera.
|
Lens |
|
| Lens | Aberration of R/G/B channel and exponential power of effect in encoded in the Alpha channel. (UseLensAberration=true) |
| Lens Color | A color multiplier of the lens texture. |
| Lens Map | Render the target of the scene. |
| Lens Refraction | Lens refraction effect scale (fisheye). (UseLensRefraction = true) |
| Specular Offset | The base secular of the lens (lens reflection) |
| Specular Scale | The secular scale of the lens out of the screen center. (lens reflection) |
Overlay Layer
The texture layer renders the telescopic sight.
|
Overlay |
|
| Overlay Alpha Source | The source channel of overlay alpha. |
| Overlay Color | The color multiplier of the overlay mask. |
| Overlay Depth Offset | Depth offset of the overlay texture. |
| Overlay position Scale UV | RG-Position, BA-Scale of overlay texture. |
| Overlay Texture | The texture is used as an overlay map. |
| Use Overlay Texture | Whether to use the overlay map. |
Advanced Mesh UV
Mesh UV is a group of advanced parameters that can be used to adjust the UV mapping of the scope projection on the screen.
|
Circle |
|
| Depth Offset | Offset scale when the circle is not centered on the screen. Use 0 for no offset. |
| Depth Scale | Scale the circle when the circle is not centered on the screen. Use 0 for no scale. |
| Pivot Direction | Pivot the direction of the scope relative to the weapon. It helps to calculate the projection of the camera texture on the screen. |
| Pivot Pivot Offset | Pivot the location of the scope relative to the weapon. It helps to calculate the projection of the camera texture on the screen. |
|
Use Component Space Pivot |
Should the circle mask be calculated in the pivot space? |
Questions & Answers
Unreal Engine 5 camera FOV is not consistent with blueprint function
Unreal 5 introduced a dynamic aspect ratio which is not supported by this product yet. You have to switch those two in the main player camera to make everything work correctly:
- Constrain Aspect Ratio = true
- AspectRatio Axis Constraint = X-Axis-FOV
The weapon mesh is disappearing (flickering). Why?
It's a known issue of the engine. Sometimes occlusion culling marks meshes as invisible so they are excluded from the rendering pipeline. It can be fixed by increasing bounds size in the mesh component (Bounds Scale) or mesh asset (Bounds Extension).
I’ve spent some time on R&D focused on resolving a few important problems with FPP weapon/hands in UE4. A material node that I’ve implemented is an (I believe better) alternative to commonly used “Panini projection” node known from Unreal Tournament project.
Why not? 🙂 I’ve just spent two days on preparing VR and mobile support in Aquatic Surface it looks like all features works. A new update is coming soon I just have to add another feature – character interaction.
My new water package is coming really soon. List of features is huge read more on the documentation page.
New update of Fast Stylized Procedural Sky is already waiting for a review on Epic Marketplace.
Fast Stylized Procedural Sky and a small sneak peak of the next update 🙂
Sometimes unlit material can look different in the mobile preview than PC. Colors are washed up or overburned and It’s really hard to tweak the emissive color to achieve the same look. This short tip describes how to get almost the same colors on mobile as on PC platform.
I’m happy to introduce a new huge update of package Anime Toon Shading.
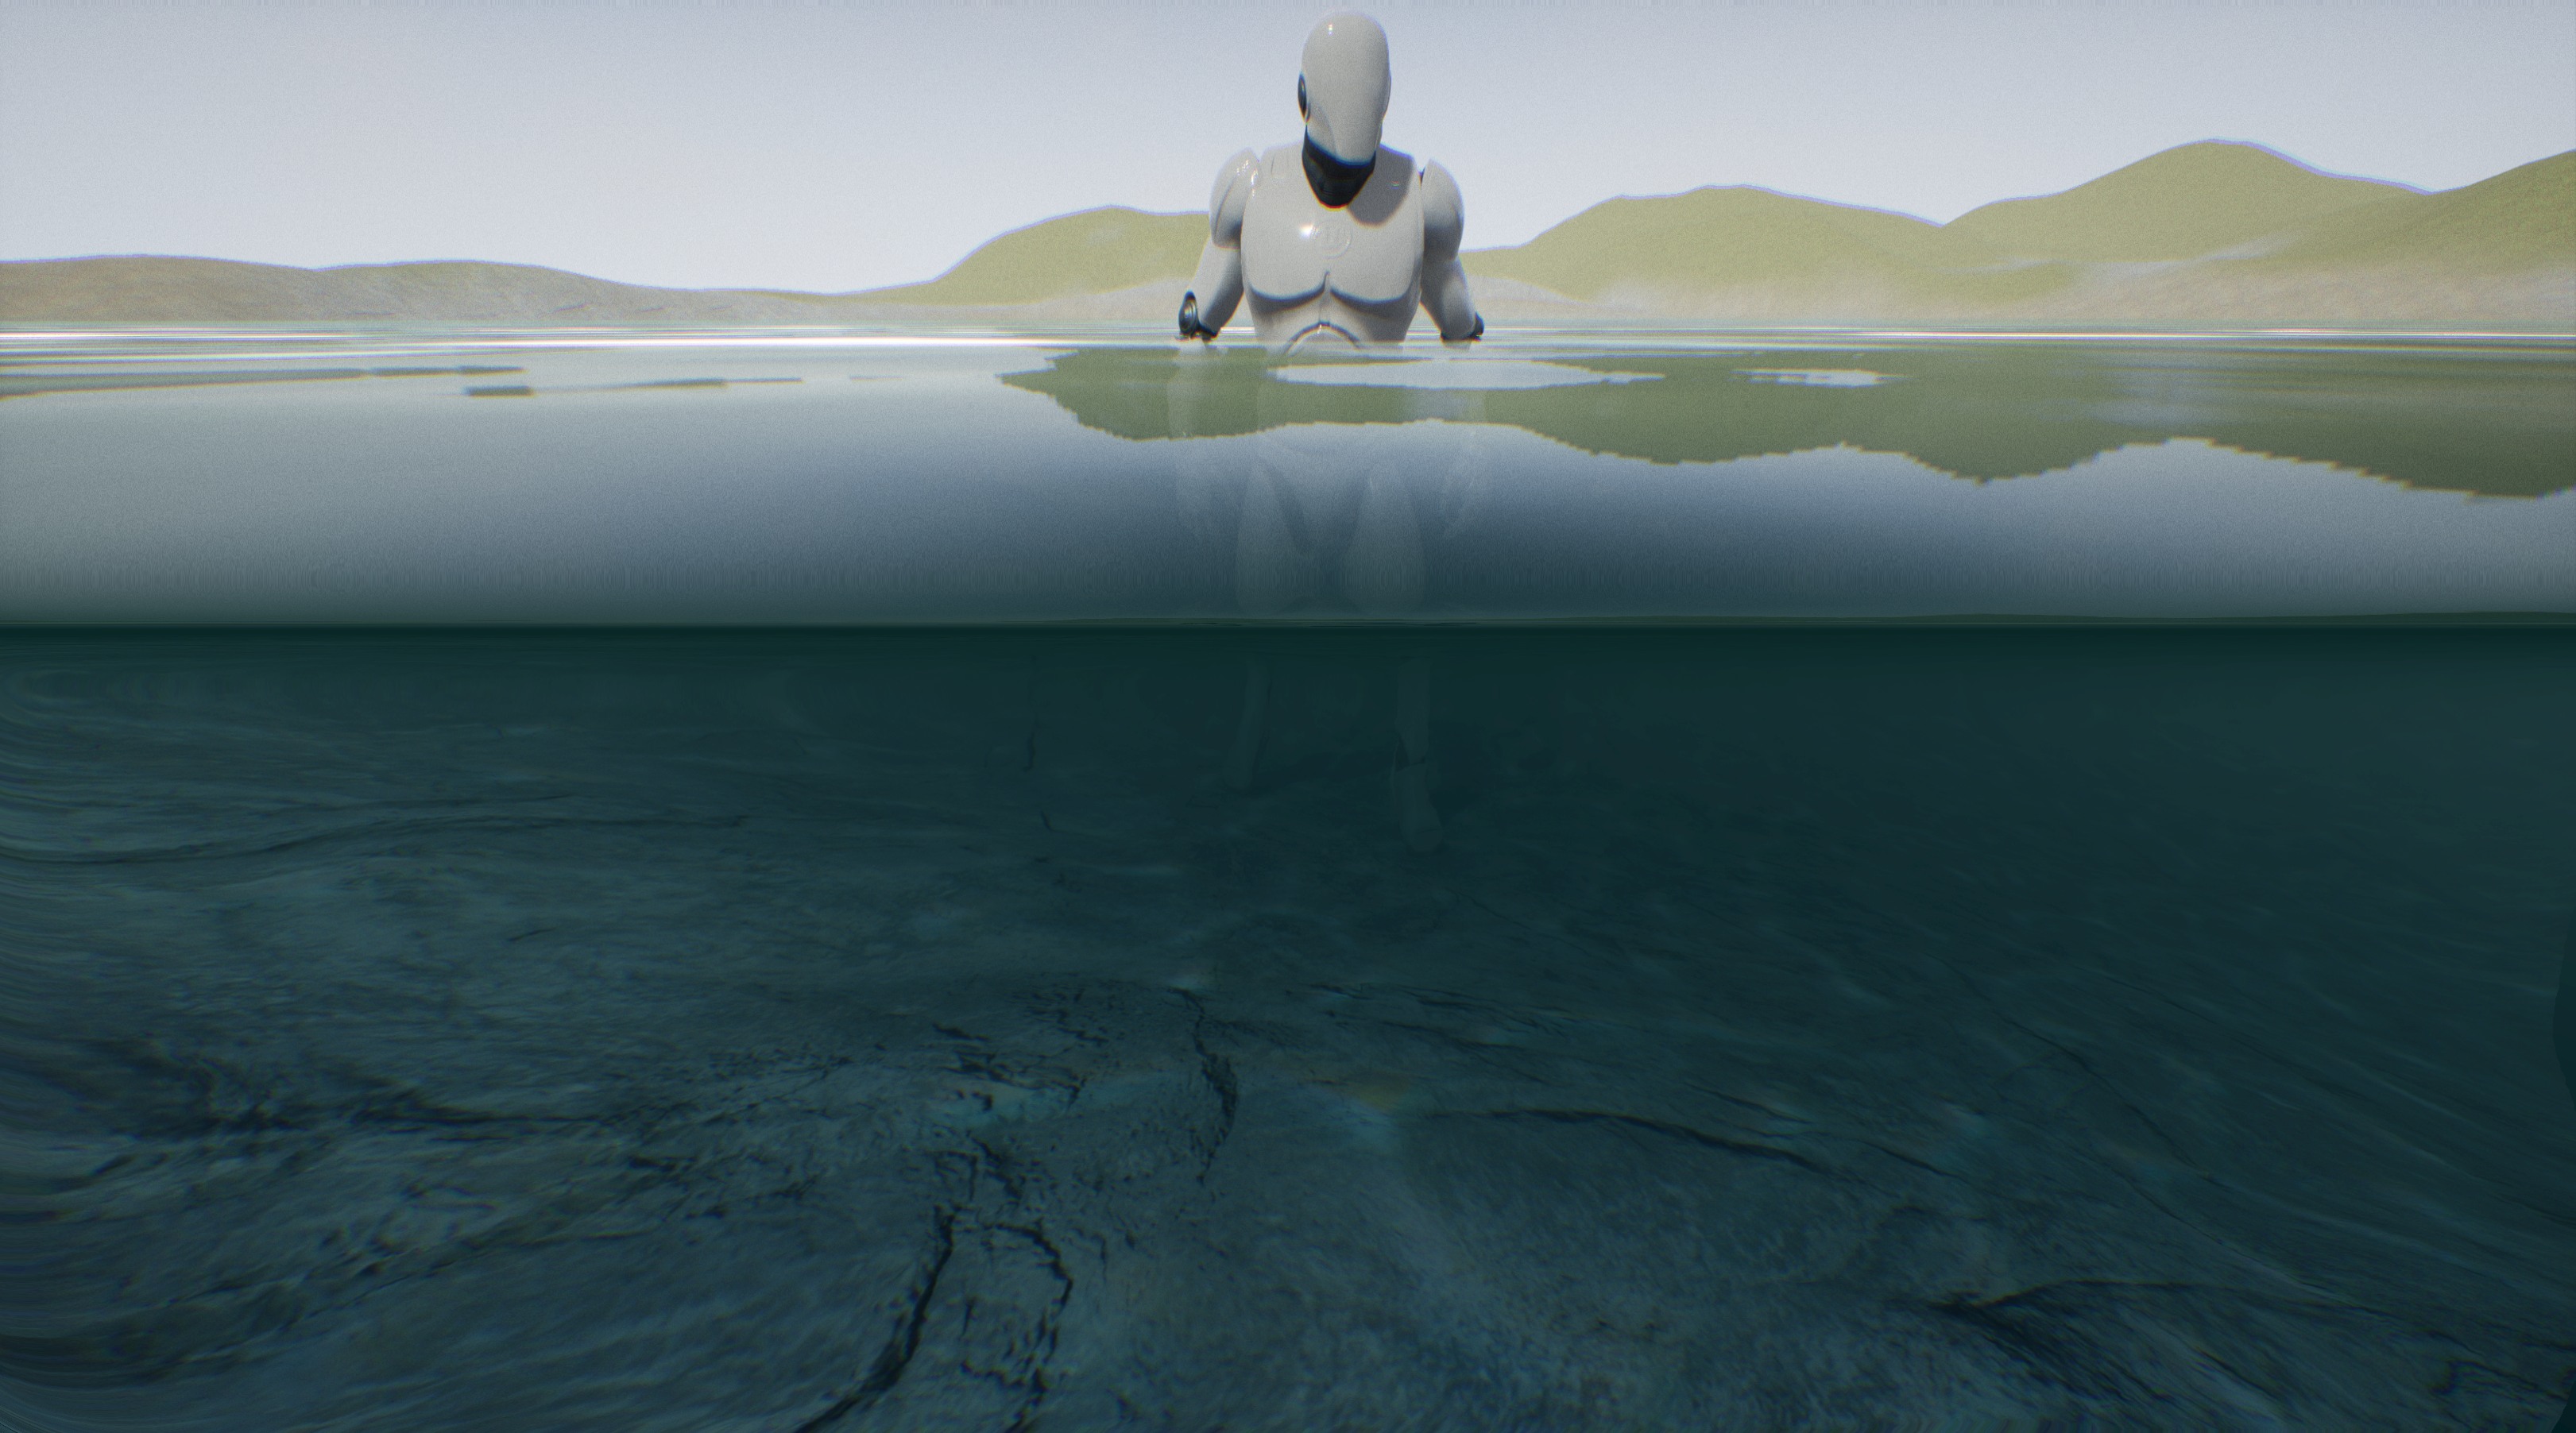
Aquatic Surface is a well optimized advanced material that implements configurable water effect.
Features
- Water clip line effect
- Underwater and over water surface
- Underwater post-process volume
- Two types of static reflection/refraction projections (box projection. spherical projection)
- Translucency effect support for underwater particles and meshes
- Water holes for boats
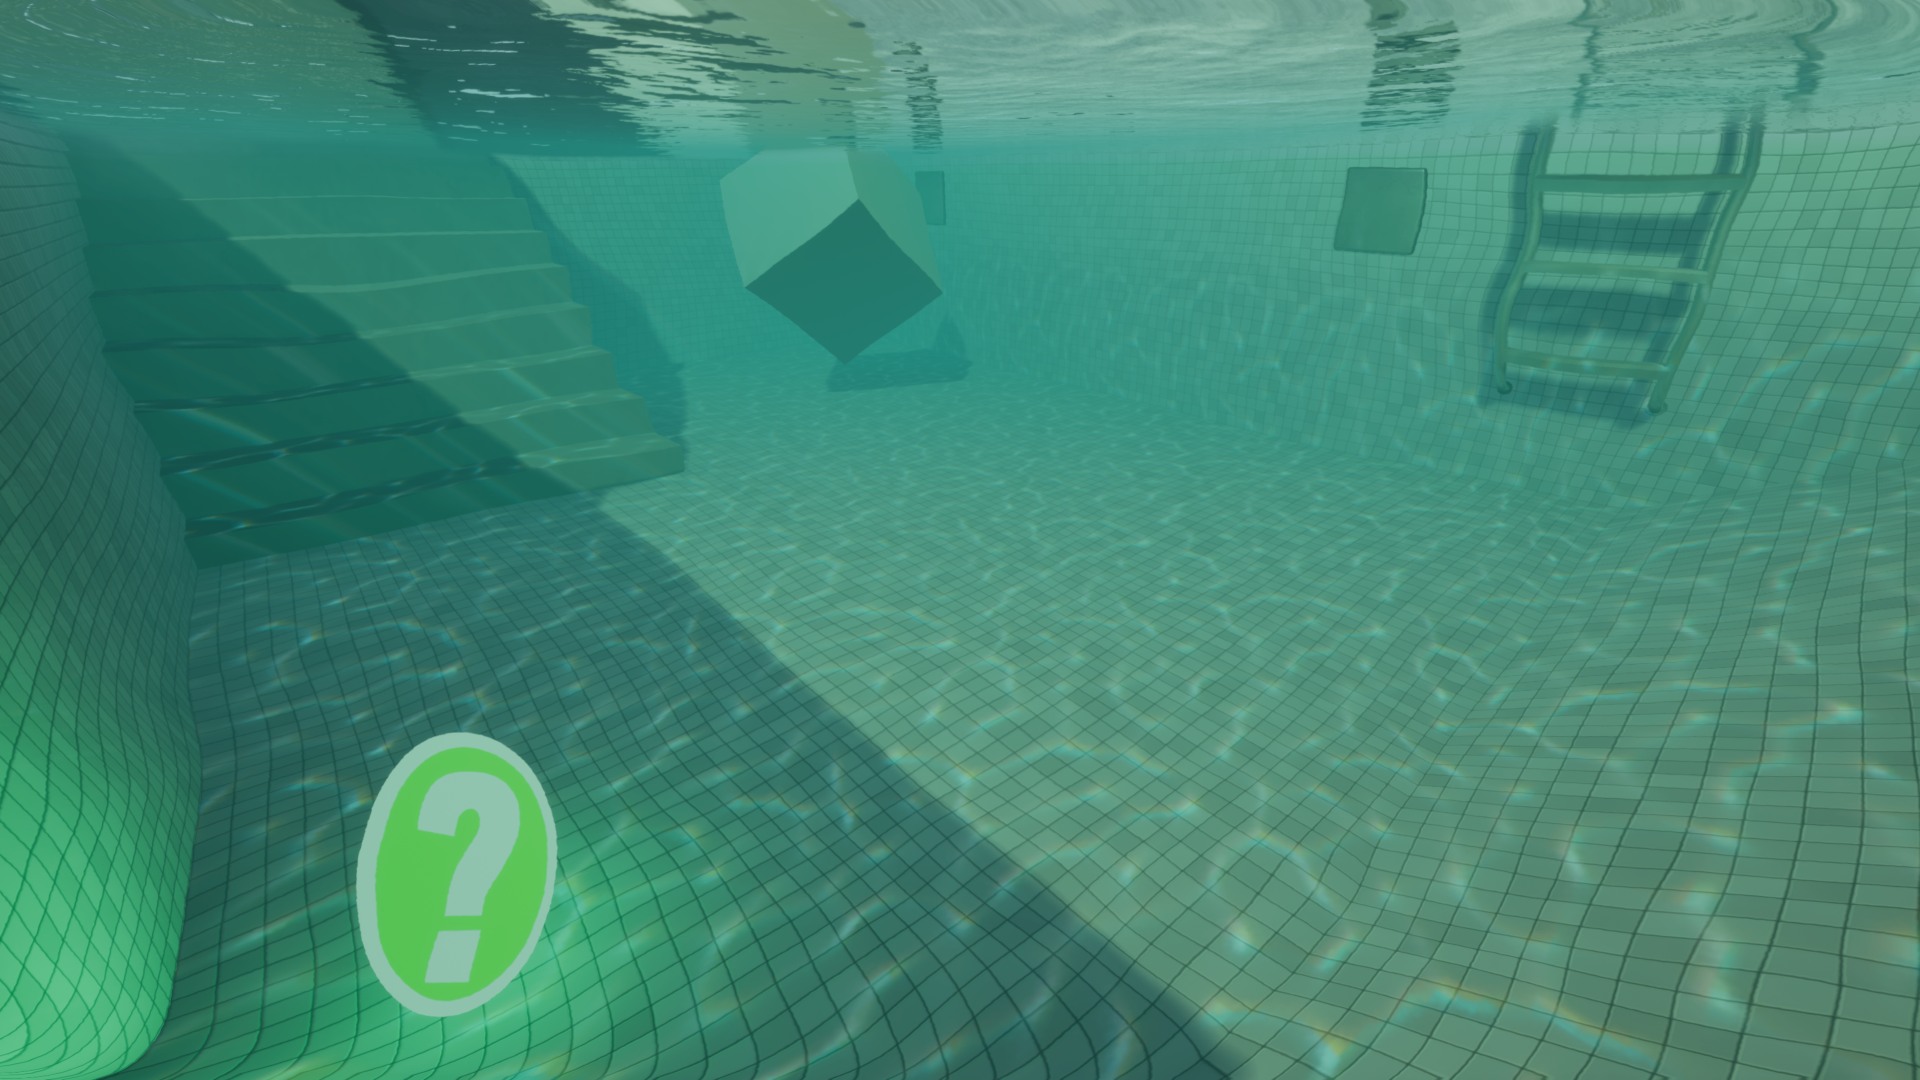
- Example 4 types of basic configurations: lake/reef/pool/waste
- Animated caustics based on decals
- Standard UV mapping, vertex color flow, and texture color flow maps
- Over 100 parameters like translucency, fog depth, mapping, reflective, refraction, scattering, wet color.
- Multiple material switches enable/disable some of the effects to increase quality/efficiency
- Separated onto 4 materials: overwater surface, underwater surface, in water post-process volume, caustics decal. Each of them can be used with other water systems.
- Very fast and GPU friendly. 120-160 instructions depend on used effects.
- Quality/Efficiency adjustment. cinematic (realistic reflections) and standard (fast static box projected cube-map)
- Water edge implemented without using the distance fields
- Specular effect and glittering on waves
- Simplified underwater scattering
- Implemented as the unlit translucent material
- Interactions & Buoyancy components
- Fast simulated interactions with moving area
- More options and switches to customize/optimize than you can try during your whole life 🙂
Gallery


Release changelog
Aquatic Surface Roadmap
List of features planned in a future version of the package. Sorted by priorities:
- Per-vertex wave animation (oceans)
- 2D Platformer water clip plane effect
- Better coast effect, waves with foam
- Far distance cube-map for large-scale maps
- Reflection plane support
- Character swimming
- In boat underwater volume clipping
- Underwater post-process blur
- Postprocess water drops on the screen when leaving the water
- The wet material on the character drying effect.
- River and sloping surfaces
- Wet sand footprints
- Caustics generator
- Wave noise texture generator
- Flow mesh/flow map generator
If you have any suggestions please mail me or leave a comment.
Version 1.2 (05.11.2018)
- Fast simulated water interaction effect (single RT update 0.05 ms).
- Added water interaction component that can be connected to every dynamic actor.
- Added Lit water material template (no SSR only reflection captures).
- Added caustics distortion
- Water interaction works on underwater planes too
- Lake map interaction example
- Added underwater coast effect.
- Fixed underwater refraction quality
- Fixed lit material normal-map transform
- Fixed texture flowmap UV
Version 1.1 (08.10.2018)
New features:
- Mobile Support
- VR support
- HTML support O_O
- Simple fast buoyancy component
- Better fast material lighting
Changes:
- Distance Fade disabled in axis z
- Locked Blueprint scale Z (please modify parameters to change height)
- Water coast fixes
- Better refraction effect
- Optimizations in materials and ticks
- Changed translucent material to precomputed alpha
- Better autoexposure blend
Version 1.0 (27.09.2018)
- Aquatic surface package released
Documentation
Get started
In Aquatic Surface package the water visualization is divided into multiple specialized material effects. Each layer of the effect can be separately configured to achieve incredible effects and can be used individually.
- Overwater surface (M_AquaticOverWater)
- Underwater surface (M_AquaticUnderWater)
- Pre-translucent volume water (M_AquaticVolume)
- Post-process screen water (M_AquaticScreen)
- Caustics decal (M_AquaticCaustic)
- Waterplane holes for boats (M_AquaticHole)
- Material function fo translucent meshes (MF_AquaticTranslucent)
Demo folder contains all assets prepared to showcase the example Maps. Check the example maps to see the possibilities of the Aquatic Surface system.
Each example map uses its own template of water materials located in Template folder like Like/Reef/Pool. A template is a group of material instances created from Aquatic Surface master materials. For example, in folder Demo/Lake you can find material instances of materials used on LakeMap. Those materials can be easily edited to achieve another visualization of lake water.
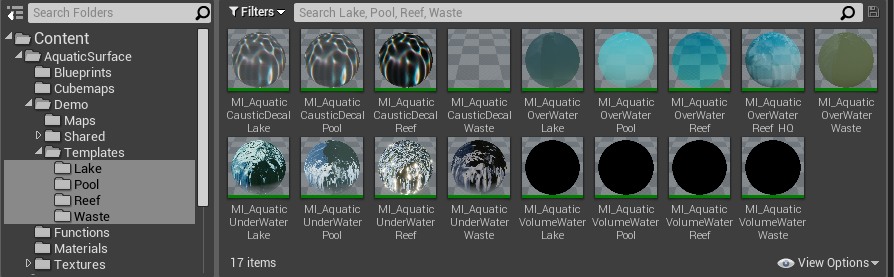
You can create your own material instances of water by duplicating the chosen template content or by using the editor option “Create Material Instance” on master materials located in Material directory.
Few simple steps to start using Aquatic Surface:
- Chose the template of Aquatic Surface water that you want to use on your map. For example AquaticSurface/Demo/Templates/Reef.
- Drop the blueprint (/Demo/Templates/Reef/BP_AquaticSurface_Reef) of water on your level.
- Modify the parameters of the blueprint to adjust the water to your map. Especially it is important to set up bounds of reflection overwater/underwater and post-process volume size. A detailed description can be found in Aquatic Surface Blueprint section.
Aquatic Surface Blueprint
The BP_AquaticSurfce is a combination of underwater overwater and post-process materials that provides a user-friendly interface to configure water.
| BP_AquaticSurface | |
| Reconstruct | Click to refresh the reflection texture and material parameters. Reconstruct the object. |
| Over Water Material | The material instance used on over the water surface. |
| Under Water Material | The material instance used on under the water surface. |
| Volume Material | Material instance used as fog volume of water. |
| Near Plane Distance | Clip plane distance. By default 10. |
| Volume Box Extend | Underwater pre-translucent volume box size. |
| Volume Box Location | Underwater pre-translucent volume box location. |
| Volume Fog Density | The density of the underwater fog |
| Volume Fog Base | The distance of underwater fog near plane |
| Reflection External | External blueprint of reflection that can be shared between multiple water surfaces. |
| Reflection Cubemap | Static cube map reflection. |
| Hidden In Reflection | List of actors not rendered to reflection. |
| Reflection Capture Delay | Allows capturing reflection after start witch some small delay (after the content is loaded). The -1 value – never recapture. |
| Reflection Source Location | The point where the reflection capture was taken. |
| Reflection Box Over Extend | The size of the box used for surrounding cubemap used as over water. |
| Reflection Box Over Location | The central location of the box used for surrounding cubemap used in the underwater material. |
| Reflection Box Under Extend | The size of the box used for surrounding cubemap used as over water. |
| Reflection Box Under Location | The central location of the box used for surrounding cubemap used in the underwater material. |
Pay attention that M_AquaticScreen material should be set in PostProcess component in PostProcessMaterials array.
Over Water Surface
The M_AquaticOverWater is the material effect visible from over the water reflection refraction fresnel and depth. This material should be used on plane meshes aligned horizontally with normals directed upward.
- Find the M_AquaticOverWater* material that you want to modify from the example library of materials.
- Click right select duplicate option on the material. Rename to your water. It is good practice to have a clean naming convention like M_AquaticOverWater+River/Lake/Ocean.
- Put on your scene flat plane surface and apply the newly created material.
- Open created material and edit parameters to customize for your scene.
| Overwater Base Color | |
| Fog Base | Specifies the covering at which fog should starts. |
| Fog Density | Cover by fog depending on depth change. |
| Fog Color | Fog color when a mesh is fully covered. |
| Use Fog Exp 2 |
The exponential types provide more depth, more natural-looking fog, and make the edges appear smoother. When disabled fog works in linear mode. |
| Scattering Color | Fog color near the coast |
| Shadow Color | The color multiplier on the ground from water shadow. |
| Wet Color | The color multiplier on the ground for simulating the wet material. |
|
Overwater Refraction |
|
| EmissiveReflection | 0.0 Reflection will be applied to the base color when 1.0 it will be added to emissive. Parameter allows controlling how much sun color can affect the reflection. |
| Refraction Color | Surface refraction color multiplier. |
| Use Shlick Reflection | Enables physical-based Shlicks fresnel calculations. Otherwise uses dot(camera, normal) based scale. |
| Reflection Exp | Exponential reflection. In the Shlick’s model of reflection, it is 5. |
| Box Projection Extend | Size of box projection. |
| Use Box Projection | Allows using box projection mapping. If disabled then the system uses standard spherical cube-map projection. |
| Cubemap | Cubemap texture used on objects. By default connected to render target. Textures should be prebaked and saved in content. |
| Use Multireflection | Blocks reflected rays from sampling the cube-map under the water, reflects the ray again. It gives better results when using very high waves. |
| Overwater Sun | |
| Use Sun | Allows using second normal texture source. |
| Use Sun Half Vector | An alternative method of calculating specular reflection based on half vector instead of reflection. Little different result. |
| Sun Color | Color fo highlights. |
| Sun Intensity | The intensity of highlights. |
| Sun Shininess | The shininess specifies how small the highlights are: the shinier, the smaller the highlights. |
| Glittering Power | High power of glittering increases lighting points intensity. |
| Glittering From Sun | How the position of the sun affects the Glittering effect. |
| Glittering Clamp | Max glittering emissive value. |
| Overwater Translucent | |
| Refraction | Simplified refraction effect based on UV shifting on waves. |
| Translucency | Alpha blend translucency on the coast. Should be very low it conflicts with the refraction effect. |
| Use Coast Foam | Activates additional coast foam effect. |
| Coat Foam Color | Coast foam color multiplier. Width in the alpha channel. |
| Use Distance Fade | Activates translucent fade effect on the horizon. |
| Distance Fade Min | Minimum distance from the camera to start fade. |
| Distance Fade Width | The width of a fading area. |
Under Water Surface
The M_AquaticUnderWater is a waterplane surface rendered from under the water. This material mainly represents the effect of refraction and reflection under the water. This material should be used on plane meshes aligned horizontally with normals directed down.
- Find the M_AquaticUnderWater* material that you want to modify from the example library of materials.
- Click right select duplicate option on the material. Rename to your water. It is good practice to have a clean naming convention like M_AquaticUnderWater+River/Lake/Ocean.
- Put on your scene flat plane surface and apply the newly created material.
- Open created material and edit parameters to customize for your scene.
|
Underwater Refraction |
|
| Refraction | Refraction coefficient <1.0, 2.0>. |
| Refraction Color | Surface refraction color multiplier. |
| Box Projection Extend | Size of box projection. |
| Use Box Projection | Allows using box projection mapping. If disabled then the system uses standard spherical cube-map projection. |
| Cubemap | Cubemap texture used on objects. By default connected to render target. Textures should be prebaked and saved in content. |
| Screen Refraction | A coefficient of screen color refraction. Makes that meshes close to the camera can be seen from underwater. |
| Use Sun Specular | Allows using sun specular effect. |
| Sun Specular Shininess | Shininess parameter of the sun. |
| Sun Color | Sun color multiplier. Scale encoded in the alpha parameter. |
Pre-translucent volume water
The M_AquaticVolumeWater is a custom post-process effect rendered before translucent. Ths material visualizes the underwater ‘fog’ and wet surface.
The fog parameters should be set in BP_AquaticSurfce blueprint because these parameters are shared between multiple materials (like translucent).
| Post-process fog | |
| Use Fog | Allows using the build-in fog effect. |
| Fog Color | Sets the color of fog. |
| Fog Density | Cover by fog depending on depth change. |
| Fog Base | Specifies the covering at which fog should starts. |
| Use Fog Exp 2 | The exponential types provide more natural-looking fog and make the edges appear smoother. When disabled fog works in linear mode. |
| Use Fog Scattering | Allow to using the second color of fog near the water surface. |
| Fog Color Scattering | The second color of fog near the water surface |
| Fog Scattering Scale | Scale config of the scattering color effect. |
| Fog Scattering Shift | Shift config of the scattering color effect. |
| Fog Scattering Width | Width config of the scattering color effect. |
| Use Fog Wet Surface | A color multiplier of the wet geometry near the surface fo water. |
| Fog Wet Color Surface | A color multiplier of the wet geometry near the surface fo water. |
| Fog Wet Color | Color multiplier f the wet geometry. |
Post-process water
The M_AquaticScreenWater a post-process effect that visualizes the distortion vignette and water plane clipping line. This material should be used in the post-process volume.
| Post-process waterline | |
| Use Water Line | Allows displaying waterline effect. Can be disabled to optimize if you are not going to display the waterline (for example when the game is located fully underwater). |
| Use Water Line Refraction | Allows displaying water line distortion effect. |
| Use Water Line Exp | Allows using exponential waterline cover and distortion. |
| Use Water Line Noise | Additional noise from full-screen texture can be used on the waterline (experimental). |
| Water Line Color | The color multiplier for waterline effect. |
| Water Line Refraction | Waterline refraction scale (better results with small negative values). |
| Water Line Refraction Width | The width of the refraction effect. Fade in distance from the waterline. |
| Water Line Width |
The width of the water line on the screen. |
| Post-process Screen | |
| Use Texture Distortion | Allows using underwater full-screen distortion effect. |
| Use Vignette | Allows using underwater vignette effect. |
| Use Vignette Distortion | Allows using underwater vignette distortion effect. |
| Vignette Distortion | Vignette distortion scale. |
| Vignette Dark | The scale of vignette dark color. |
| Vignette Edge | Hard/soft edge of vignette color |
Caustics decal
The M_AquaticCausticDecal material is the effect of caustics projected on the ground. The effect is animated using a simplified method based on animated textures. Caustics animation using a looped cycle based on 16 frames. Caustics decal should be used wich blueprint BP_AquaticCausticDecal prepared especially to update the animation.
- Find the M_AquaticCaustic* material that you want to modify from the example library of materials.
- Click right select duplicate option on the material. Rename to your water. It is good practice to have a clean naming convention like M_AquaticUnderWater+River/Lake/Ocean.
- Drag and drop Blueprints/BP_AquaticCausticDecal on your scene.
- Set created material to the Dynamic Material parameter in BP_AquaticCausticDecal on your scene.
- Open created material and edit parameters to customize for your scene.
|
BP_AquaticCausticDecal |
|
| Light source | Decal casting direction. Directional light from the scene. |
| Textures | List of textures used in decal animation. Animated caustics. |
| Animation Speed | Caustics animation speed (frames per second). |
| Dynamic Material | The material of caustic M_AquaticCaustic to use. |
| UV Scale | Caustics texture UV scale. |
| UV Move | Caustics texture UV movement in time. |
| M_AquaticCaustic | |
| Color | Caustic color multiplier. Saturation power encoded in the alpha channel. |
| Blur Max | Castaic maximal mipmap level used near the coast. |
| Blur Width | Caustics blending width from Max (near water plane) to 0(deep in water) |
| Emissive | Additional emissive lighting effect in the shape of caustics. |
| Shadow | Darkening around the caustics (water plane shadow) |
| Shadow Fade Width | Transition length from No shadow(near water plane) to shadowed (deep in water). |
| Sun Fade Scale | Only faces directed in front of the sun will be covered by caustics. This parameter allows scaling the disappearing. |
| Sun Fade Shift | Only faces directed in front of the sun will be covered by caustics. This parameter allows shifting the start point of disappearing. |
| Saturation | The saturation of caustics texture. |
| Use Wet Reflection | Allows using specular reflection on the wet ground. |
| Wet Reflection | The intensity of specular reflection on the wet ground. |
| Use Water Hight Clip | Allows using clipping the decal effect by water plane. Fixes visibility when the decal projection is the higher than the water plane. |
| Water Height | Waterplane height on the scene. |
| Water Height Fade | Fade of decal near the water plane. |
UV mapping and normals
Wave effect is based on two moving normal maps. The system supports two types of wave effect animation in UV Transform and Water Flow. To switch between these two types of UV just change Use Flowmap option in the material. UV animation is supported by overwater surface as well as the underwater surface.
|
UVMapping parameters |
|
|
Use Flowmap |
Refraction coefficient <1.0, 2.0>. |
|
Use Flowmap Texture |
Use the flow-map texture instead of vertex colors. |
|
Flowmap UV Config |
R and G is an X and Y axis speed of layers. The directions can be inverted as negative. Parameter B is the time scale of a flow map cycle. Parameter A scales the flow map UV. |
|
UV Move Sale 1 |
The parameters R and G represent the movement on axes X and Y of UV map 1. The parameter B scales the UV. |
|
UV Move Sale 2 |
The parameters R and G represent the movement on axes X and Y of UV map 2. The parameter B scales the UV. |
|
Use UV Tex Coord/Use UV Tex Coord 1 |
Use UV Texture coordinates instead of world space position. Can be useful for rivers witch specific mapping. |
|
UseBlendNormalAdvanced, UseBlendNormalUDN |
Changes the normal map blending types. There are three types of normal map waves blending. Standard linear (fast), advanced whiteout /UDN. Read more: Blending modes. |
| Normal mapping | |
| Normal Scale | Scales the normal vectors. Allow making waves higher or more flat (change B value to higher to make it flat). |
| Normal Texture | Normal texture source. |
| Use Normal Texture 2 | Allows using second normal texture source. |
| Normal Texture 2 | Second normal texture source. |
UV transform
UV Transform mode is the fastest and simpler method just moving and scaling the normal map layers UV coordinates in time. This mode is enabled when UseFlowMap is set to false. In this mode, two scaled layers of normal maps are moving linearly in a defined direction. The configuration of movement speed and scale can be changed in UV Move Sale 1 and UV Move Sale 2 parameter.
Water Flow
Water flow is one of the coolest methods of water animation, first introduced in Portal 2 presented on SIGGRAPH 2010.
The basic idea in this method is to move the UV of the water textures according to direction vectors drawn on the surface.
This package supports rendering water witch two methods of flow colors, vertex color, and flow map texture. Each method has some advantages and disadvantages described below:
| Vertex-based | Texture-based | |
| Efficiency | High | Low |
| Requirements | Additional mesh divisions | Additional texture per object |
| Editor | UE4 vertex painter -it is not | External Tool |
Flow-tools
Texture-based flow mode uses textures that can be prepared in an external tool like FlowMap Painter. Those textures should be loaded as vector displacement maps because of data precision that is important to achieve the best possible visual effect. There will be a special tool for creating flow map textures in Unreal Engine Editor in the future version of the Aquatic Surface package.
Vertex-based flow mode is the more interesting feature because does not require any additional textures only mesh used for effect should be tesselated (divided on multiple triangles). You have to decide how many verticles do you need to draw your flow on the mesh.
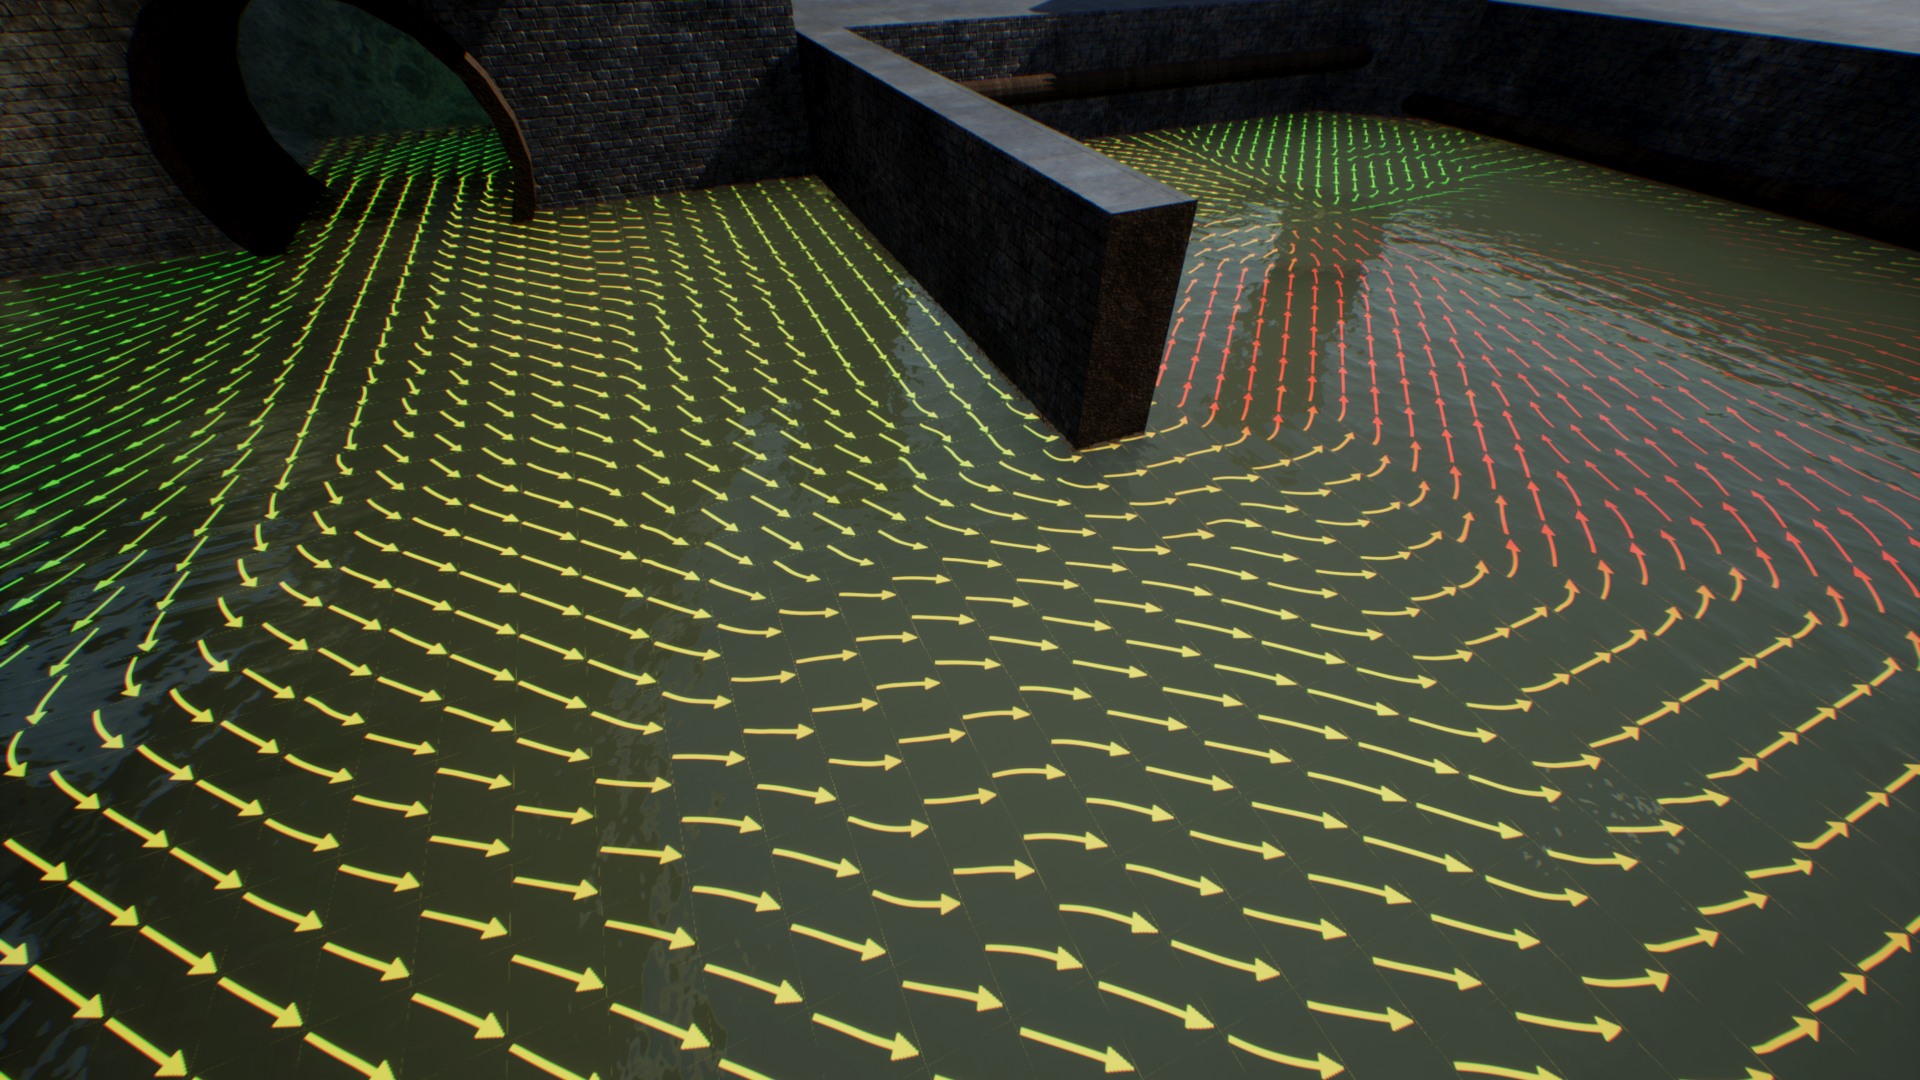
Editing vertex flow
The process of editing water flow per-vertex is a little inconvenient because there is no tool for this in UE4 editor. I didn’t want to transform this package into a vertex-flow editor plugin because it’s not the idea of Aquatic Surface. I’ve decided to use Vertex Paint editor and create additional tools for previewing the results of changes that make the whole process a little more convenient.
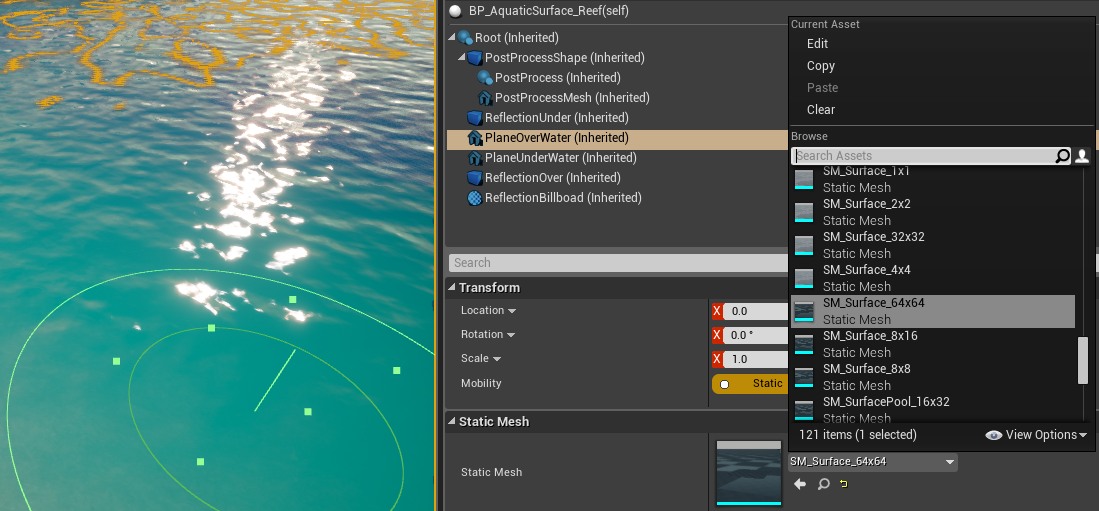
- Switch the option UseFlowMap to true to use the flow map feature on water.
- Change mesh density according to your requirements of precision. If the material is not reacting on vertex color brush then probably you should use mesh with higher density and select the mesh component to paint.
- Switch the option UseFlowmapToolthe to true in the overwater material to see debug vertex flow preview.
- Select the mesh to paint on.
- Chose Vertex Paint tool in the UE4 editor
- Setup the paint color R and G according to the table of vectors below:
(0.0, 1.0,) UP (0.5, 1.0) (1.0, 1.0) LEFT (0.0, 0.5,) ZERO (0.5, 0.5) RIGHT (1.0, 0.5) (0.0, 0.0) DOWN (0.5, 0.0) (1.0, 0.0) - Paint on the mesh
- Use random value on the blue channel to force noisy transition between normalmaps.
- After finished work, you have to propagate changes to mesh to save the data.
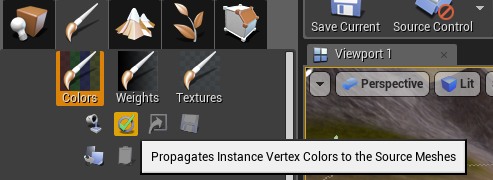
Unreal Engine 4 has some troubles with using dynamic vertex colors on actors so propagation is required to run vertex colors in the standalone version of the game. It’s inconvenient because you will have to do copies of every water surface that using vertex flow. You can speed up resolving this issue by voting on my bug fix request: https://issues.unrealengine.com/issue/UE-64354
Translucent under the water
The Aquatic Surface package supports translucent materials. This effect is very limited by the material system and requires to add special material node MF_AquaticSurface to the translucent material that will be used on an object in the water. This effect is implemented by fading the translucent objects depends on the distance from the camera.
There are three examples of material created for use under the water:
- M_TranslucentAdvanced – Advanced translucent effect calculated per pixel. It can be slow but very accurate.
- M_TranslucentFast – This material is using Vertex Interpolation. It’s a fast method to implement this effect.
- M_TranslucentDither – Traditional dither material used in UE4.
Translicent example, particles(fast) and box (accurate).
Reflections
Aquatic Surface supports multiple types of reflections. Table below shows differences between all approaches:
| Reflection type | Efficiency | World | Scene type | Material type |
| Cube-map | Very fast | Static | closed area, lakes pools | M_AquaticSurface_Unlit, M_AquaticSurface_LIT |
| Reflection capture | Fast | Static | all | M_AquaticSurface_LIT |
| SSR | Slow | Dynamic | all | M_AquaticSurface_SSR |
| Planar reflection | Slow | Dynamic | all | M_AquaticSurface_SSR, M_AquaticSurface_LIT |
The type of material is specified in the Parent attribute of the material used as OverWaterMaterial in BP_AquaticSuraface. It’s good practice to use _Unlit, _Lit, _SSR post-fix in water surface material names.
Static cube-map reflections
All BP_AquaticSurface actors use the same shared Render Target reflection texture so it is not possible to generate the textures for multiple water reflections at the same time. However, the system can be set to use static pre-baked cube maps and it solves that problem.
Step by step how to create and use the static cubemaps:
- Select the water actor on the scene.
- Find the reflection tab in the properties of water actor
- Clear the Static Reflection Cubemap value if is set. This will force the system to render reflection into the cube-map texture.
- Click reconstruct button to refresh the texture.
- Find /Game/AquaticSurface/Textures/Cubemaps/RT_AquaticCubemap
- Click right button on the RT_AquaticCubemap and from the context menu chose the Create Static Texture
- Set the newly created texture into the Static Reflection cube-map parameter in an Aquatic Surface actor.
- Repeat all steps for all Aquatic Surface actors on the scene.
Probably you have some questions. For example WHY the hell I have to do this? Thanks to using static cube map textures your game will load and work very fast even on mobile and VR. It’s far better solution than dynamic reflections used in other water systems.
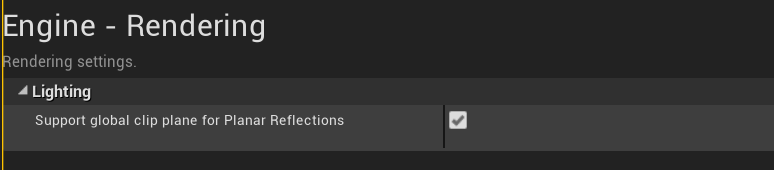
Dynamic planar reflections
Aquatic Surface can be easily set to use dynamic planar reflections.
- Select BP_AquaticSurface on your map.
- Switch UsePlaneReflection attribute to true.
- Change OverWaterMaterial attribute to material that supports dynamic reflections (with post-fix _SSR or _LIT (for example MI_AquaticOverWaterOcean_LIT)
- Open project settings and search for “Planar Reflections” switch the “Support global clip plane for Planar Reflections” to true.
- Save and restart the editor.
Hole in water plane
There is a simple solution for holes in water planes that can be used for boats. You just have to create a mesh that will be rendered inside the boat and use material M_AuaticHole. Check the example boat.
This feature requires screen color sampling so it is not supported on mobile platform.
Interactions
Aquatic surface supports the interactive surface effect based on physics simulation in a quality comparable to current-gen games. The basic configuration is presented in the video below (LakeMap):
- Set UseInteraction=true parameter in the overwater/underwater material used in the water surface.
- Drag and drop BP_AquaticSimulation actor on the scene.
- Set parameters of the BP_AquaticSimulation. Add the BP_AquaticSurface from the scene to the AquaticSurface list.
- Add the BP_AquaticInteration component to the actor that is going to interact with water.
| BP_AquaticSimulation | |
| AreaSize | Size of simulation area. |
| AquaticSurfaces | List of surfaces managed in the simulation. |
| Interp Speed | The speed of simulation area interpolation to important place on the map (where something is moving in water). |
| DrawDebug | Preview the are of simulation. |
| Animation Rate | FPS of simulation. |
| Wave Travel Speed | Simulated wave speed. |
| Wave Damping | Simulated wave sampling |
| Wave Normal Scale | Normal-map wave vector scale. |
| Materials | Three render target textures used for rendering the simulation. Can be replaced by textures with a higher resolution. |
Aquatic simulation reacts on two types of interactions:
- Component-Based – Actors that contains BP_AquaticInteration will be registered in the water surface and make waves when moving. Check the example Character blueprint with left/right foot interactions connected to the foot bones in the construction script.
- Event-Based – Interaction can be generated on the event for example hit/explosion by executing the AddInteraction function on Simulation blueprint. The simple example presented in LakeMap level blueprint.
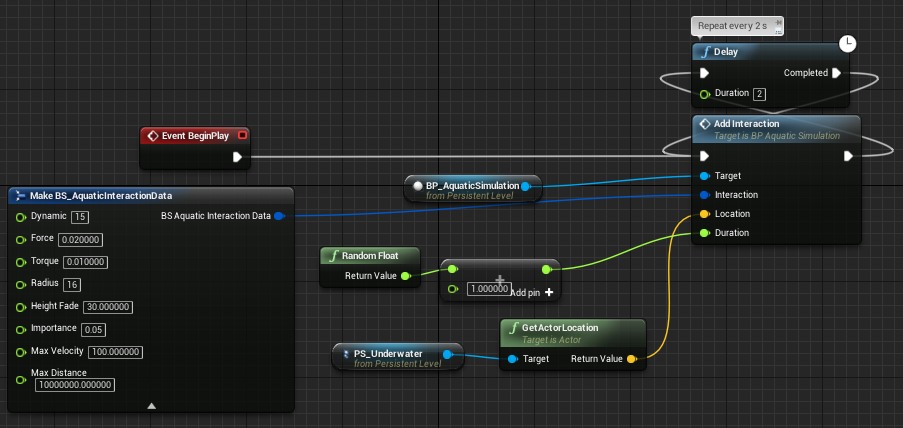
| BP_AquaticInteraction | |
| Dynamic | Noise added when actor stays in place. |
| Force | How much location change generates waves. |
| Torque | How much rotation change generates the waves. |
| Radius | The radius of the interactive object |
| Height Fade | Fade out of interaction when it is far from the surface. |
| Importance | Bigger importance means that the region should be moved to show the effect. |
| Max Velocity | Max velocity of waves generated from this interaction. Allow clapping the forces. |
| Max Distance | Max distance from interaction to the center of the simulation area. Useful for a player that should always interact with water. |
How fast it is where is a bottleneck? It takes about 0.06ms per frame for render the simulation in 256×256 texture that result is reasonable even for VR games. Update of the interaction component is the biggest bottleneck of the algorithm because of the slow math evaluation in the blueprints. That is why you should consider minimization the number of interaction components in actors or aquatic simulation blueprint nativization.
Buoyancy
Aquatic Surface supports a fast simplified buoyancy system for physics actors. An example of using buoyancy is presented in the BP_AquaticBuoyancyActor.
- Add BP_AquaticBuoyancy to your physics-based actor
- Set the parameters of an added component
| BP_AquaticBuoyancy | |
| Shape | The shape of the object that will be reacting to water. Cone shape is the best choice for Boats – if deeper is object the force of buoyancy will be higher. |
| Shape Radius | Used for calculating the density of the object. |
| Linear/Angular Damping | Allow controlling how much object is slowing down in the water. |
| Center of mass | The position where the force is applied to the object. Boats should transfer the center of the upper higher to be more stable. |
| Force scale | Scales the force applied to the physics object. |