
Introduction
- Category: Blueprints
- Update: 1.0 (011.02.2020)
- Unreal Engine: 4.18 - 4.24
- Platforms: VR, PC, Console, HTML
Description
Lightning Fast is a powerful combination of materials and blueprints that implements a wide range of realistic and stylized electricity effects.
Lightning effects have plenty of uses in games, from background ambiance during a storm, and electric fences to devastating lightning guns and spells. This system is designed in mind to achieve all those effects with high performance, and AAA quality at the same time.
Supported effects:
- lightning flashes
- lightning bolts
- lightning chains
- lightning strikes
- lightning discharges
- lightning beams
- lightning trails
- lightning guns
- lightning electrocute
Features:
- GPU-friendly and optimized for all platforms
- Wide range of high-quality effects
- Two types o beam rendering (spline mesh/spline billboard mesh)
- Integrated with UE4 dynamic lights and material light functions and splines
- Over a hundred parameters in materials to customize the final effect
- Spline spline-based shape of the bolt easy to adjust to the scene
- Character electrocute discharges effect
- Advanced lightning mesh editor tools
- Multiple animated lines rendered in a single beam
- Depth fade/direction fade effect
- Glow and line color
- Refraction based distortion
- Procedural beam texture
- Dynamic branch masking and fading effect
Additional content:
- prototype pack – textures and materials created for demonstration purposes
- mesh generator – an advanced tool prepared for editing and generating lightning meshes, allows implementing external lightning propagation class
- demo example map – a showcase of 14 use cases
- Procedural mesh lib – Additional library of functions that helps to create static meshes in UE4
Gallery


Documentation
Getting started
Everything starts from the geometry (meshes) and effect (materials) rendered using geometry.
The Lightning Fast mesh combined with the material has some useful features and properties that are very important in production.
- can be used with spline meshes
- can be skinned and used as skeletal mesh
- can be scaled and keeps the proper shape
- can be used in a particle system
- can be watched from every angle
That gives us a wide range of effects that the system can handle so the package is divided into multiple blueprints specialized in custom effects.
All of the effects can be found in the Blueprint folder and are presented on ExmapleMap (Demo/Maps/LightningFastMap)
Example use-case:
- Find folder Blueprints/LightningBolt
- Drag end drop BP_LightningBolt on scene
- The effect is ready to use. Now you can adjust parameters to get the effect that you need.

Blueprints
Blueprints folder contains multiple lightning effects that show how the system works with materials and meshes is should be treated as example content or templates prepared for general use cases. Some of the effects contain blueprints the others are represented only by particle effects that the main character is using.
Check the Demo/Mannequin/ThirdPersonCharacter blueprint to analyze the implementation of the skills.
The list of effects will be extended in future updates.
It’s good practice to create your own effects by inheriting Blueprint classes and copy material instances to your project folder.
Lightning Spline
The Blueprints/BP_LightningSpline blueprint is a simple combination of mesh spline effects and lights. You can combine any mesh created using the Lightning Fast package with splines even bending the lightning bolts is allowed.
Drag and drop BP_LightningSpline on the scene and modify parameters. [Editing splines]
| Mesh | Description |
| Static Mesh | Mesh used to bend |
| Material | The material used in mesh |
| Forward Axis | The axis of the mesh is directed forward of bending. |
| Translucency Sort Priority | Rendering priority |
| Fix Spline Direction | Additional correction of spline UP direction. Fixes some twist bugs. |
| Texture Scale | Scale texture UV for beam start and end. |
| Glow Color | Override material glow color. |
| Line Color | Override material line color. |
| Lights | Description |
| Lights Count | Number of lights created for spline |
| Light Snap Curve | Importance of snapping the lights to the curve (0-1) |
| Light Color | Override the color of light |
| Light Falloff | Fall off parameter of light. |
| Use inverse squared falloff | Fall of the mode switch. |
| Light Function | The light material function used for blinking |
Lightning Bolt
BP_LightningBolt is a complex example of lightning bolt effect implementation based on a lightning spline blueprint. The biggest advantage of this blueprint is that can be easily integrated with every weather system.

| BP_LightningBolt | Description |
| Animation | Bolt animation curves describe how parameter changes during the update. R – time offset, G – fade, B -(not used yet), A- lightning intensity |
| Animation Rate | Speed of animation update. |
| Activation Loops | -1 (infinite), 0 – not active at start, 0> loop counts |
| Activation Delay | Delay until the first activation. |
| Preview Time | Draw a debug preview at some time of animation. |
| Retrigger Time | Random time in range (x-y) that the system waits until the next activation. |
| Use Randomization | Whether the system should randomize rotation and location in Random Volume. |
| Rotation Range | The range of rotation changes during randomization. |
| World | The world that manages the light intensity on the scene |
Use the parameter World to register the blueprint in BP_LightningWorld. The BP_LightningWorld actor is the manager that changes directional light intensity and skylight intensity during stormy weather according to all managed lightning bolts.
To activate Lightning Bolt by hand (from events) use Activation function and set ActivationLoops = 0.
Lightning Beam
Dynamically updated chain of splines that connects target points in the closest range.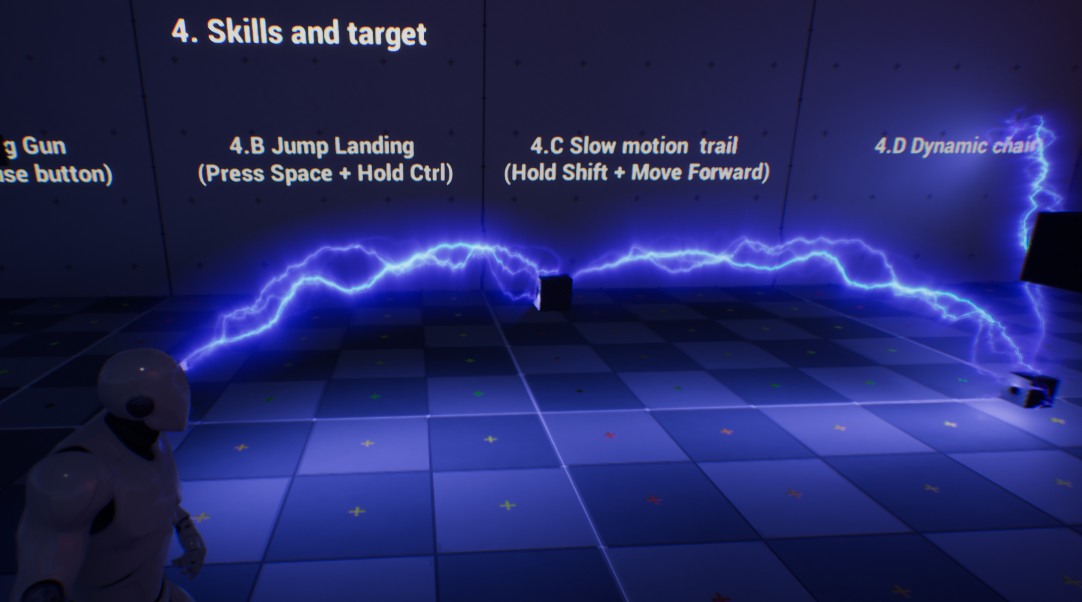
Simple use case of working with a beam:
- Drag and drop BP_LightningBeam on the scene
- Drag and drop a few target actors (BP_lightningTarget) on the scene near the lightning beam actor.
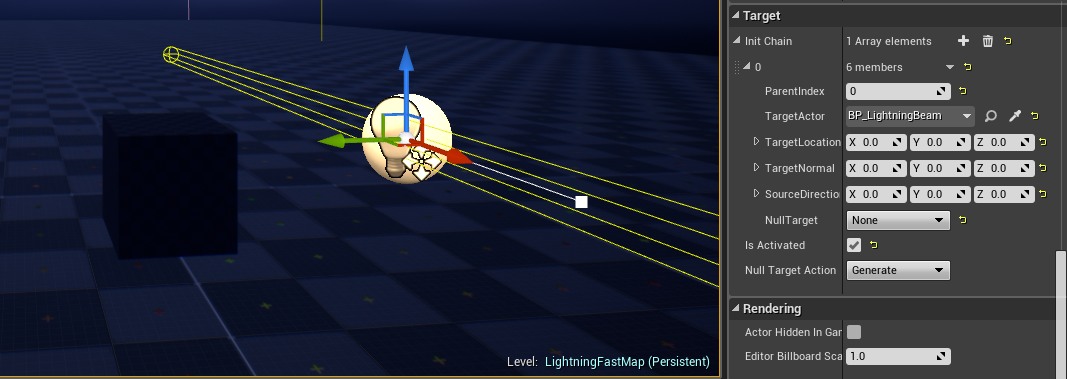
- Select BP_LightningBeam and edit parameters:
IsActivated=true - Find the InitChain array and add one element. Set up the starting chain element.
Set TargetActor to self it will make the beam actor the source of effect.
- Play and watch how the beam connects the target actors that are moving around.
The concept of the BP_LightningBeam actor is based on the idea that the chain should be represented by multiple nodes connected by spline meshes in a specific order. The list of nodes and order can be set by the user or generated automatically.
The BP_LightningBeam effect is divided into the static and dynamic parts.
- Static (set by user) – predefined, represented by InitChain structure created by the user during activation.
- Dynamic (generated) – generated starting from the last element of the static fragment using an algorithm of searching in range.
InitChain is the array that describes the connections between chain elements. The first element of the array is a root (starting point). For example, the Init Chain of lightning guns can be represented by 2 nodes. The first node is the gun muzzle and the second one is the hit point. The ParentIndex is the index of the parent node in the InitChain.
You can even specify a looping shape in init chain by this kind of config:
InitChain[0] = (TargetActor=Target0, ParentIndex=0) //start, points to self so it’s empty
InitChain[1] = (TargetActor=Target1, ParentIndex=0) //spline from element 0 to Target1
InitChain[2] = (TargetActor=Target2, ParentIndex=1) //spline from element 1 to Target2
InitChain[3] = (TargetActor=Target0, ParentIndex=2) //spline from element 2 to Target0 (loop)
| Init Chain Node | Description |
| Target Actor | The actor is used as a node in the chain. The algorithm uses the location of the actor as the endpoint of the spline mesh. |
| Parent Index | The index of the element InitChain array where the algorithm will look for the starting point of the spline mesh. InitChain[ParentIndex].TargetActor is used to set the location. |
| Target Location | If the target actor is null then Target Location is used. |
| Target Normal | Overrides the normal direction of the spline mesh. It can be used to change the shape of the spline. |
| Source Direction | Overrides the source direction of the spline mesh. It can be used to change the shape of the spline. |
| Null Target | How to react if the actor is destroyed/null:
|
The last element of the InitChain is the starting point of searching. The search uses the attributes in the Search tab to specify which actor should be in the dynamic chain.
After the InitChain is specified then there it comes to dynamic chain generation. ChainLength is the number of spline meshes that can be rendered by the BP_LightningBeam actor. The ChainLength attribute is used to calculate how many additional nodes should be generated. The number of the dynamic nodes that the algorithm will look for is ChainLength reduced by the number of renderable connections specified in the Init Chain.
Example situation (lightning gun)
ChainLength = 4
InitChain contains 2 elements, the connection between start point(muzzle) and one target point is represented by 1 spline mesh.
Finally, algorithm will look for 4-1 = 3 target points and try to render 3 additional spline meshes.
The algorithm for searching is simple:
- Find the closest target actor in range to the last element of the chain
- Add the element to the chain.
- If CombinedChain is smaller than ChainLength then goto 1
After the searching process, all the nodes are linked together in a chain 0-1-2-3 … -n. UseClosestToChain=true option runs an additional update that changes the topology of the chain to render the shortest possible spline meshes. It looks for the closest connections between nodes.
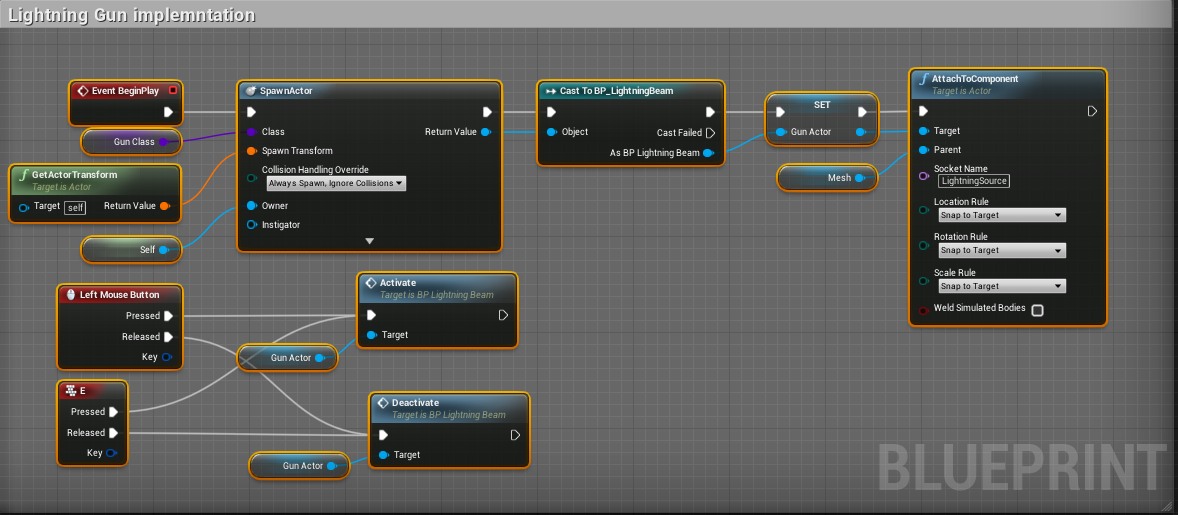
Lightning Gun
A complex example of Lightning gun implementation based on the Lightning Beam blueprint.
Lightning Discharges
Particle emitter that presents discharges effect.
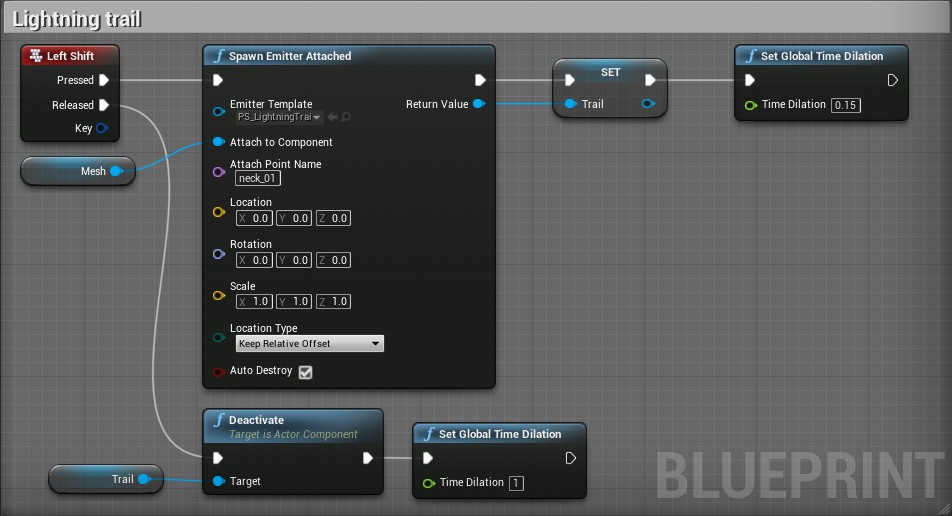
Lightning Trail
Effect of trail attached to the actor example content was used as a ribbon behind the character during a slow-motion run.
Lightning Target
Object targeted by lightning gun and other skills. Target also spawns an example of a discharging particle when it is attacked by a lightning beam or lightning gun.
Lightning Source
Folder contains a base class of dynamic light source components and light materials.
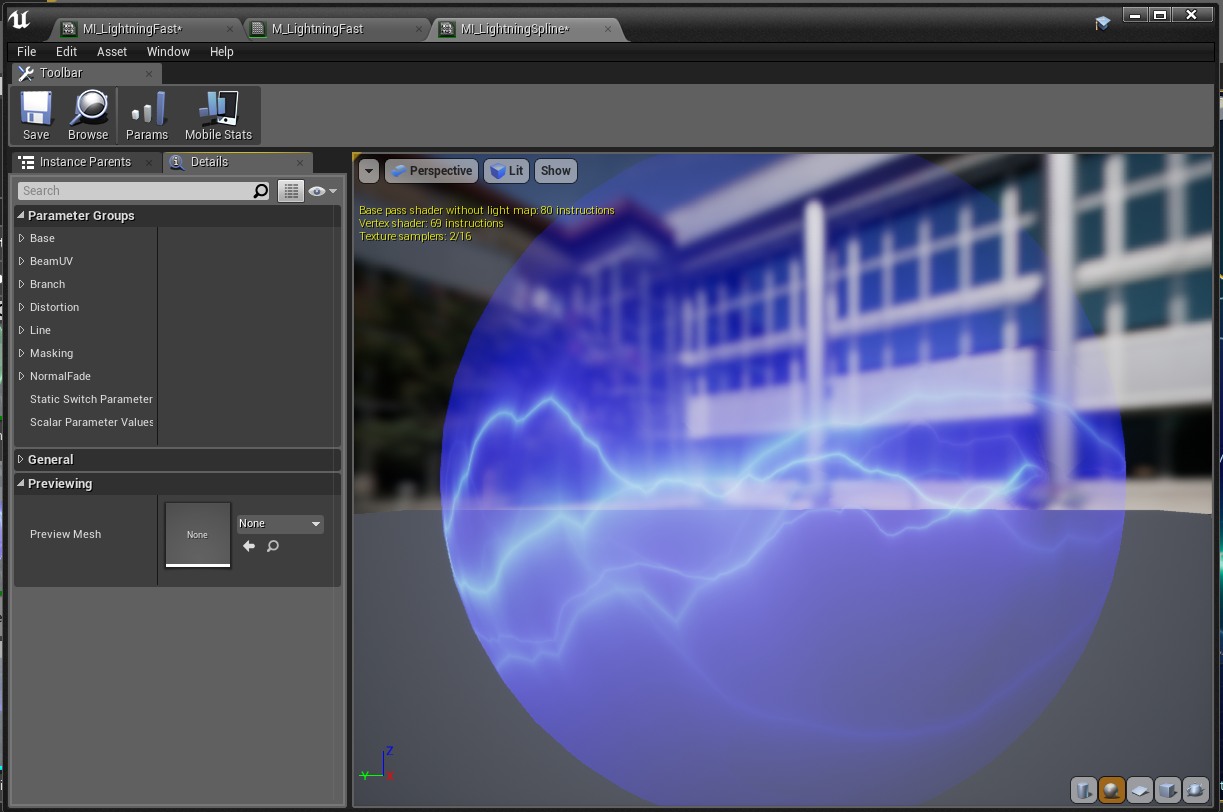
Material
M_LightningFast is the heart of the package and all material subtypes derive functionalities from this advanced master material.
Creating material instance in UE4 is really simple. Click right on the material (M_LightningFast) and chose option “Create Material Instance”. After that operation the newly created material will be ready to configure and use on Lightning Fast meshes. You can do the same with all material instances created for specific cases stored in the blueprints folder which I am recommending to do first.
The material has a very high potential for setting up and creating a wide range of effects. The following list includes all available configuration options with usage recommendations. Some of the parameters can be hard to describe and understand at first but I encourage you to test it in the engine and check the results of changes. 🙂
Base, Fade
List of general basic options.
| Base | Description |
| MeshWidthScale | Scales the geometry of billboarding mesh. |
| Opacity | Opacity/Additive mode. |
| OpacitClamp | Opacity clamping for high values. |
| UseBillboardMesh | True – use billboarding system for rendering, false – render original mesh |
| UseDebugMesh | Draw debug mesh |
| UseRefraction | Use the refraction effect. |
| RefractionClamp | Clamp intensity of refraction effect. |
| Refraction | Refraction scale. |
| UseVertexInterpolators | Optimization that forces the system to use interpolators (does not work with particle emitters) |
Group of parameters that helps to fade effect in some specific conditions. Close to the wall or unpleasant angle.
| Fade | Description |
| UseNormalFade | Normal fade is the feature that helps to hide the beam when it’s in bad wrong related to the mesh. The fade is calculated based on the normal vector of the mesh. For the mesh in billboard mode the normal means axis of rotation. When the Axis is similar to the camera direction then mesh should be invisible because we can notice some bugs. |
| NormalFadeScale | Scale the effect to make it fade faster or lower |
| NormalFadeOffset | Offset the effect to make it more visible. |
| Fade | Makes the effect translucent. |
| UseDepthFade | Whether lightning should fade when intersecting scene meshes. |
| DepthFadeScale | How fast lightning should fade when intersecting scene meshes. |
| UseVertexFade | The Vertex color of lightning meshes contains additional information about fade this option allows use the for beginning and end of the node. |
| VertexFadeStart | Scale vertex fade start |
| VertexFadeEnd | Scale vertex fade end |
Branch, Masking
The lightning beam is built of four branches that can be displayed at the same time or one after one. This section covers the basic settings.
| Base | Description |
| UseBranchFading | Activate the algorithm of asynchronous fading of branches. |
| BranchFadngAlpha | Alpha multipliers of each branch of the beam are stored separately in RGBA channels. |
| BranchFadingOffsets | Time offsets in fading animation. |
| BranchFadingPower | Exponential fading speed of endpoint. |
| BranchFadingSource | Fading blend in of start point. |
| BranchFadingScale | The scale of fading UV. |
| BranchFadingTimeScale | Branch fading animation speed. |
| BranchFadingOffset | External controller of branch fading time. |
| UseBranchCombine | Combine branches into one beam. Set False to use separate colors. |
| UseBranchCombineMax | Combine branches by max function. False forces the system to use the sum function. |
| UseAlphaChannelBranch | Use the fourth branch from the alpha channel. |
Masking is the feature implemented for randomly hiding the branches of lightning. Even static meshes can look dynamic and various thanks to masking some of the nodes during the update.
Beam, Bolt
Beam configuration focused on UV mapping transformations.
| Beam | Description |
| BeamUVScaleSpeed |
UV mapping of distortion texture:
|
| BeamSkew |
Additional skew UV offset stretches the distortion. |
| UseBeamBlend | Beam blend is the effect of the fading beam on the start and end. |
| BeamBlendStart | The intensity of start beam blending. |
| BeamBlendEnd | The intensity of end beam blending. |
| UseVertexColorUVOffset | Adding UV offset based on vertex color R-value. The parameter helps to make the mesh beam look more variable. |
| BeamUVScaleSpeed | Most important parameter |
Bolt is the effect that allows animated offsetting of the beam position on the mesh.
| Bolt | Description |
| UseBoltAnim |
Whether the bolt animation should be active. |
| BoltStart/BoltEnd | Start/end position of the bolt. |
| BoltMoveOffset | Sets the offset of bolt animation (can start from any point) |
| BoltMoveRange | Sets the value range of bolt animation. |
| BoltMoveSpeed | Speed of bolt animation. |
Distortion, Line
Each beam is created of multiple light lines that are distorted by noise texture. The texture is moving so the effect looks dynamic and chaotic.
| Distortion | Description |
| DistoritonScale | Scales the distortion effect. |
| DistortionTexture | The texture is used for distortion offset and detail distortion offsets. |
| UseDistortionDetail | Whether distortion detail should be active. |
| DistortionDetailUVScale | Scales the UV mapping of detailed distortion. |
| DistortionDetailScale | Scales the intensity of detailed distortion. |
Describes basic parameters of the line that is distorted and generates glow.
| Line | Description |
| LineColor | Color of line |
| GlowColor | Color of glow effect around the line |
| GlowTexture | The texture is used for masking the glow. |
| GlowTextureScaleMove | Animating glow texture RG-Scale, BA-Move |
| UseGlowTexture | Whether the glow texture effect should be active. |
| LineWidthBase |
Width of line. |
| LineDistanceFade |
Line disappearing in distance from the start point of lightning. |
| UseLineSoft |
Material supports two modes of rendering glow effects around line Hard/Soft. The first one is based on the smoothstep function and the second one is based on division by distance. |
Mesh editor
 Lightning Fast package contains mesh editor BP_LightningMesh that allows the creation of unique lighting meshes. Drag and drop blueprint on scene Blueprints/LightningMesh/BP_LightningMesh to start creating a lightning mesh.
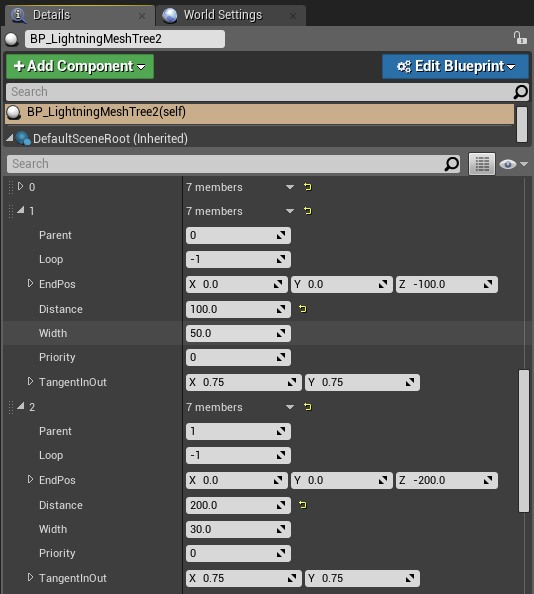
Each mesh is generated from a node list (attribute Nodes array). The node list is an array that contains a graph of connections between nodes described using a special structure called BS_LightningNode.
| BS_LightningNode | Description |
| Parent | This attribute describes the index from an array of the parent nodes. Each node has a parent. If the parent of the node has the same index as the source node then the parent is the root(starting point) of the hierarchy generated from the node list. |
| EndPos | Location of the ending point. It can be edited visually in the main viewport as well by selecting and using translation gizmo. |
| Loop | A value higher or equal to 0 is the index of the loop endpoint. The -1 is the default and means that there is no loop. |
| Width | Node width. |
| Priority | Higher priority means that the node describes the main branch. |
| TangenInOut | The scale of the tangent input-output vector. |
The package comes with additional tools that help to create unique lightning meshes in the Unreal Engine 4 editor. There are two methods of editing the Nodes array.
- Editing by hand using Tree Editor
- Editing using Tree Generator
Tree editor
Tree editor is the basic method of editing the node list multiple buttons increase the speed of building the new branches of lightning mesh.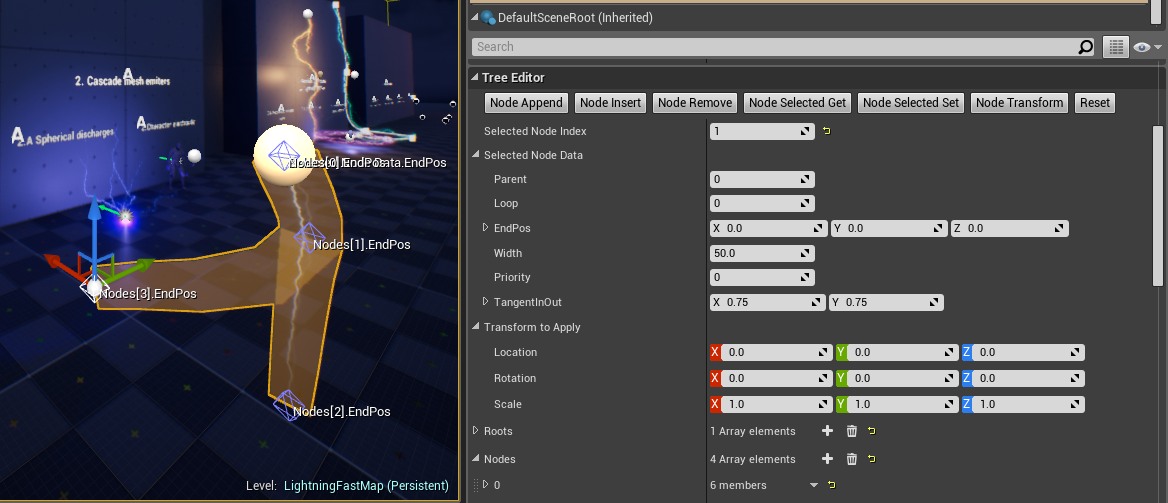
| Editor Buttons | Description |
| Node Append | Append the child to the selected node (selected node index). |
| Node Insert | Divide the selected node (selected node index) by inserting a node in the middle. |
| Node Remove | Removing the selected node (selected node index). |
| Node Selected Get | Load data from the selected index to Selected node Data. |
| Node Selected Set | Save data from Selected Node Data to the selected node (selected node index). |
| Node transform | Transform a selected node by Transform to apply the attribute. |
| Reset | Clear the tree. |
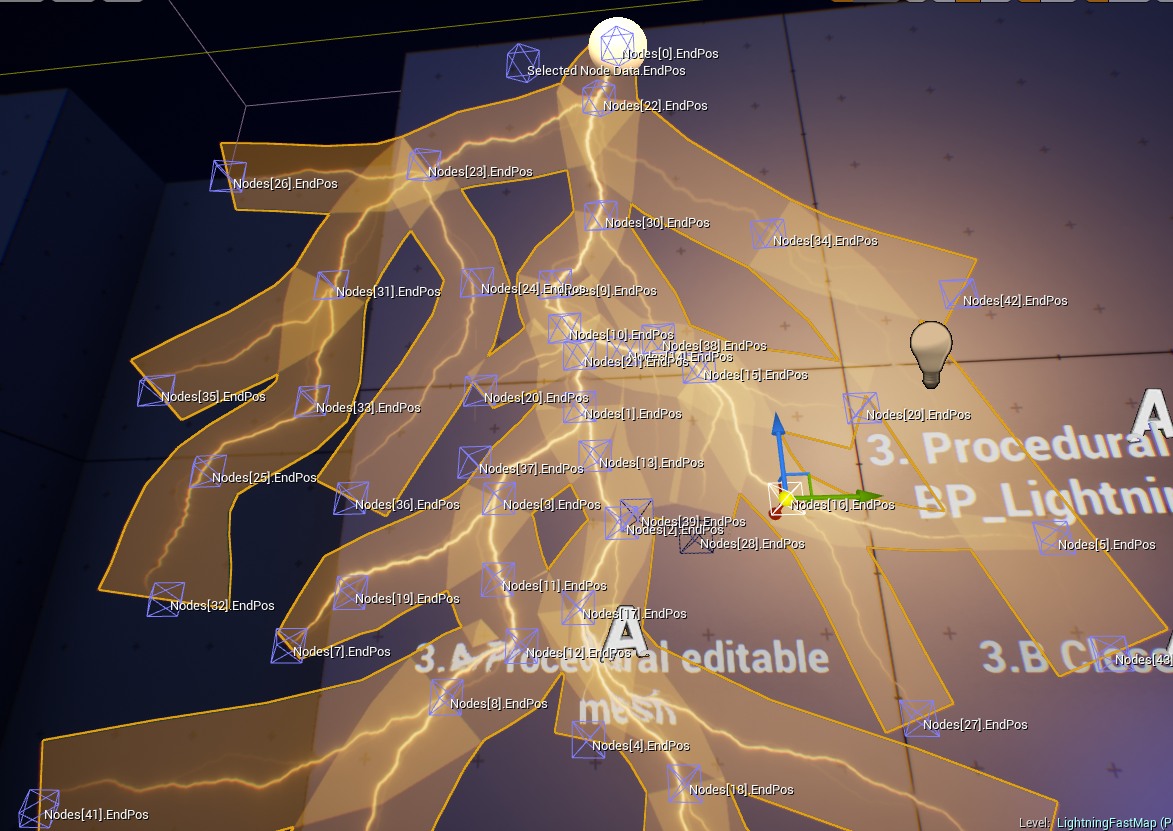
Tree generator
Lightning Fast has an advanced system of mesh generators that can be used to automatize the creation of wide-range meshes.
Working with generators is simple:
- Add the generator to the Generator List used by the BP_LightningMesh editor.
- Chose the class of generators LTG_Branch
- Click Evaluate All Generators
- Double-click on the generator instance edit parameters and click “Evaluate All Generators” again.
BP_LightningTreeGenerator is the base lightning generator class that can be extended by other generators by overriding the Evaluate function.
Example generators provided in version 1.0 of the package are described below:
LTG_Branch – Example generation that creates branched lightning effects.
LTG_Spline – Example generator that creates lightning based on spline shape.
Create static mesh
A generated mesh can be easily converted to static mesh and used in other blueprints and particle effects. A few steps are needed to do this:
- Select BP_LightningMesh blueprint and find the component called ProceduralMesh
- Find option UseDynamicMaterial and set it to false.
- Click the button Create Static Mesh
- Select where to save the mesh
UseDynamicMaterial = false forces system to use default not instanced material. If you will skip this step then newly created meshes will contain reference to instanced material ant wont save.
Questions & Answers
Integration with Fast Stylized Procedural Sky?
Yes! Last update of Stylized Procedural Procedural Sky supports integration with Stylized Procedural Sky just place lightning bolt on map and activate it on event from build in lightning system.
It is worth buying?
Hell yes! After four mounts of:
- researching the topic,
- watching thousands of photos and videos with lightning effects,
- testing multiple solutions,
- removing huge amounts of unsatisfying effects
- hard time spend on iterations and optimizations
I can ensure you now that it's not worth to do it by yourself from the beginning when you have finished solution and my support. I would never start again if I would could... 😉
So far I’ve found the documentation and internal commenting on code and variables rather lacking for anyone who wants to tweak this for their own use, but on just trying to use it purely as is listed the first thing I went to use I’m running into an issue.
For Lightning Beam.. “Find InitChain array and add one element. Setup the chain element:
TargetActor can be any actor or even empty then TargetLocation will be used.”
I tried to set this up in my own project, but it didn’t work. After various settings I went into the demo level again, and dropped one next to the demo BP_LightningChain actor that is the BP_LightningBeam actor in that level.
This way I’d use the same targets, and it still didn’t work. It seems that leaving TargetActor on the Init Chain null/empty will result in it doing nothing. In addition, setting it to a specific one of the targets near it will also result in it doing nothing. The only way I was able to get them to work was by setting them to target themself like you had with the demo actor in the level already. If it targets itself, then it does search for new targets around it.
http://prntscr.com/rdu8fw (pic of settings used on one not working as an example)
To confirm, I both created by own new actors to test this, and copied the existing ones to make sure only that one setting was different, and these are the results I found.
——-
Moving on, I think you should improve the documentation in general. Take the lightning gun for example, you just show a shot of it being set up, and then activated/deactivated with lmb/E. No detail are provided on what it does, how it looks or finds targets, what rules it uses, how to set certain obstacles or things to be ignored, nothing. I tried making one just float in space, and put a wall and a target actor both in front of it a short distance and set it to be activated and nothing happened. I tried looking into its code and it turns out is uses the players camera manager, something I couldn’t find written anywhere in its description or tooltips, I just had to search through its nodes to figure that out. Explains why my attempt to use it not on a player pawn didn’t work well.
Like you said, making something big like this can take a LOT of time and effort. But, if you don’t have good enough documentation and info available for the user, then to figure out how to use your stuff, or make even seemingly simple tweaks (at least they might think so, not having known anything about how it does/doesn’t work), then the end user needs to spend a LOT of time and effort learning how your own product works. There is a learning curve on any product, but yours seems both very big, and very steep right now, issues of things not working according to documentation aside.
You are 100% right I have to improve the documentation and I will do it as soon as possible.
Probably all of your chain configurations should work if you set IsActivated=true (true – automatic activation on start, false – manual activation)
InitChain must be set so the first element is important.
1. The first element of the chain can be NULL then the system will use the location value in the chan element structure as a starting point.
If you have not changed the location then it started in the center of the map and properly there was no target close to the (0,0,0)
2. The first element of the chain can be any actor then this actor location will be used as a starting point. Just checked and it works as expected.
I feel that IsActivated was not set because it is false by default.
The lightning chain and lightning beam feature is the most complicated part of the package with a lot of blueprint code.
I was overwhelmed by the number of features in this pack and did not pay enough attention and time on the documentation and I will try to work on my English to be more clear.
If you have more problems or questions you can always ask on discord https://discord.gg/nYsfkW or mail me.
Thank you for your feedback it is very important for me.
Thanks, for the reply, I had gone into the code and just set active to default as there was no case in this project they wouldn’t start active.
1 and 2, you are mentioning starting point. When I read the “Target Actor” variable, I assumed that was the target this actor would be arcing a bolt too. As there was no overview describing the general idea of what this actor does/how it does it, nor tooltip in the variables, or comment instructions in the main upper level of its even graph or actor description value.
From your current wording, it sounds like the “Target Actor” is not the actor to arc too for that Init Chain, or the target as I normally would think. But the starting actor of the arcing, or “Initial/Origin Actor” for the Init Chain. In which case if I just had a lone target next to it, that could explain why it would not be visibly arcing from the place I’d put this actor figuring that was how it based on how I saw the initial demo actor working of the arcs originating from the actor itself. And with target actor being called as such, I figured just referencing itself might be the means to automatically find targets around itself on its own rather than just arcing to a single pre set target.
I believe one of the first things to work on for documentation is a brief overview of each blueprint or asset, describing what it is, what it does, and at a basic level how it does it. Coming in without that info, I, and other users are left to try and intuit stuff ourselves. And not having any fore knowledge of this, your methodology when solving problems, or your own experience making this… we won’t share the mindset where we can simply intuit or know some seemingly basic part of something.
Similar to many variables having a tooltip that’s just their name. I don’t know what the Init Chain is or how it works in this actor. So if I cursor over for a tooltip I’m probably interested in knowing what it does, from the perspective of someone who doesn’t know any of the inner workings of this product or its own terminology/variable names yet.
I will try to approach my project with this knowledge in mind on how this actor actually works, and hopefully you can take from my feedback on how I’ve come to misunderstand it’s workings to better improve your documentation/commenting processes as you see fit in the future.
Your feedback is very useful, thank you very much for the precise description.
I’ve updated the Lightning Beam chapter in the documentation, added some details about the InitChain and nodes searching.
Do you plan to add the ability to play sound(s) when a lightning is triggered (thunder, or electricity buzz) ?
There are already sounds in lightning and beam blueprints.