
Introduction
- Category: Materials
- Update: 1.1 (05.03.2018)
- Unreal Engine: 4.18 - 4.19
- Platforms: VR, PC, Console, HTML
SDF Robo Progress Bars is an advanced master material usable for creating a wide range of customized progress bars. Package contains over 50 predefined excellent styles easy to use for various types of games. Material supports advanced customization that covers most of the possible design requirements. Thanks to using SDF functions instead of huge textures all created progress bars always stay sharp, well aliased.
Features
- Two types of shape circle bar/rectangular bar. Fully callable and extendable for more shapes.
- Signed distance functions based rendering. The shape is generated from mathematical functions that give the quality of ‘Vectorized’ graphics without using huge resolution textures.
- Configurable for all resolutions.
- KISS – One mesh per bar.
- Can be mixed with SDF and standard textures.
- Rounded corners of shape colors patterns and progress bar showing.
- GPU friendly, one draw call per bar.
- 23 different example themes that can be adjusted to requirements.
- Unlimited user-defined themes can be created easily using the available properties.
- Multiple advanced effects of progress bar – burning/fade.
- Easy to integrate witch UMG.
- Supported reparenting of themes between different shapes.
- Flexible modification options, each bar presented in this package can be created directly from another.
Gallery


Release notes
Version 1.1 (05.03.2018)
- circle bar mode
- 10 new presets of bars
- additional demo room
Version 1.0 (22.01.2018)
- Releases basic version
Documentation
Showcase and material parameters
Creating a new bar
- Select bar from group ExamplesSurface/ExamplesUmg. Find a bar that looks closest visual to effect that you would like to achieve (all bars share the same functionalities so can be modified one to another but it’s faster to start from some point).

- Create duplicate or material instance from the selected bar.
- Set the name for the newly created instance of material. It’s good practice to start name from MI_Surface or MI_Umg. Open material and modify parameters.
- Modify the parameters of the new bar according to your requirements.
Basic types of bars
All bars used in the game should be created as Material Instance that derives from the build in types of materials. Multiple combinations of bars are possible based on bar shape and bar type. The base bar instance name is constructed according to the specified naming convention:
MI_ + BarType + BarShape + Bar
BarType – System is divided into two separate material instances that allow using this system on the surface meshes as well as on UMG widgets.
- Umg – material can be used on hud controls (widget elements).
- Surface – material used on regular meshes (planes in 3d space). Check ExamplesSurface folder to see all examples prepared for surface bars. UseInterface switch set false (for optimization).
BarShape – Allow to chose the basic method of bar visualization.
- Rect – classic rectangular bard that fills from on side to another.
- Circle – advanced bar that fills the circle.
Check ExamplesUmg, ExamplesSurface, ExamplesUmgCircle, ExamplesSurfaceCircle, folder to see all examples.
Using Robo Bars in UMG
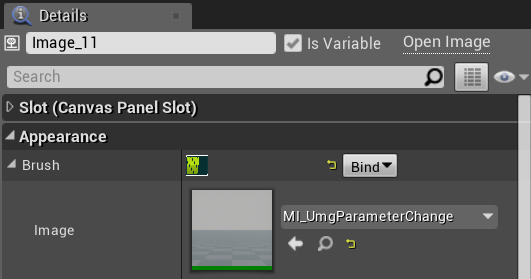
- First place the Image widget on the hud widget.
- Then apply the progress bar material onto your image widget by setting the parameter Brush->Image as presented below:
- Setup the material parameter called “Progress” in blueprint graph. You have to get dynamic material instance from the widget and set the parameter value.
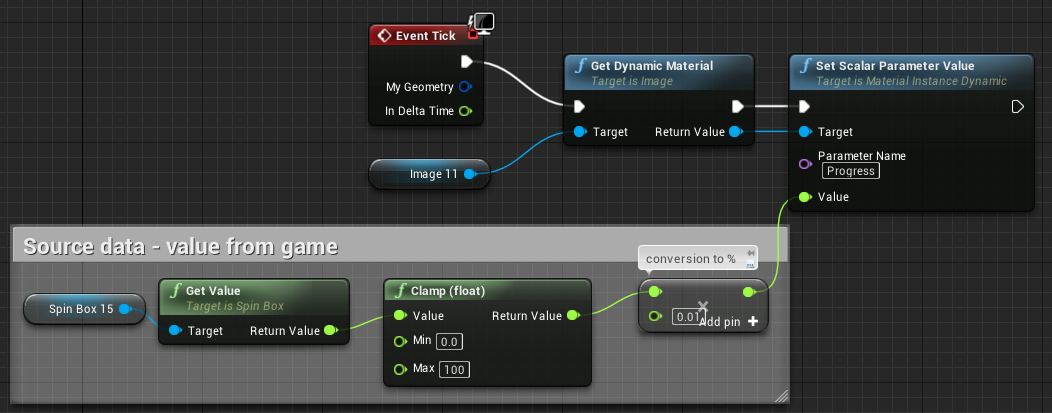
-
Progress is a basic value parameter in the master material in range between 0.0 (empty) and 1.0(fully filled) used for setting how much progress bar is filled.
Debug options override the behavior of progress bar by default to visualize the effect of changes in the preview. Find material that you used in your progress bar and disable the debug option by setting:
Progress->ProgressDebug = false
A simple example of using Robo Bars is presented in the demo (Demo/Blueprints/BP_Hud)
Signed Distance Fields

Signed Distance Field is an image where each pixel contains the distance to the nearest point on the boundary. An additional sign of distance allows determining if the pixel is inside or outside rendered shape. SDF image that looks like gradient can be loaded from a file or generated by mathematical functions called Signed Distance Functions.
One of the biggest benefits of using this method is very cheap and configurable antialiasing effect. The same method is used to render outlined/smooth high-quality fonts in Unreal Engine 4 based on low-resolution textures.
Package SDF Robo Progress Bars uses this method to render all bars in multiple ways.
- drawing smooth outlines, shadows, edges
- configurable division on bars
- combining multiple shapes
- round corners using smooth min function
Master material parameters
The progress bar is divided into 4 basic layers that are combined into one using translucent blending. Each layer is configurable and implements some additional effects.
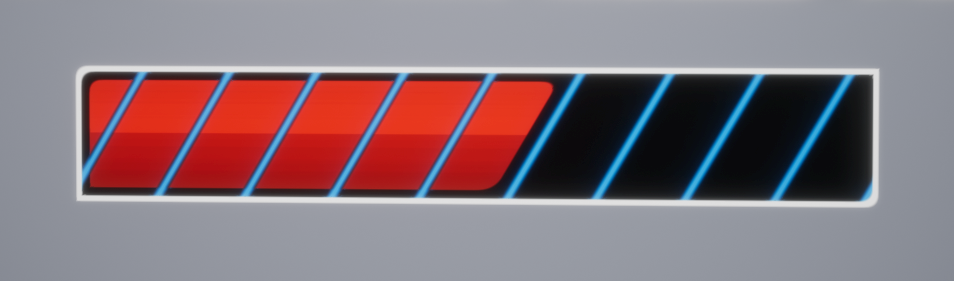
- Outline layer (white)
- Shape layer (black)
- Progress layer (red)
- Pattern layer (blue)
Outline layer
The outline effect is very common in progress bars, it’s a great tool to highlight the shape or separate bar from the background to make it more readable. Outline layer is represented by the base shape. In final effect, it can be rendered as shape, filled background or stay invisible.
| Outline layer | |
| Use Outline | Switch that determinates whether the background outline should be rendered. When disabled then the background is filled by one color. |
| Outline Color | Color of outline/background layer. To make it fully invisible change color alpha to 0. |
Shape layer
Shape layer is to describe the shape of the bar and it is represented by combined signed distance functions. Shape layer is always active.
| Shape layer | |
| Use Shape Texture | Allow using SFD texture as shape description. |
| Use Shape Color Texture | Fill the shape by texture color multiplied by shape color. |
| Shape Color 1/2 | Colors of divides shape. |
| Shape Edge X/Y | Edge scale allows fitting bar into different aspect ratio. |
| Shape Scale X/Y | Scaling the visual part of the bar to fit into the mesh model. |
| Shape Slope X/Y | Allows you to create inclined progress bars |
| Use Shape Round 1/2 | Enable/Disable round corners on shape. |
| Shape Round | Strength of round corners in shape. |
Progress layer
Progress layer is used for drawing current progress (how much shape is filled by color/texture/effect).
| Progress layer | |
| Progress | Parameter used to steering fill of the progress bar. Active only when Debug is disabled. |
| Progress Debug | Debug options override the behavior of progress bar by default to visualize the effect of changes in the preview. |
| ProgressAnimU/V | Sets animated UV of progress bar texture. |
| ProgressUV | Define progress texture UV mapping. XY- Position, ZW-scale. |
| ProgressColor1/2 | Sets separate colors of the pattern used on the bar. |
| Use Progress Color texture | Allow to use progress color texture. |
| Progress Color Texture |
Texture of progress bar sampled based on ProgressAnimU/V. The final color of the bar is calculated by the multiplication of Colors and Texture. This option is useful for an additional effect like gloss/shadow. |
| Progress Direction |
Two functionalities in one parameter. Allow changing the direction of progression by setting positive-negative value. The negative value means that the bar will be filled from left to right and the positive from right to left. The absolute value of this value represents the blending of the progress bar into the shape layer. Big value = hard edge/small value = soft edge. |
| Progress Slope |
leaning of progress bar lines. |
| Use Progress Round |
Allow to use round corners on the progress bar. |
| Progress Round |
Represents the roundness of progress bar corners. |
| Use Progress Move |
If true then progress texture will be moved when Progress parameter changes. |
Pattern layer
Pattern layer describes the scheme of a division the bar into two colors.
| Pattern layer | |
| Use Divisions | Allow using automatic division of the bar on two colored patterns. |
| Divisions Jump Hard | Hard jumping between progress values. Round to closest. |
| Divisions Jump Soft | Soft jumping between progress values. |
| Divisions Count | Number of divisions on the bar. |
| Divisions Gaps | Distance between divisions bars. |
| Use Pattern Texture | Allow using texture as the division of the bar into two colored patterns. |
| Use Pattern Texture Progress | Allow using texture as the division of the progress bar on two colored patterns. |
Layers antialiasing
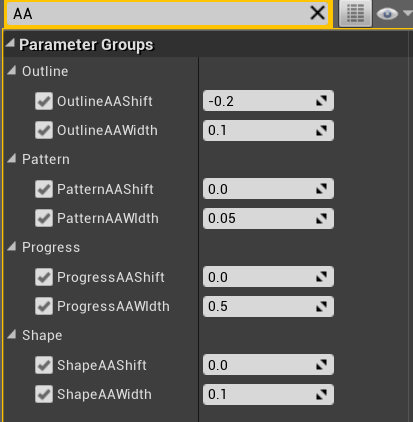 Each layer of bar contains parameters designed especially to control antialiased and smooth edges. This functionality allows to set up hard or soft blending between lower and higher layer.
| Antialiasing | |
| Width | Range of smoothness. Bigger value allows making smooth edges of the layer. |
| Shift | Parameter shift is related to zero position on SFD. Determinates the edge size of the layer. Can be used to set up outlines. |
From UMG to Surface
Sometimes there is a need to change Surface material into UMG to render on hud without loss of all parameters set in the material. This operation is well supported by UE4.
- Open material that needs to be changed to support UMG/Surface mode,
- Find option General->Parent and change to MI_Umg*Bar/MI_Surface*Bar depends on your needs.
Explanation of UE4 mechanism. There are two differences between UMG and Surface materials:
UMG does not support vertex interpolators so UseInterface needs to be set false in materials used in UMG. Surface allows for vertex interpolators so it is used as an optimization.
| MI_SurfaceRectBar MI_SurfaceCircleBar | MI_UmgRectBar MI_UmgCircleBar | |
| UseInterface | false | true |
| MaterialDomain | Surface | User Interface |
Questions & Answers
How would I go about changing the number of stars
PatternUV = (R=0.000000,G=-0.100000,B=5.
Why I can’t control the progress value?
It's because of the debug option "Debug Progress" is enabled by default in all bars. That is very useful in testing and previewing bars. Open your bar material and change Debug Porgress=false.
Is there a second layer of bar usually called ‘buffer’?
The easiest way to do this in Robo Bars system is by creating two bars:
- Background bar with buff.
- Foreground top layer bar where: Outline color and shape Colors are set to fully transparent. (only progress will be rendered)
How can I make it work like a progress bar? I fixed the Debug Progress but I can’t find out how to make it work from there.
Please read the documentation first and tell me which part is hard to understand aI will try to explain it better and fix the documentation. You have to chose first if you want to ue bar in UMG or 3d scene.
I’ve added video tutorial https://youtu.be/1ZVBnIpnGvc
Yes can you make a better tutorial for stupid people, yours makes no sense how to apply it to HUD.
Hi, I’ve spent a lot of time on preparing this very detailed documentation. If you have some troubles witch understanding then I’m ready to help, just point me on parts where it’s to hard. So tell me please where it makes no sense. You should read the USING ROBO BARS IN UMG and check the hud implementation (Demo/Blueprints/BP_Hud) on the example map.
I’ve added video tutorial https://youtu.be/1ZVBnIpnGvc
How would I go about changing the number of stars/hearts/etc when using a shape layer?
I’v added answer to the FAQ 🙂
Create a tutorial where you connect these bars to things like health, stamina, magic, experience. That is the biggest complaint here.. none of these people care about setting it up to use for your speed, they want to use it as a progress bar like in every other tutorial about creating health bars.
It is focused on ‘how to connect progress bar with your player variable’. Speed is just an example of variable that is already available in player and does not require any any additional external mechanic like taking damage. Ths tutorial has everything you need to know to use progress bars.
The only difference between the health and speed in this situation is a variable connected to bar. I’ve prepared simple explanation specially for you:
Step 1: Follow the video: https://youtu.be/1ZVBnIpnGvc
Step 2: Create health variable attribute (float type) in character pawn.
Step 3: Use ‘health variable’ in hud instead of ‘speed variable’.
And it is it 🙂
If I want to create a custom pattern how do I make a sdf material from normal texture?
I’ve used 3d studio max to render mesh that simulating SDF gradient. A lot of 2d editors supports generating SDF textures from masks for example “distance transform” can be used in GIMP for this task. I’ve created simple generator in UE4 that helps to generate this textures from masks using material system, it will be available in the next update of package.
Im having trouble getting Surface Circle Material to work with my health, i did get it to work with UMG.
What do you mean ? Have you created material instance in your blueprint and modified the progress parameter ?
Yes, i’ve made a material instance in my blueprint, but which parameter would i need to modify to have it work with a simple health variable?
Check the example BP_CircleBar from the package, I have presented there an example of surface bar implementation 🙂
How do I animate the progression of the progress bar when changing the value?
Is it possible to make a circular progress bar that fills from the center to all directions?
This is not supported yet. I have done prototypes but hard to say when it will be finished.
Hi, Krystian! I just wanted to thank you for such an amazing product… even if I got it during free for the month marketplace thing and I can say that I was skeptic at first because few people make materials that are actually easy to modify and handle, your product is fantastic! Because of the functions and the way it’s set up, you saved us a lot of work…
I will share a quick tip for people that want to use the materials with the progressbar widget and bind it to the percentage inside the widget editor. It’s a workaround but fairly easy:
1 – add a progressbar element from the palette
2 – add a image element right under it
3 – select the progressbar and set the background image, fill image and marquee to Draw As None (right under the Tint)
4 – select the image and set the progressbar material
5 – go to the Graph Editor and create a function from the example above (USING ROBO BARS IN UMG) but add an input value of type float to control the parameter value and do not connect it to the Tick
6 – go back to the Designer Editor and select the (hidden) progressbar element
7 – go to Progress, Percent and create a new binding…
8 – inside the binding function add you desired output value to drive the progressbar percent but also add the function previously made connect the same value
9 – be amazed of how great your progressbar material is :p
Thanks again for your fantastic product!
Can you explain what the SMin and Smin2 functions do? Thanks so much!
Yes, It’s a minimum function with additional soothing 🙂 Read this article if you need more details.